
It has been a while since I published a comparative review on camouflage patterns. Since it is Winter – or better said – since winter is almost over, I had another opportunity to make use of the many camo uniforms given to me by Helikon-Tex.
Some of you might remember, that I have already written two reviews about conventional camouflage patterns used in winter time. My theoretical assumption for this was born in the reality of modern armies – lacking funds. You can read all about this in my previous reviews, but long story short: Sometimes you just simply don’t have any overwhites – for whatever reason.
Now I have looked already at several temperate camo patterns in winter – even some solid colours. One thing is missing though: Transitional or semi-arid patterns. Since I see it very often in different pictures, I decided to compare these patterns, which are usually meant for arid environments and the like. Because of their brown dominant colors, lots of people do use them as “Autumn” or “Winter” camos not only in Europe, but also over the pond, in North America.
With this review I want to take a look at how much sense this actually makes.
Patterns used
- Camogrom – a polish derivative of Multicam, having more contrast and more greens.
- PenCott Badlands – the latest generation of the Badlands pattern with more contrast.
- Kryptek Highlander – the semi-arid version of the Kryptek patterns.
More on these patterns can be found in this review on transitional patterns.
At the end you will also find a nice bonus!
Locations and photography
- This time I took pictures in my usual spot, plus an additional new one, since my other alternative is not accessible anymore. The distances are between 10 and 30m, I will describe it further down below.
- Another change for this review is the focal length. I only shot in 35mm to simulate human vision. No wide angle anymore. I could give you a made up reasoning for this, talking about long distance view etc, but I was under time pressure and simply forgot.
With that being said, all of you will know by now, that at a certain distance it is nearly impossible to tell the various camos apart. Also: I don’t have the need to bash a particular pattern or lobby one, so you can trust me on my remarks as far as humanly possible. As always, I have no scientific claim whatsoever – I am just trying to give you a decent comparison.
Editing Yes/No
The only editing done on the pictures was:
- Lense correction to flatten the pictures
- Watermark
- .jpeg compression to make it web compliant
- On the second location: I decreased the overall brightness a full stop, because the pictures were overexposed. This affected the whole picture but has no impact on the comparison since it was done on all of them.
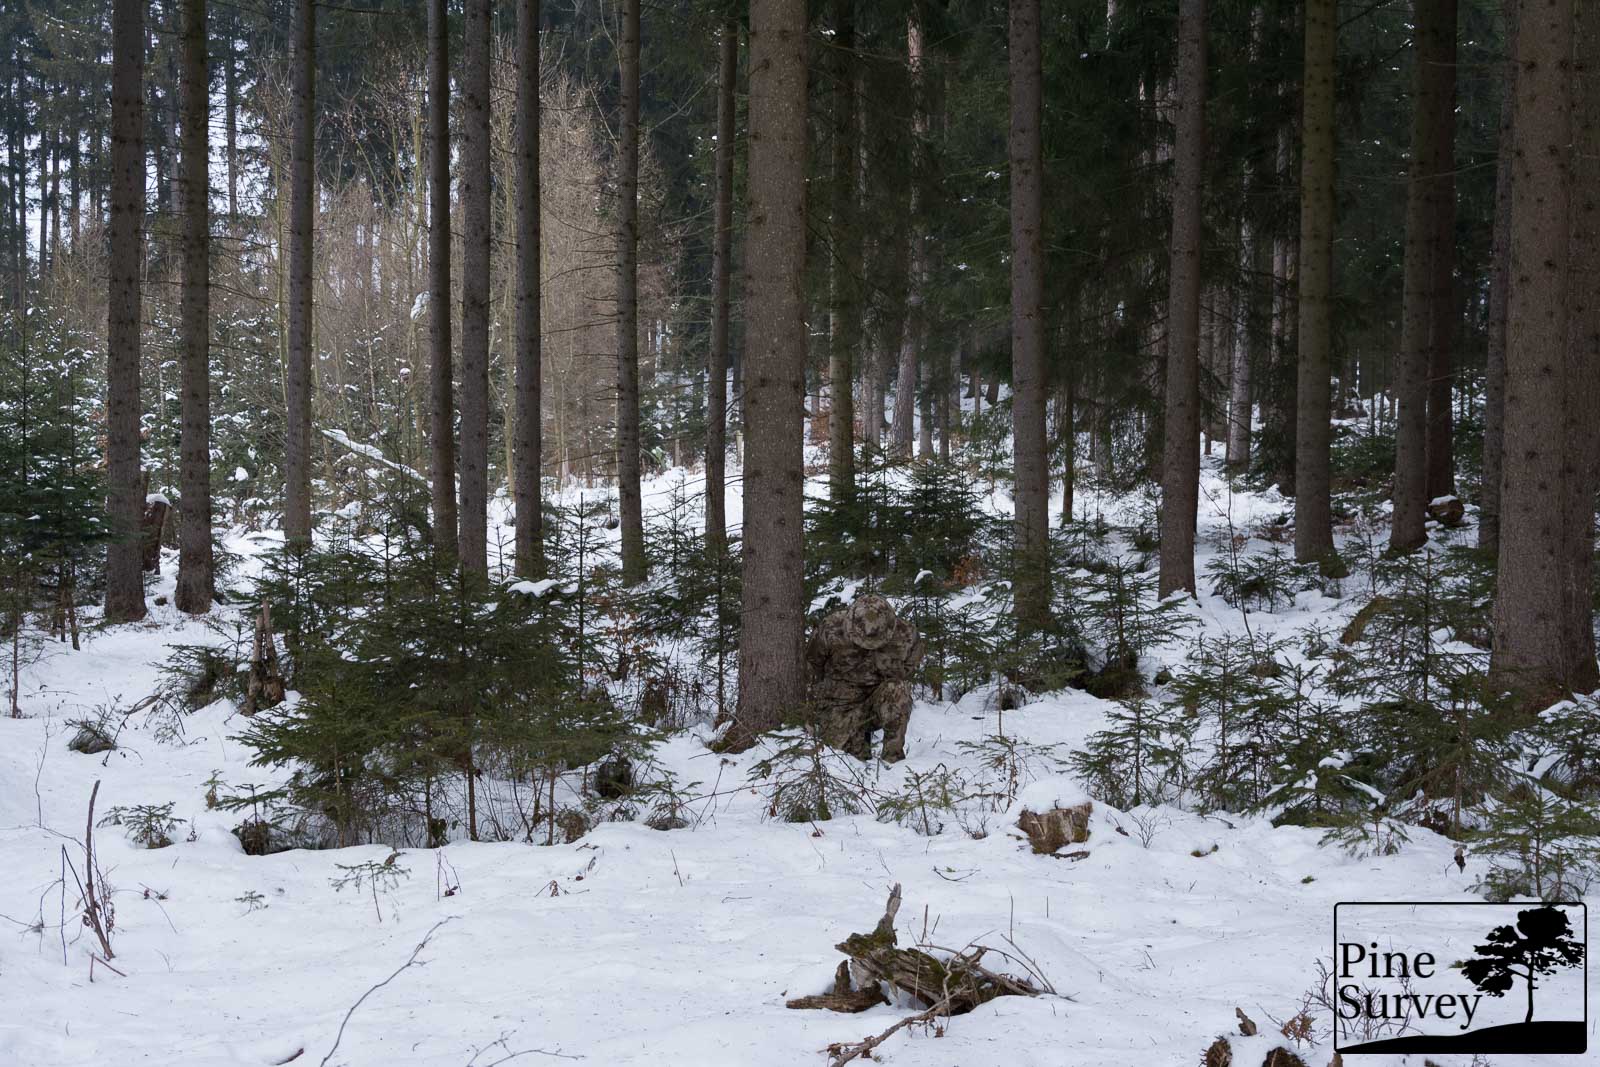
Location 1 – coniferous forest with a closed foliage roof
This location should be well known by now. It is a part of a coniferous forest with a closed foliage roof, but with very little ground cover. The distance to the camera is about 15 – 20m.
Camogrom
As you all know I am not a huge fan of Multicam and its derivatives. It is an effective pattern, I have to say that, but since it is designed to work in multiple environments it has to make compromises. As a result it performs not good, but “good enough” in most environments.
With Camogrom I found out already in previous tests, that it actually is a very effective pattern for Winter environments in Europe. The higher contrast of this MC derivative breaks up the silhouette quite well and the colours match the flora quite good.
In a standing position you can see the various midi elements breaking up the silhouette, while the colours match those of the surroundings.
Camogrom – standing position. 35mm Distance: 10-15m
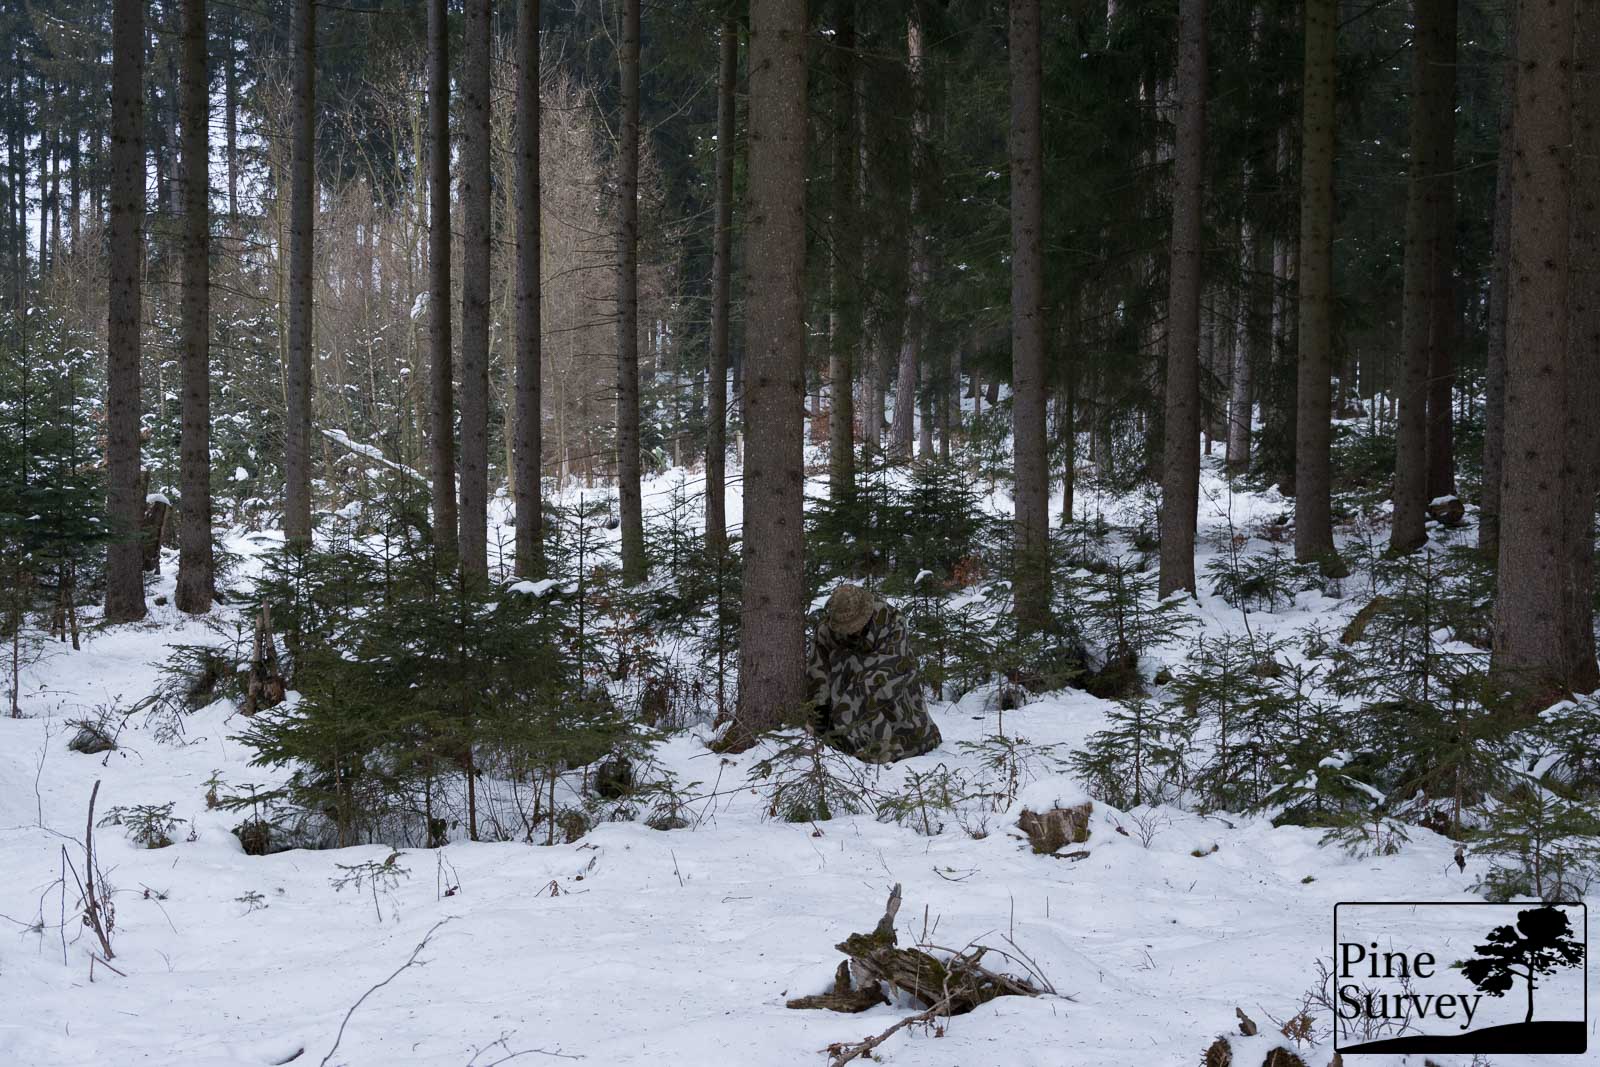
By lowering into a kneeling position the concealment effect becomes even more apparent since the human shape vanishes and the pattern is allowed to work more efficiently. From experience you can tell that at greater distances you would not be able to identify the shape anymore.
Camogrom – kneeling position. 35mm Distance: 10-15m
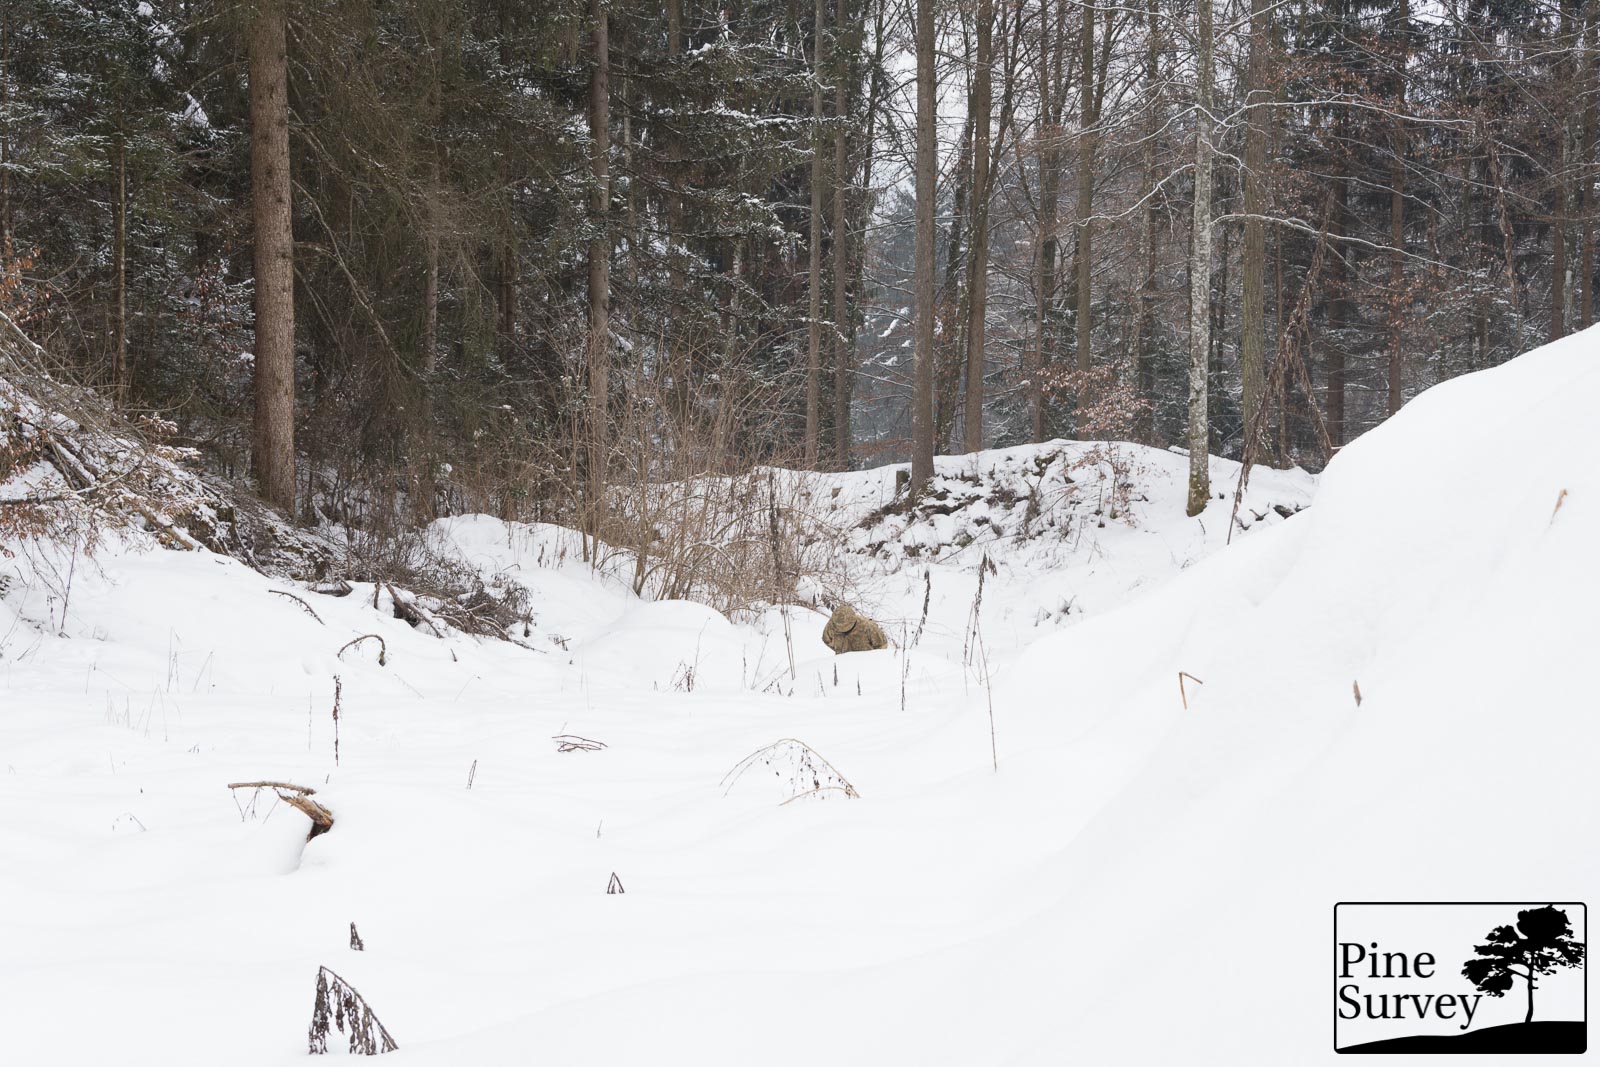
Going into the prone position makes this even more convincing. Not knowing that there is a person, you could just as much suspect a pile of mossy rocks, lying at the bottom of the tree.

Camogrom – prone position. 35mm Distance: 10-15m
In that sense the combination of midi elements and the colour choice work well in this particular environment. While the pattern breaks up any human shapes, the colours blend in with the environment, therefore confusing the picture even more.
Badlands
Considering this pattern is for “dry, upland, bushland, semi-arid and transitional terrain” and not per se a “universal” pattern like Multicam, it is far more brown dominant with less greens. Badlands underwent an adaptation in the last years to show more contrast between the midi and macro pattern, while having a stronger green color to it.
In the standing position you can clearly see the macro pattern breaking up the silhouette, but not as strongly as one is used from PenCott Greenzone. The base color is also fairly lighter than Multicam, since it is designed for the bushland.
PenCott Badlands – standing position. 35mm Distance: 10-15m
As a result Badlands does not blend in as well as Camogrom, while still maintaining considerable concealment because of the brown colors. Nevertheless in my personal opinion Greenzone performed better in a winter setting, despite being a temperate pattern.
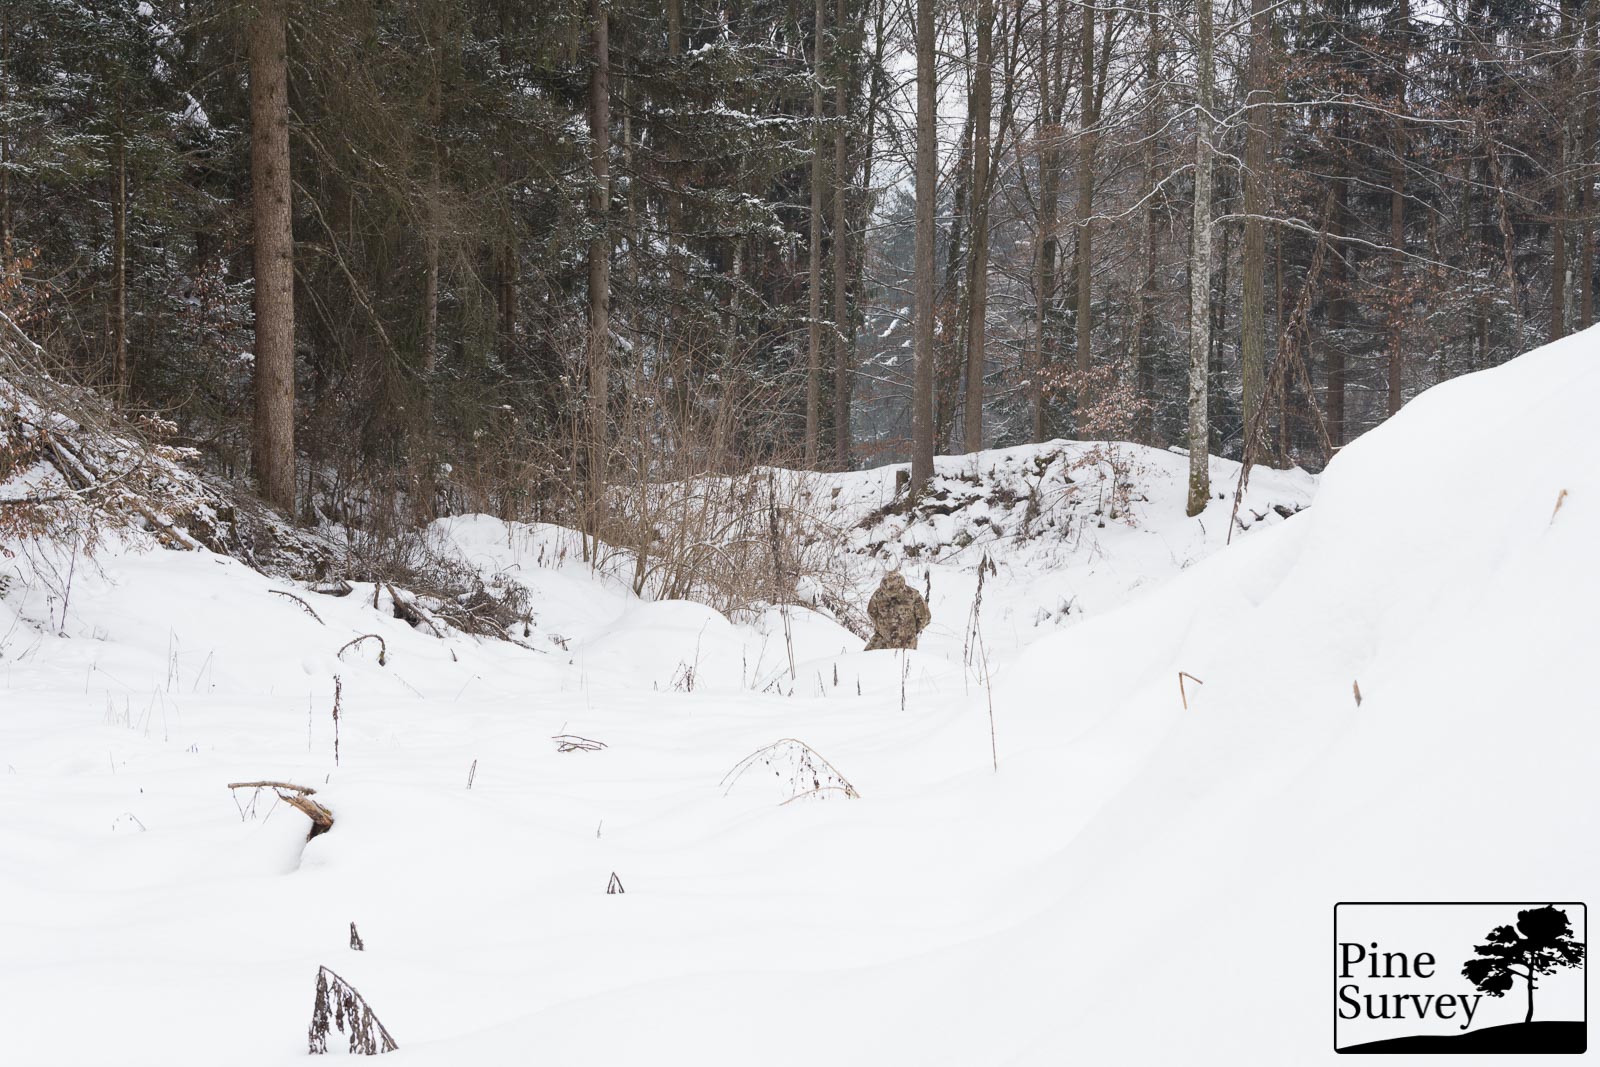
In the kneeling position the situation changes drastically because of obvious reasons. The human shape disappears, while colors, midi and macro elements still do their job.

PenCott Badlands – kneeling position. 35mm Distance: 10-15m
The prone is just as effective as with Camogrom. Only the knowledge of a person actually lying there is giving it away.

PenCott Badlands – prone position. 35mm Distance: 10-15m
As you can see, Badlands is not a bad choice for Winter settings because of its brown dominance, at the same time it becomes apparent that it lacks more contrast to work better. It would be of interest how the new “Leatherneck” version of PenCott would do in this setting, having exactly what Badlands is missing in this particular setting: darker browns and stronger greens.
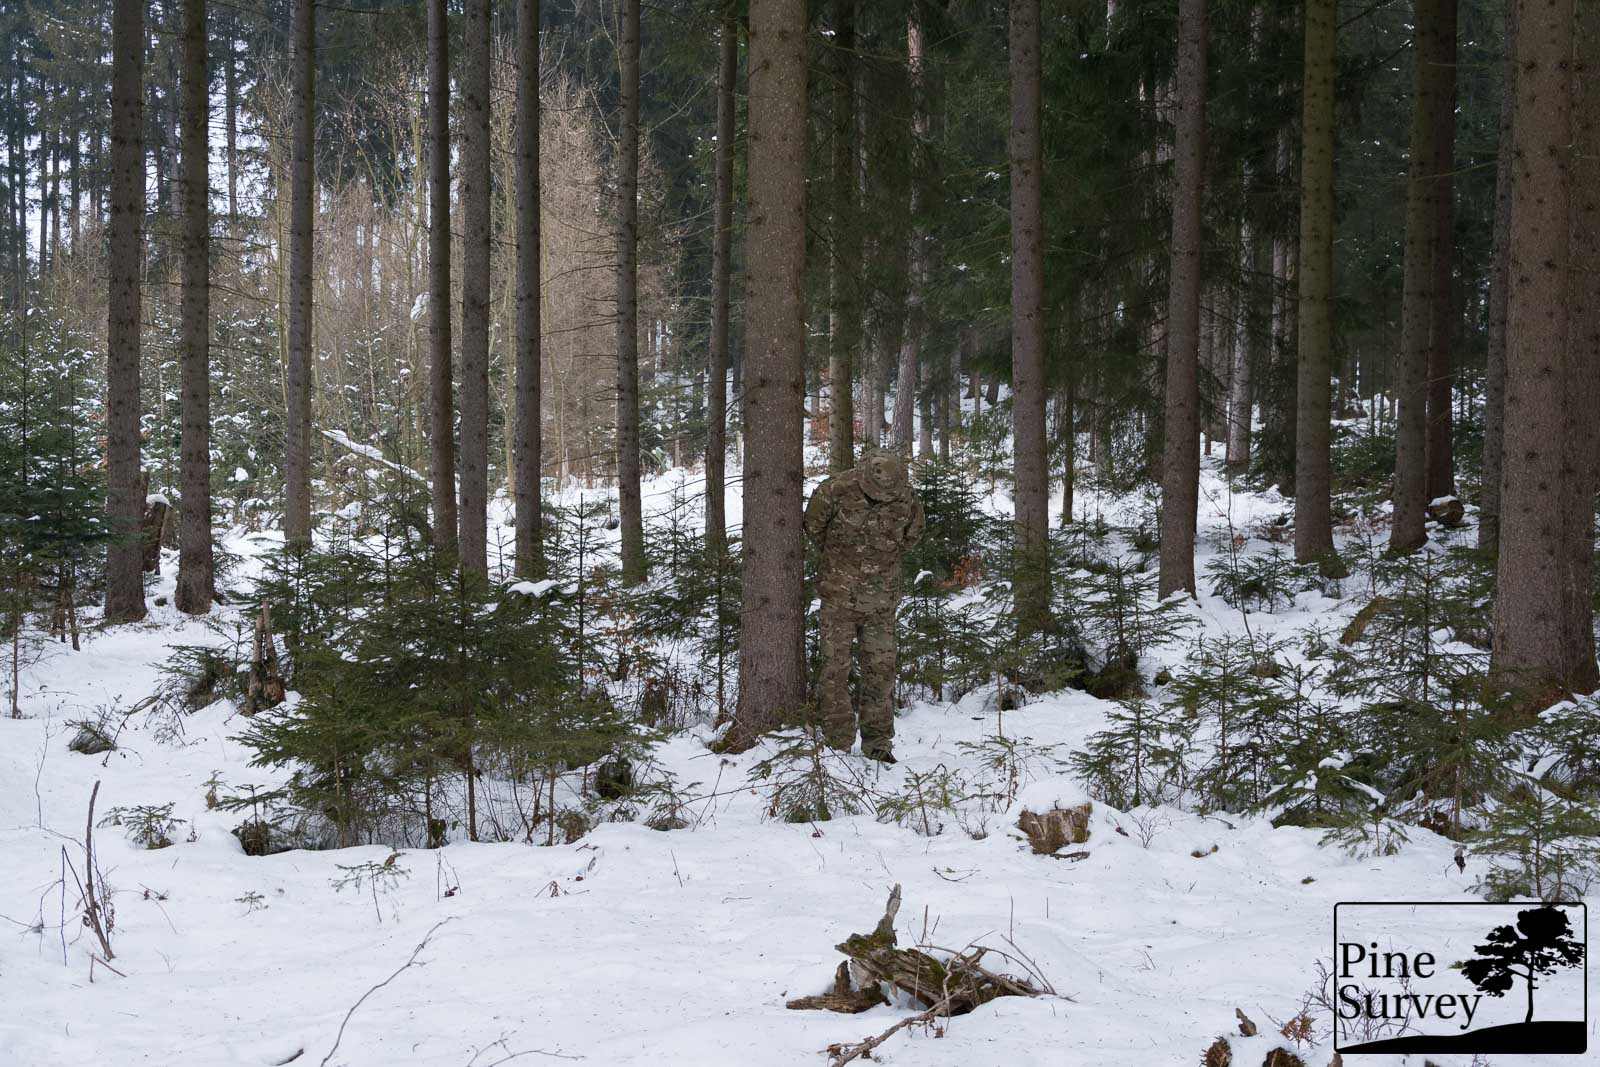
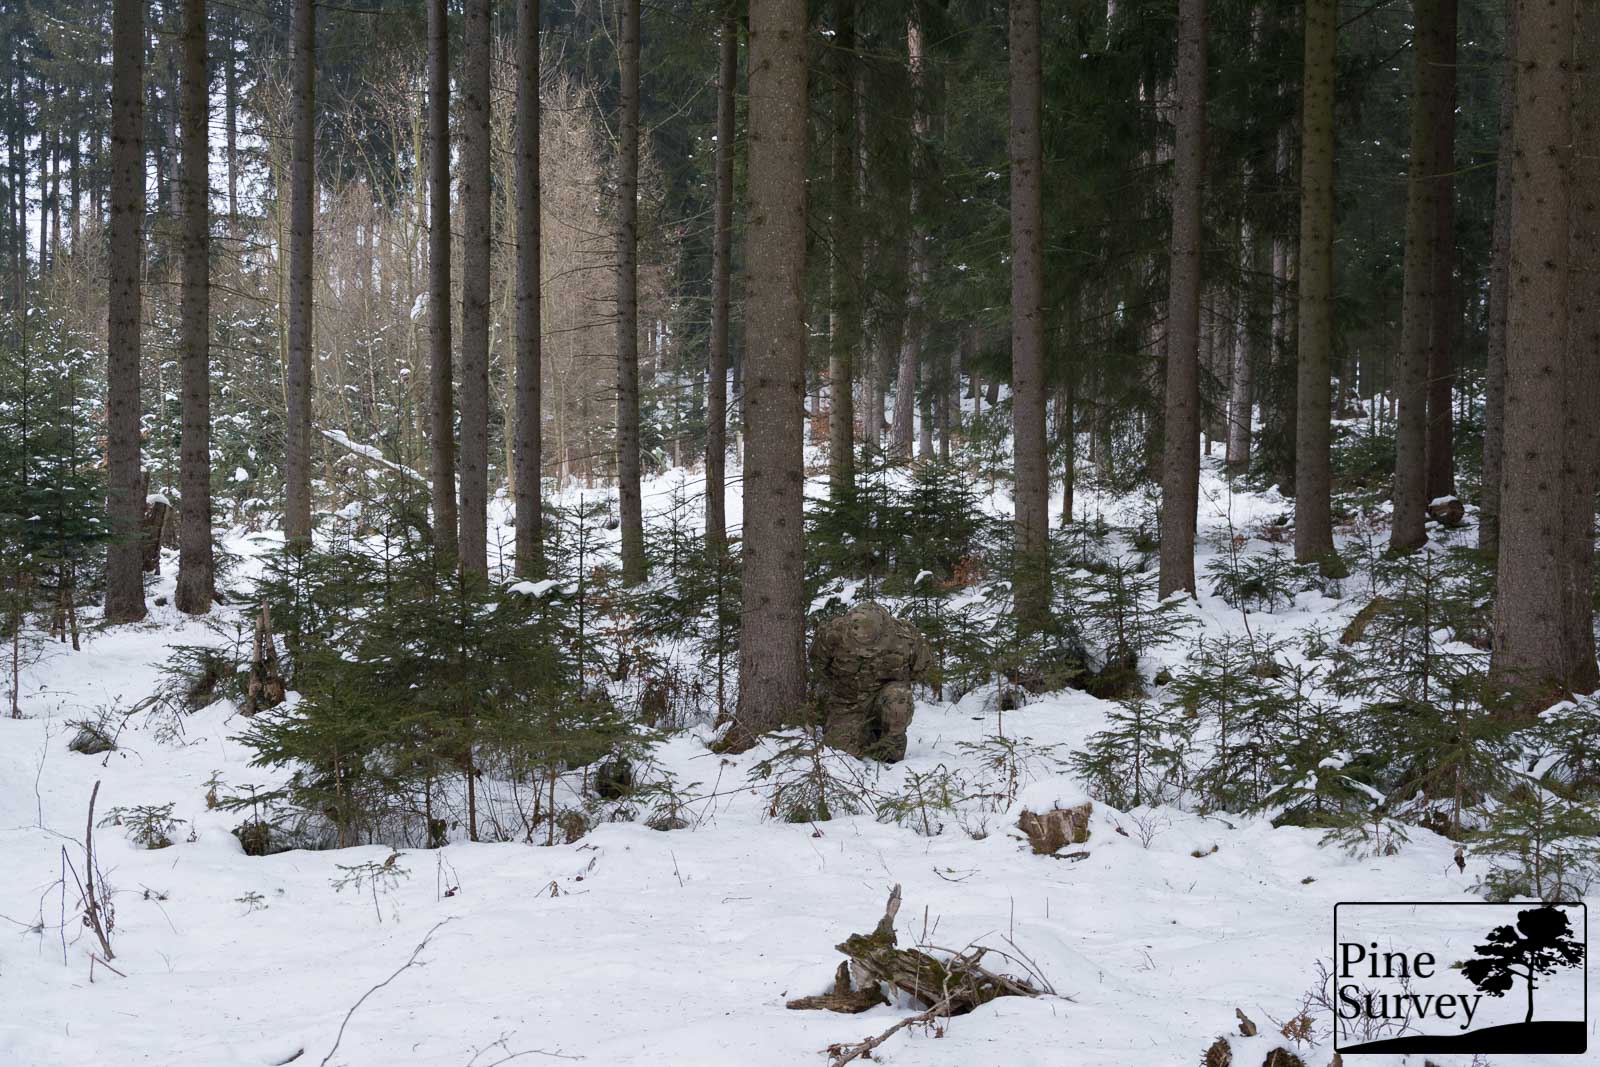
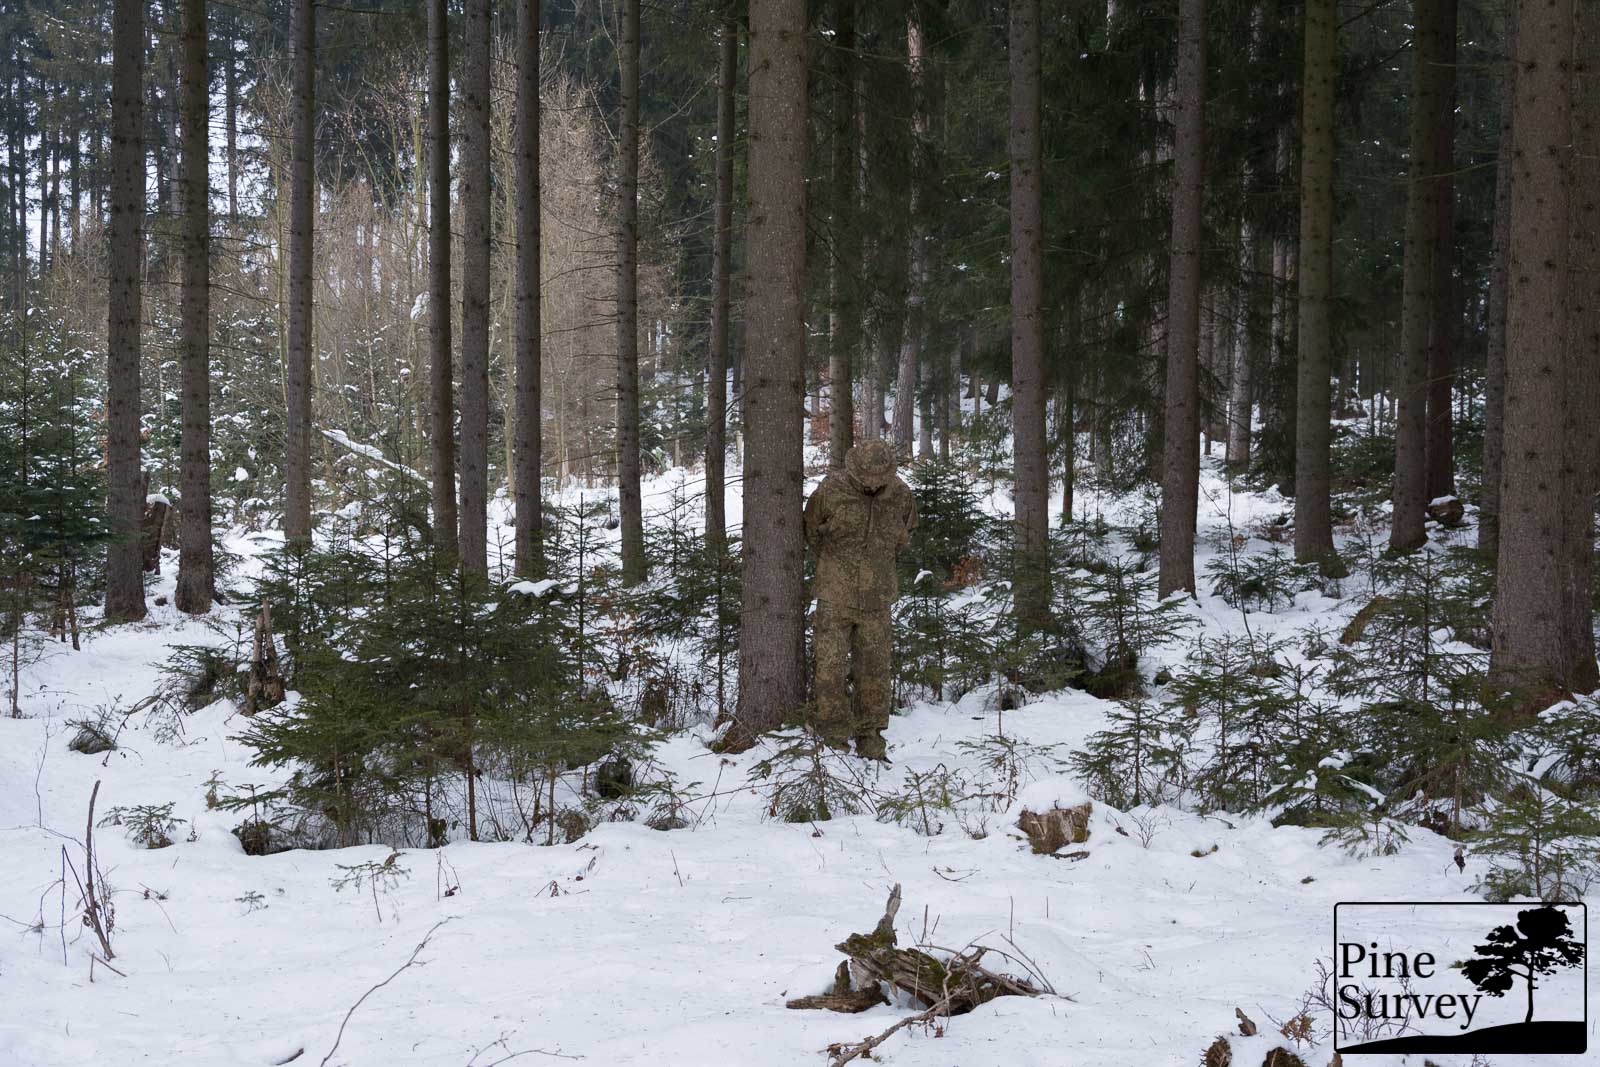
Highlander
Just as PenCott Badlands, Kryptek Highlander is designed mainly as a transitional, semi-arid pattern, and not as a universal pattern as Multicam. The pattern features almost no greens. The base color is the lightest of the three patterns here and the macro elements are standing out with high contrasts. This results in the best breaking up of the silhouette of all the three patterns here.
In the standing position you can clearly see how the macro pattern disrupt the human shape, while at the same time the light base color blends into the surroundings. The midi and macro elements look very organic in this setting.

Kryptek Highlander – standing position. 35mm Distance: 10-15m
This drastic effect is ironically minimized in the kneeling position because the macro elements are not that apparent anymore. At the same time the colours and midi elements still provide a decent concealment.
Kryptek Highlander – kneeling position. 35mm Distance: 10-15m
The prone is as effective as with the other two patterns, although Highlander looks the most natural in this setting.

Kryptek Highlander – prone position. 35mm Distance: 10-15m
In my experience, Kryptek Highlander is way more effective than Mandrake because of its higher contrast and more apparent macro elements, which break up the human shape quite well. The very light base color works well in winter and the organic look is contributing to the overall effectiveness.
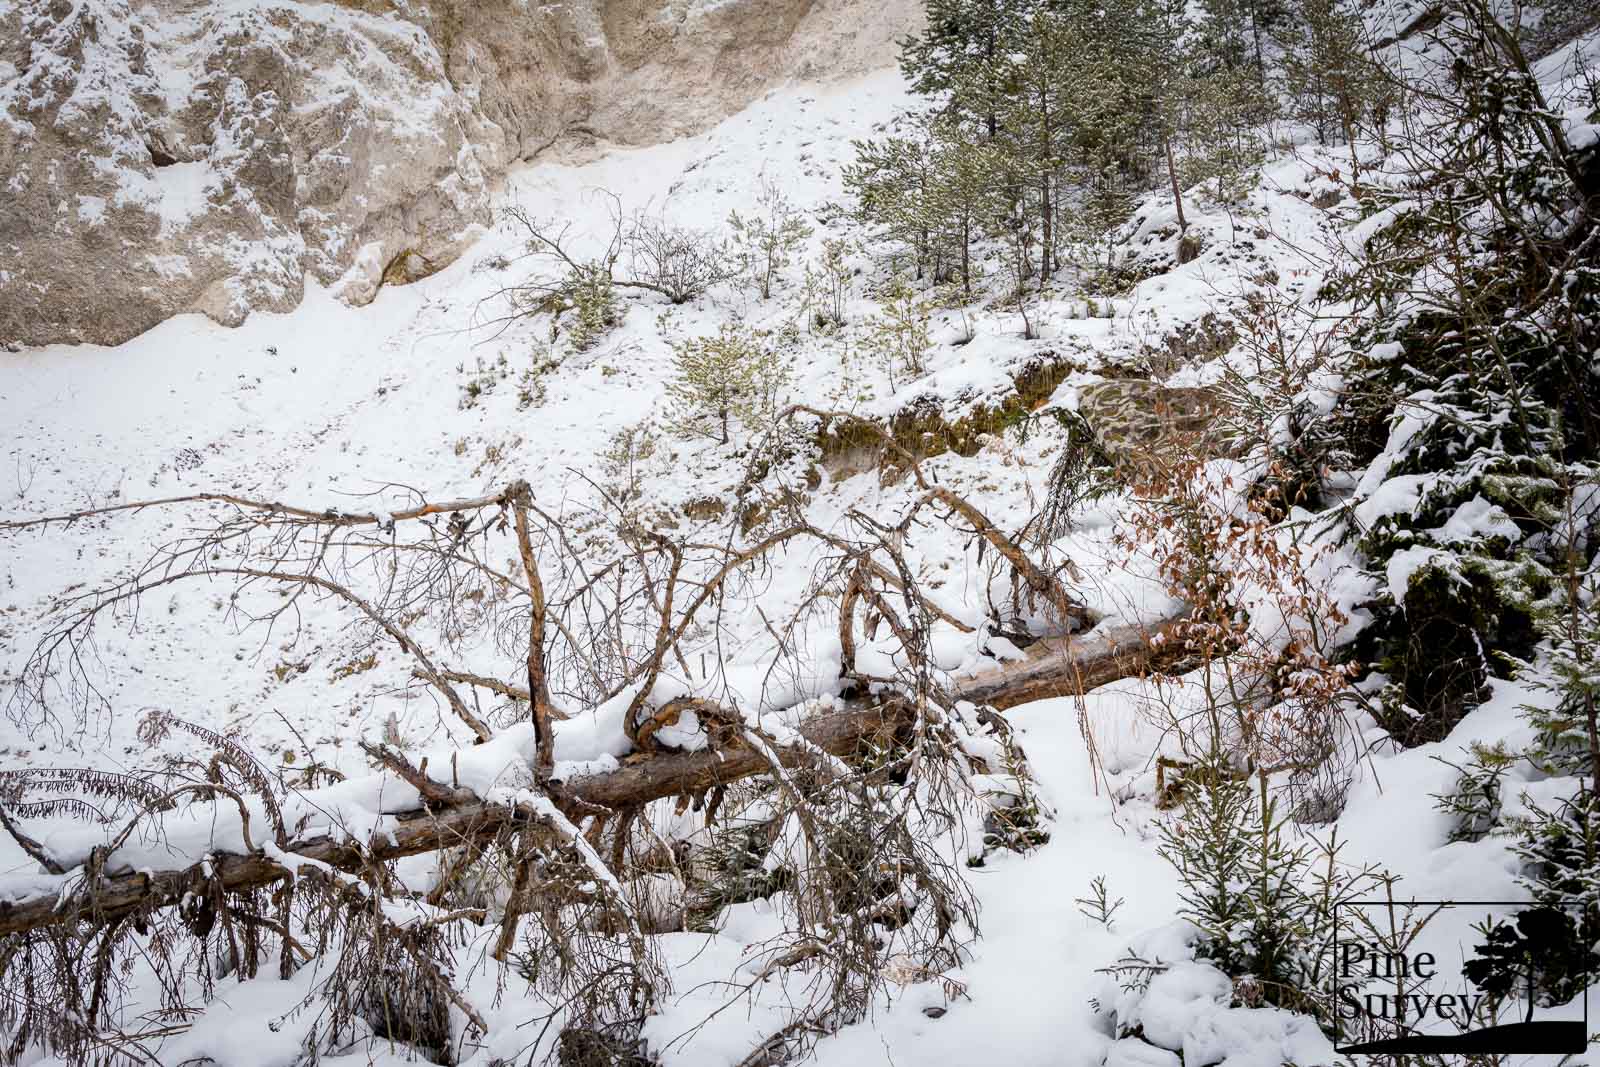
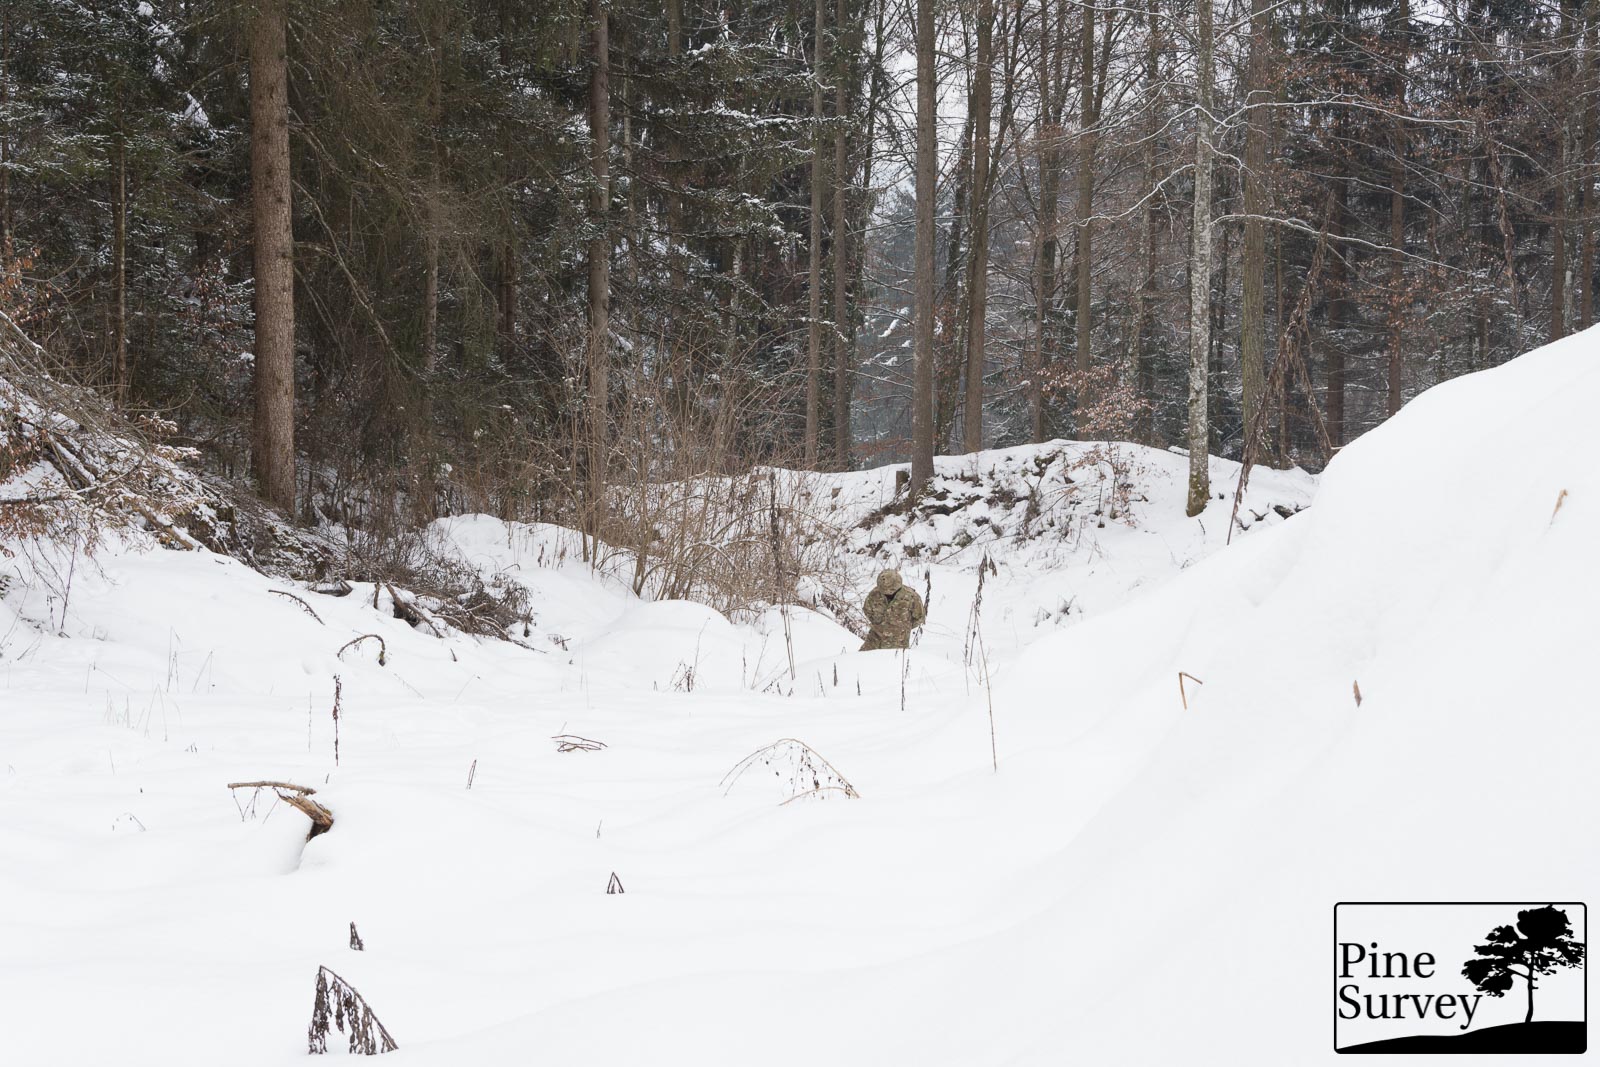
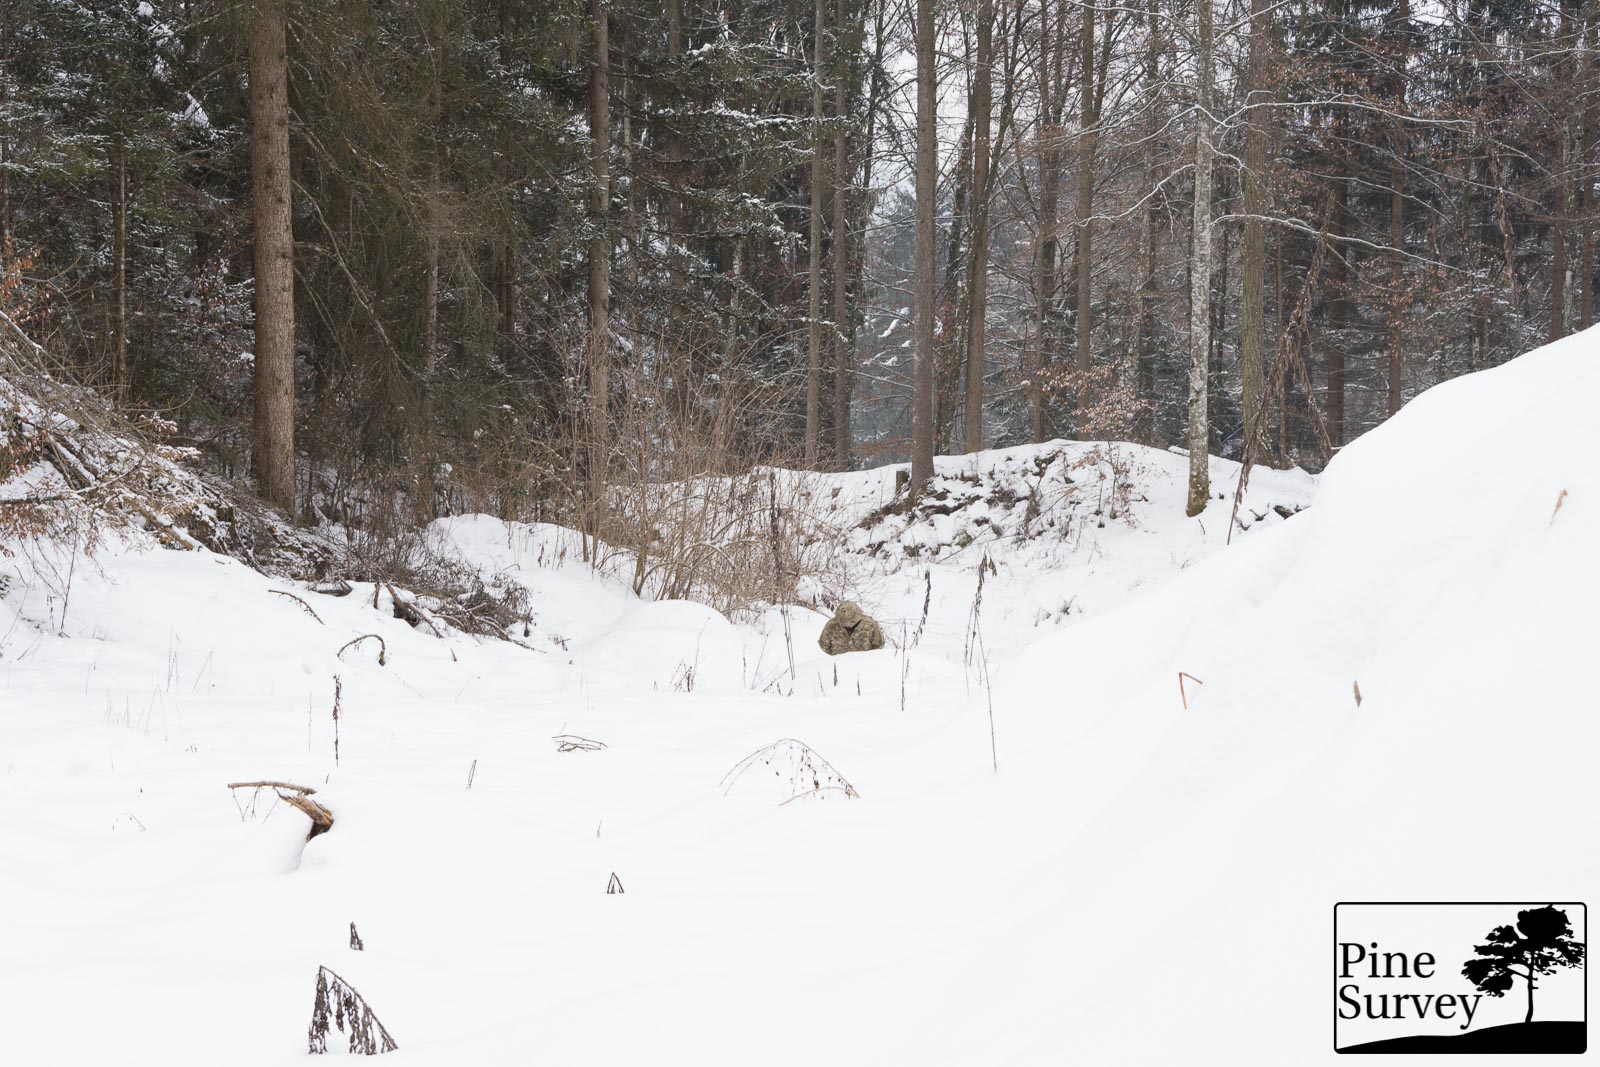
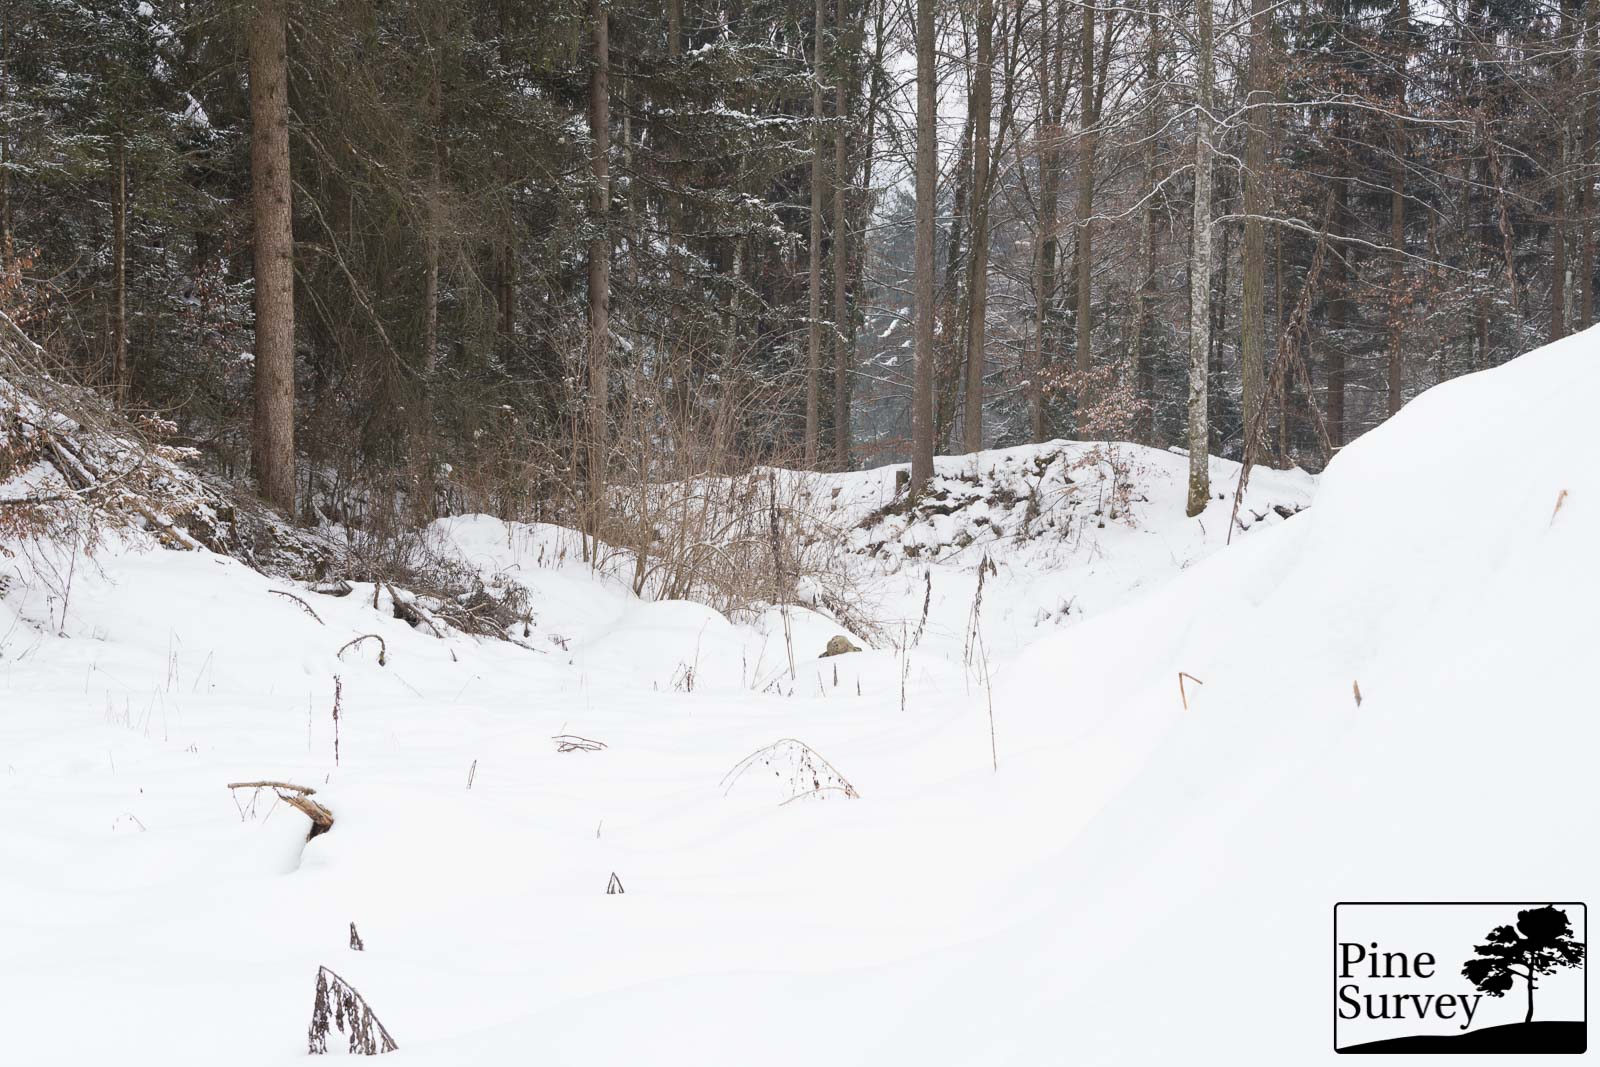
Location 2 – choke point in the open
This location is new and quite interesting, since it is a small valley-like entry to a gravel pit with some cover on the ground, but also with a very bright backdrop that makes the human silhouette stand out. Quasi a worst case scenario to find concealment, which will give us a stark contrast to location one. The distance is at least 20m.
Camogrom
Starting with Camogrom again, you can obviously see the human shape, because of the white backdrop. At the same time however, it is noticeable, that both colour and midi elements blend with the nearby vegetation.
Camogrom – standing position. 35mm Distance: 20m
The same effect can be witnessed in the kneeling position. The only reason the silhouette is standing out is because of the position in the center of the picture.
Camogrom – kneeling position. 35mm Distance: 20m
This changes drastically in the prone position. Since there is some concealment available and the prone is always a good position in itself to take cover, you can barely see anything.
Camogrom – prone position. 35mm Distance: 20m
Badlands
At this distance Badlands performs just as good as Camogrom. In the standing position the silhouette is visible, but the colors and elements of Badlands blend in with the vegetation nearby. The macro pattern is also visible, breaking up the shape. The contrast could be higher nevertheless for more effect.

PenCott Badlands – standing position. 35mm Distance: 20m
In the kneeling position the performance increases for already mentioned reasons. The colours and the midi and macro elements blend in with the surroundings.
PenCott Badlands – kneeling position. 35mm Distance: 20m
The prone is just as good as with Camogrom – no further explanation needed.

PenCott Badlands – prone position. 35mm Distance: 20m
Highlander
Also this time, Highlander profits from its very bright base color. In the standing position it blends in the best with the white backdrop. At the same time the very organic looking macro elements break up the silhouette quite effectively. From the three compared camouflage patterns this one performs the best in this revealing situation.
Kryptek Highlander – standing position. 35mm Distance: 20m
The same can be said in the kneeling position: colours and macro elements blend in very well, making the human shape disappear. Although identification is still possible, the time to do so is drastically increased.
Kryptek Highlander – kneeling position. 35mm Distance: 20m
The prone position is the same as with the others. Concealment and camouflage pattern work hand in hand.
Kryptek Highlander – prone position. 35mm Distance: 20m
Conclusion
Coming to a conclusion it is obvious why there are so many people using semi-arid or transitional patterns for autumn and winter camouflage, although it is not the primary setting for the patterns.
The brown dominant colours blend in quite well with the dead vegetation during winter, with the available green elements of the patterns still giving enough added value for the evergreen vegetation.
Multicam – or in this case Camogrom proved once again its versatility to blend in in almost every environment to a certain extent. Although not ideal in Spring and Summer, Multicam/Camogrom is quite usable in Autumn/Winter for its color combination and midi elements.
PenCott Badlands is just as much usable, although the base colour is different from what you would find in a winter forest – here you can see the intended operational use in semi-arid bushland. The darker brown macro elements break up the human shape however. In comparison with previous tests I would however prefer Greenzone over Badlands, if I would have to choose between PenCott patterns, since GZ offers more distinct midi and macro elements and also more greens which are still needed in Winter, if you are not in a plain white field.
Kryptek Highlander proved to be a pleasant surprise in this test. Usually the Kryptek patterns performed not as good in my tests as other patterns, because of lacking contrast, color and print quality. In this case Highlander blended in very good with the Winter environment, because of its bright base color and the dark brown, organic looking shape of the macro elements.
With that being said I hope I could give you another useful comparison. At this point thanks to Helikon-Tex who sent me the uniforms a long time ago – it seems this is a gift that keeps on giving.
Thank you for reading! Take care!
Addendum
Since I started to give you additional material in previous comparisons, I want to share some here as well. Recently I came across an original Austrian Armed Forces Zeltbahn in a very good condition. As some camo aficionados will know, this was issued in a heavy double sided cloth. On one side you have Erbsentarn aka the pea dot pattern, and on the other side you have Steintarn, which is a Sumpftarn variant, designed for the alpine regions. Here are some pics at the two locations to give you some idea about this amazing old school camouflage patterns.
You can clearly see why these patterns were chosen. The Erbsentarn is perfect for the coniferous forest and the Steintarn is not only very good in Winter, but also works very well in alpine environments. But enough said – just enjoy!
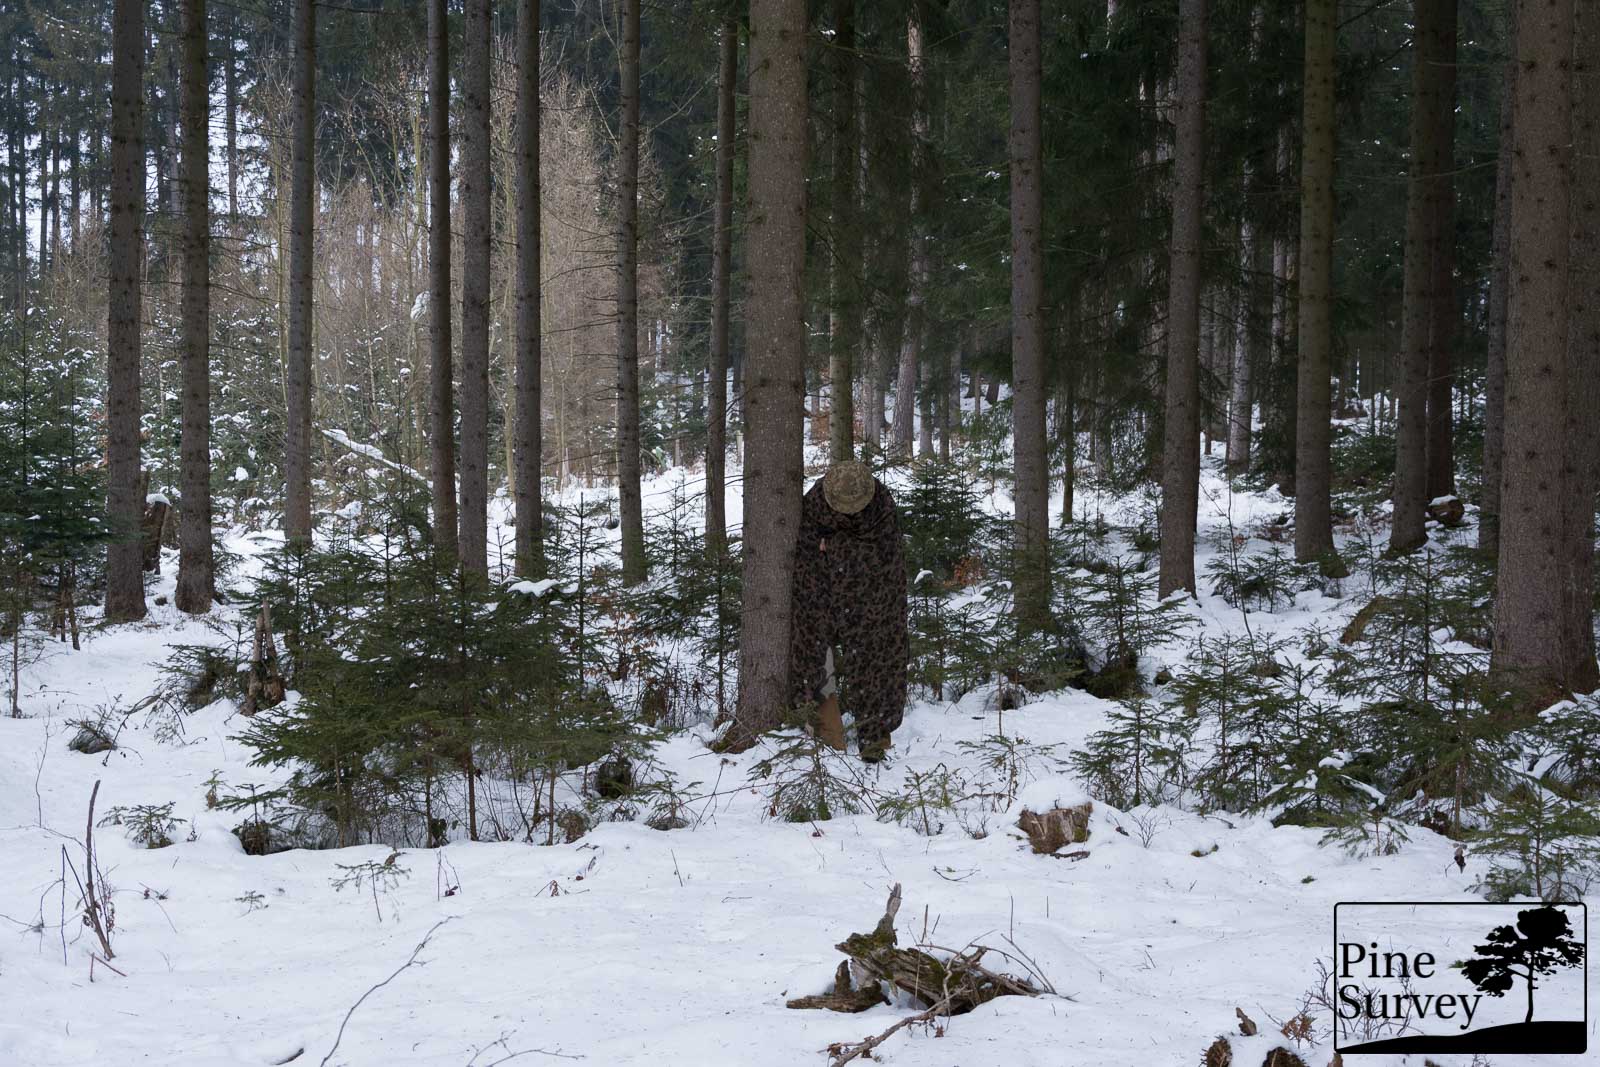
ÖBH Erbsentarn – as a poncho, standing
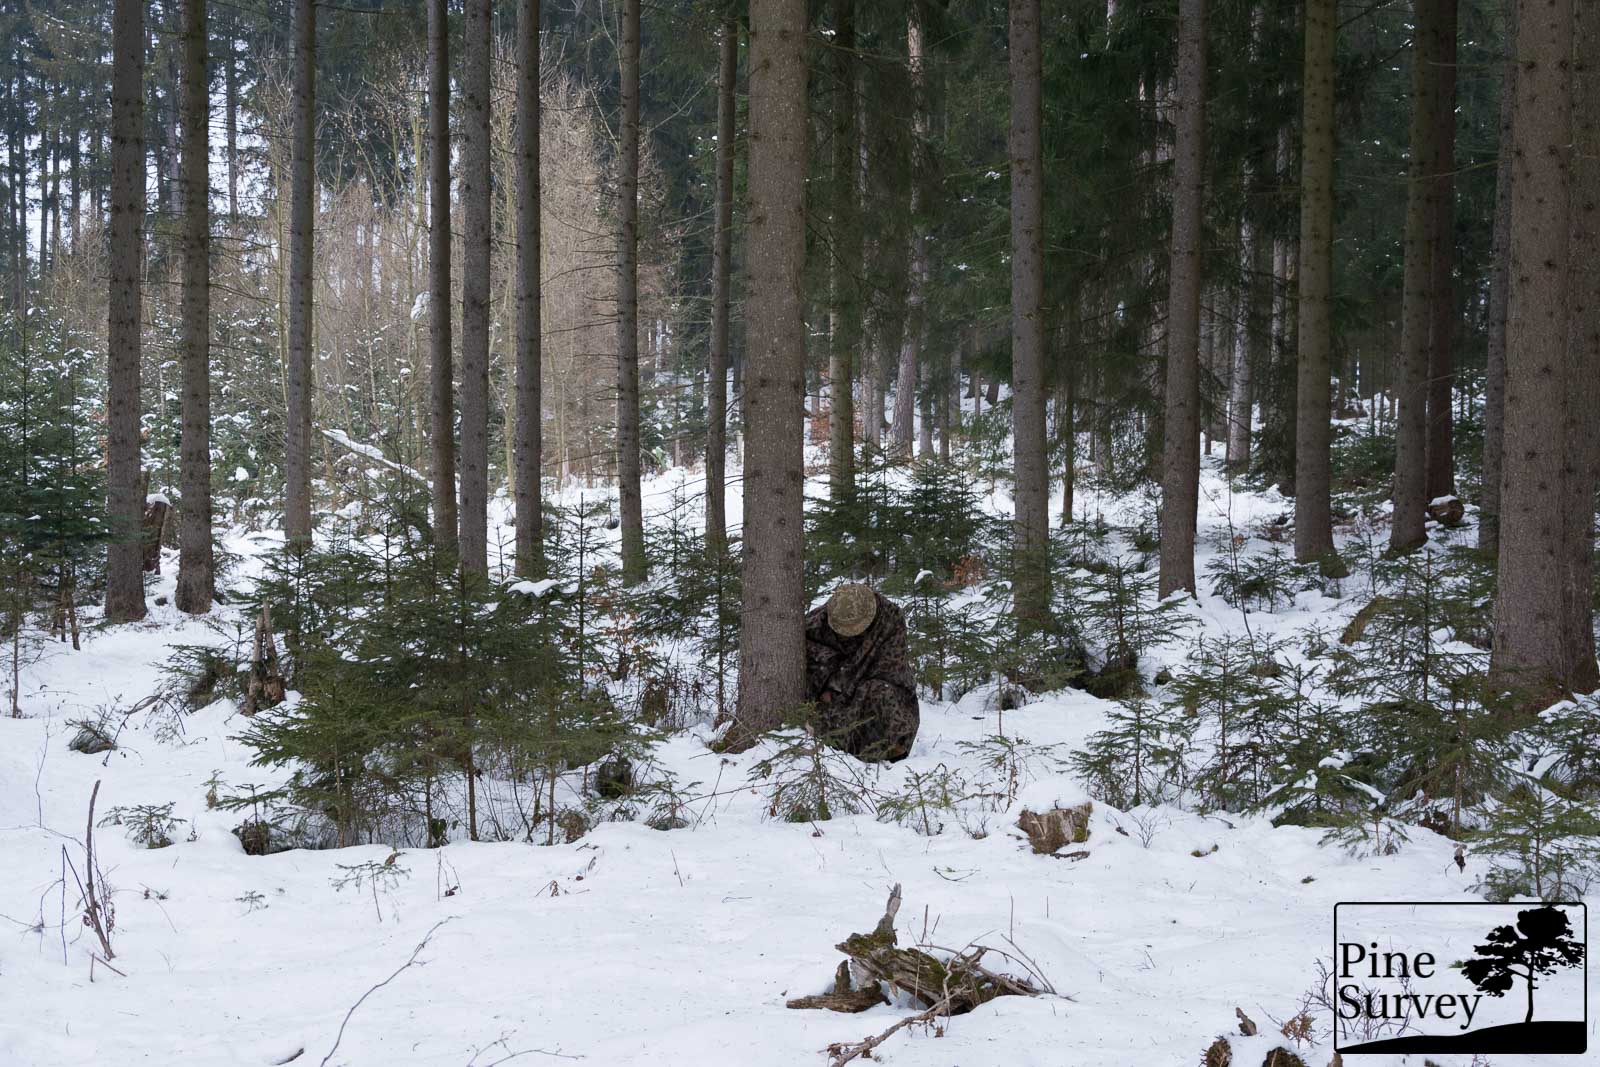
ÖBH Erbsentarn – as a poncho, kneeling
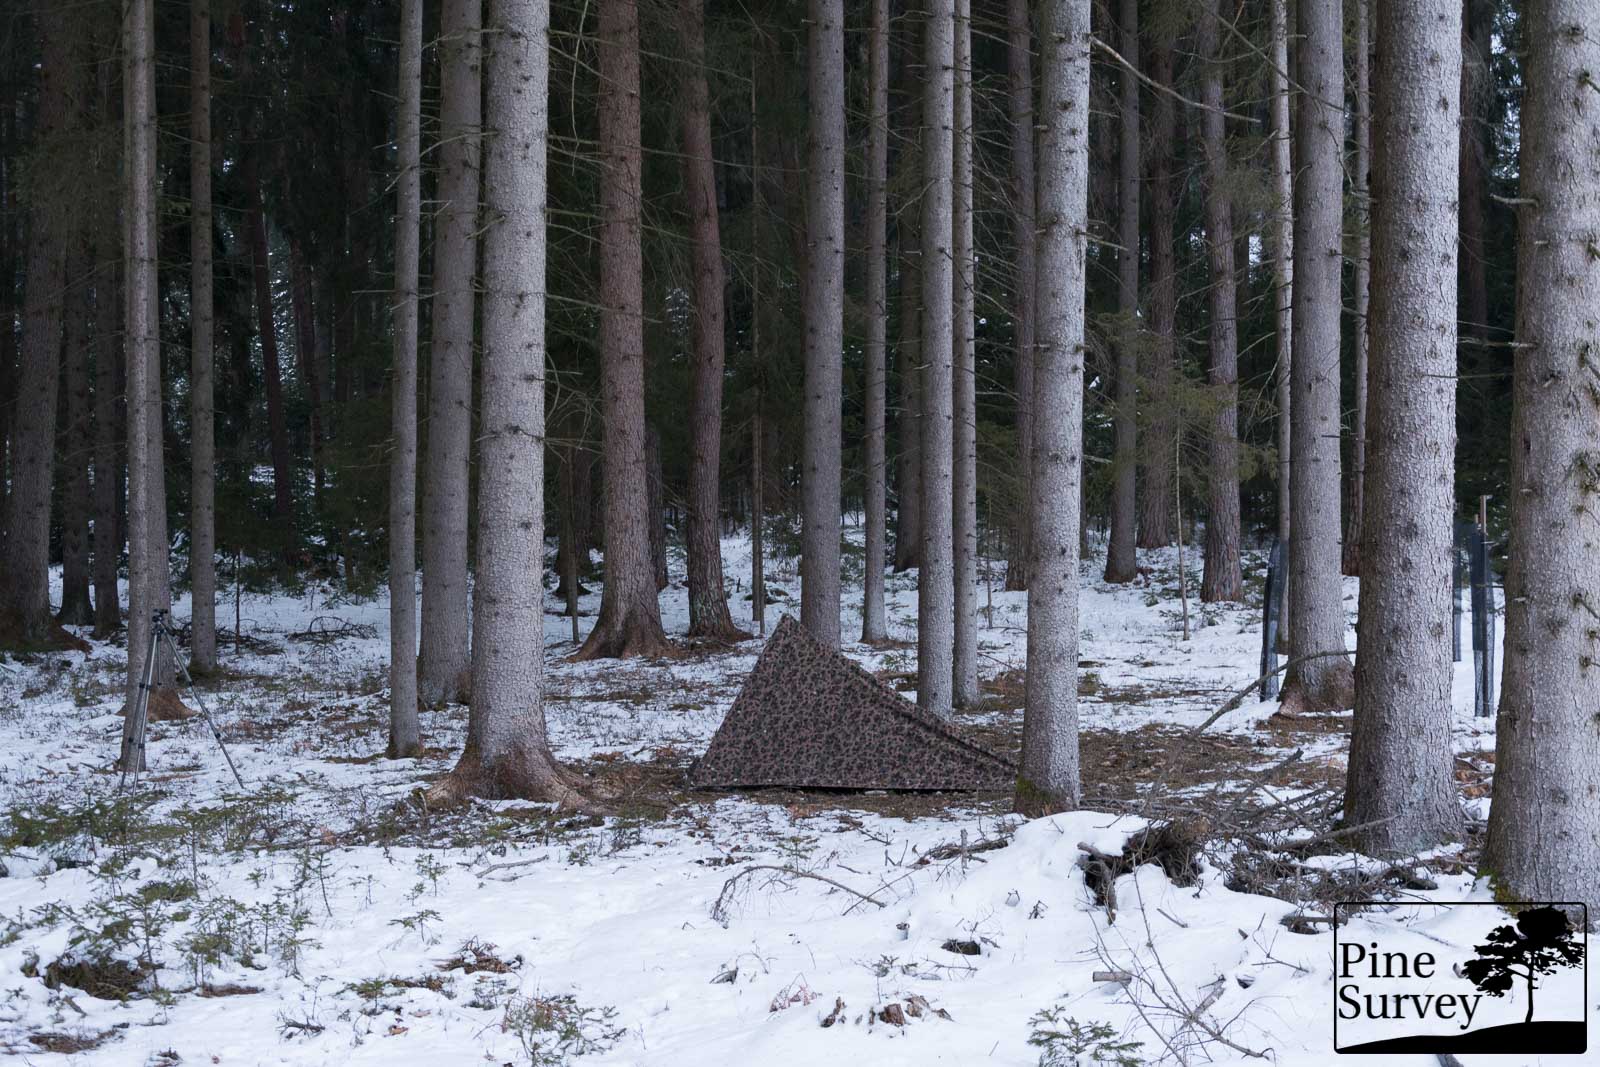
ÖBH Erbsentarn – as a tent
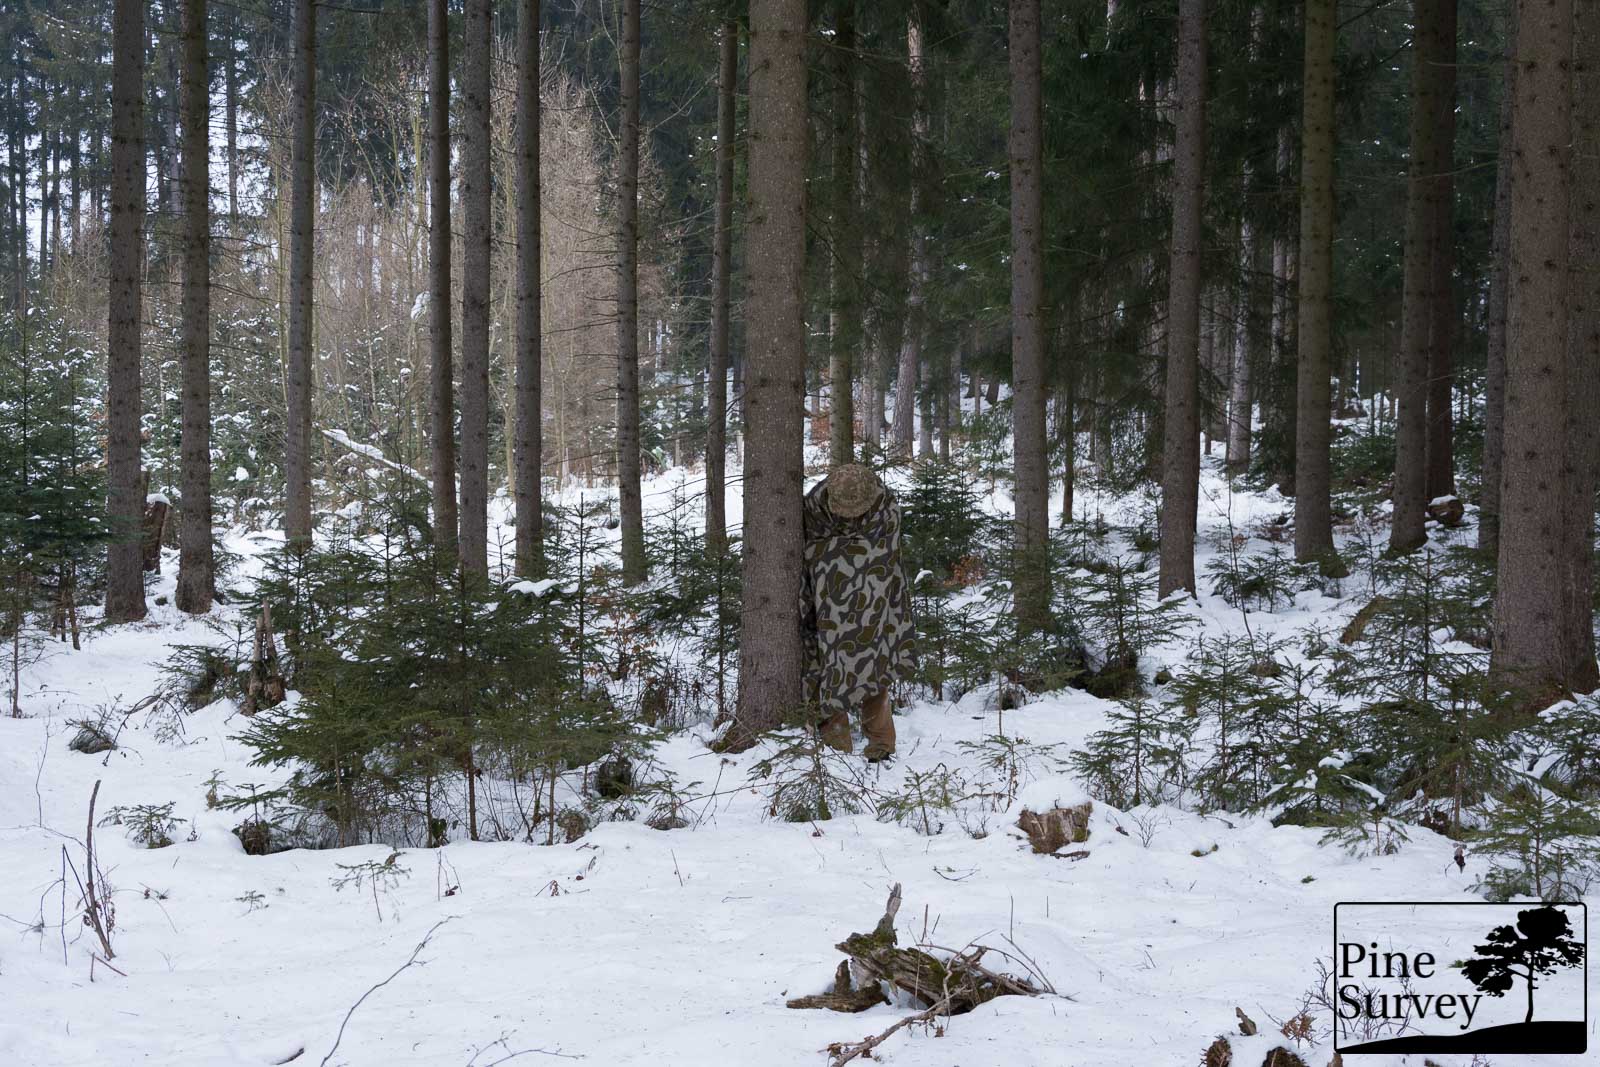
ÖBH Steintarn – as a poncho, standing
ÖBH Steintarn – as a poncho, kneeling

ÖBH Steintarn – as a tent
No Comment
You can post first response comment.