
Another article from the outdoor series, written by my dear friend and Pine Survey contributor Deep Forest. This time he will continue with fire starting, focusing on cotton coal.
Cotton coal – a good alternative for tinder?
Introduction
Sometimes (usually when you need it the most) starting a fire can be really tricky. Improvised starting equipment, no proper tinder and firewood, but also wet weather conditions or physical and psychological stress can be hard obstacles. But as trained outdoor practitioners know, even when the first fire on a trip can be sometimes difficult, it is very important for various reasons:
- cooking,
- purifying water,
- getting warm again,
- withstanding harsh weather conditions,
- drying clothes and gear or
- signalling for help.
When the first campfire is burning, many things get a lot easier, and you feel better.
Fire – and maintaining it
Maintaining a fire that has burnt for a few hours is not difficult, if enough firewood is available. Even heavy rain cannot put it out, and after a night, restarting it in the morning is not a problem. When you are “on the run” and want (or have to) change the camp site every day, it would be very helpful to be able to “carry” a piece of fire with you for the new site. There are possibilities for this – the frozen body of the Neolithic hunter called “Ötzi” (found in the glaciers of the alps near Ötztal) carried some prepared pieces of a tree fungus in small bags made out of birch bark for example. It is assumed he used them as spark catchers and for carrying small amounts of blaze. Some kinds of tree fungus, when properly prepared, can preserve a small blaze for hours (I’m planning to do a review on this method in the future).
I also read about the possibility to use bundles of dry grass and small branches to keep and transport the blaze of a fire – I have not tried this out so far (would also be an interesting task for the future). As I estimate it, carrying a blaze needs much preparation, certain preparations for the way and of course it inherits the risk of simply going out (and you have to start anew).
The question arises if there would be a more secure alternative, something you can prepare with a fire to start the next one easier and spare energy and resources. This is the idea behind one of the best artificial spark catchers I came across so far – cotton coal.
Cotton coal – ready for transport
Sparing some cloth for a guarantee of fire
The basic material for cotton coal are some small pieces of cotton cloth. As far as I know every piece of cloth made partially out of cotton can be used to produce these small pieces: a T-Shirt, a pair of jeans, even an old piece of underwear, everything you can spare in the moment. Even when cotton is combined with other materials like polyester or elastan, this is usually not a problem.
Never forget that, if it is necessary, even clothes you wear are an option – it can be helpful to sacrifice a part of a sleeve of a shirt or a few centimetres of a T-shirt in the hip area to be sure about starting a fire. A complete and good-looking T-Shirt will not save you out there – fire will.
Procedure
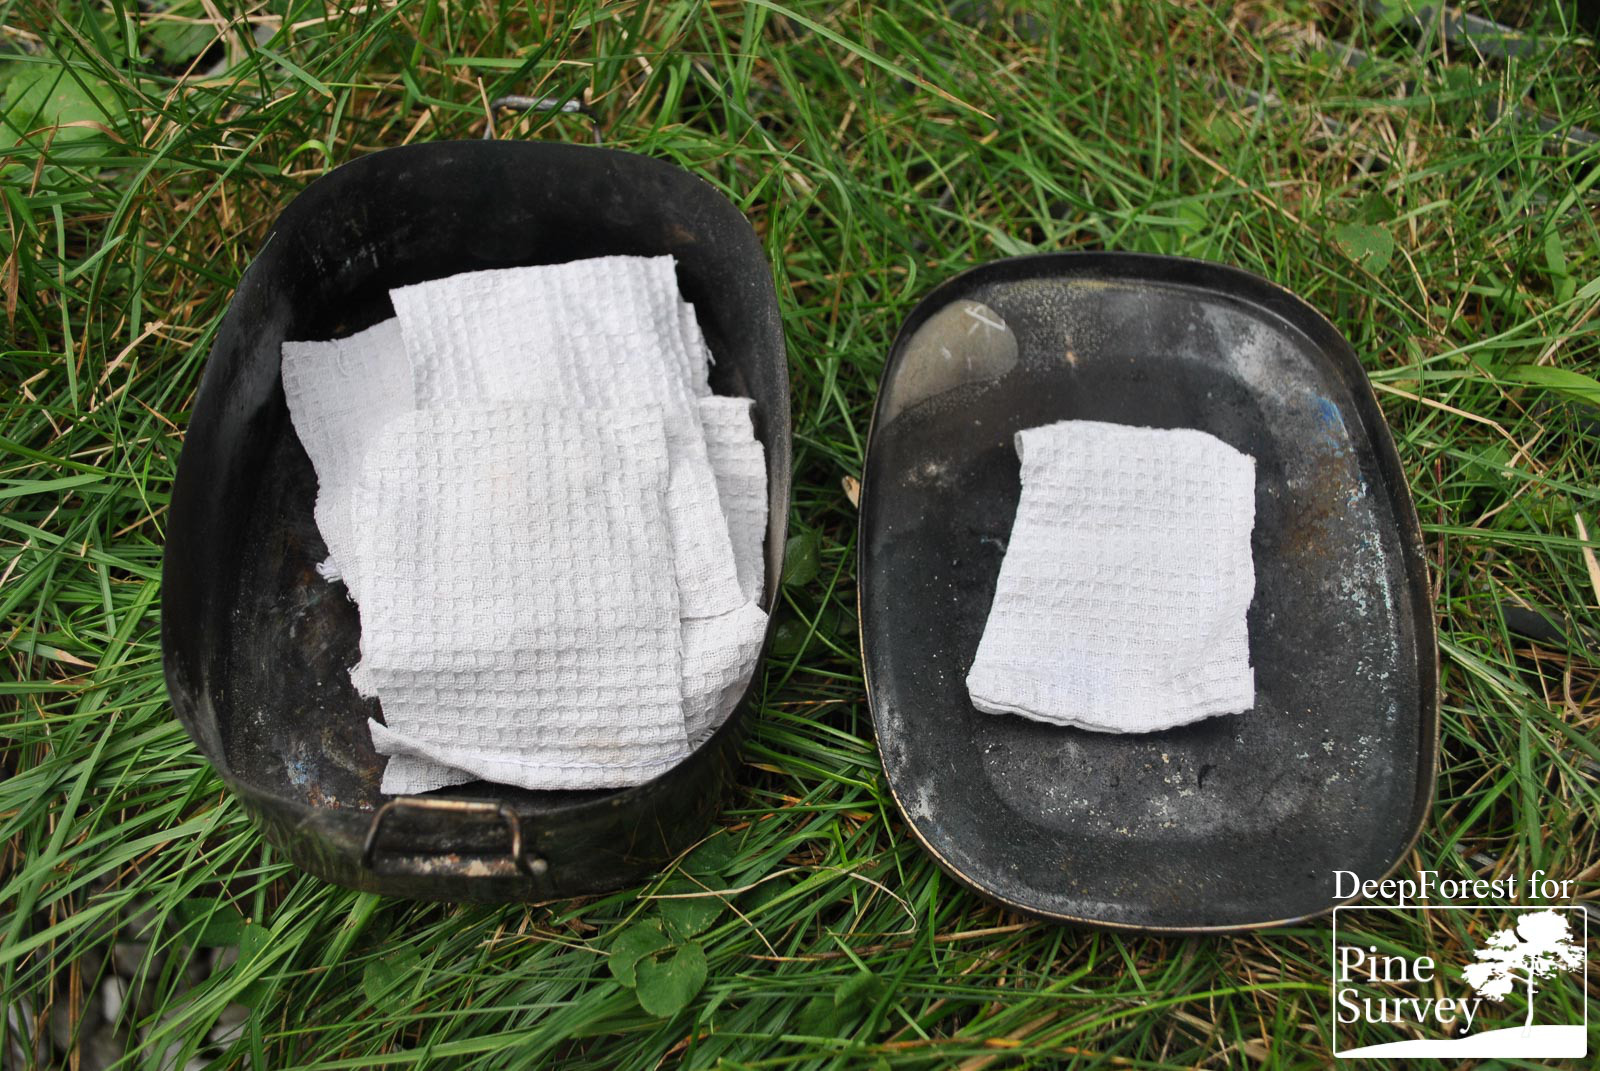
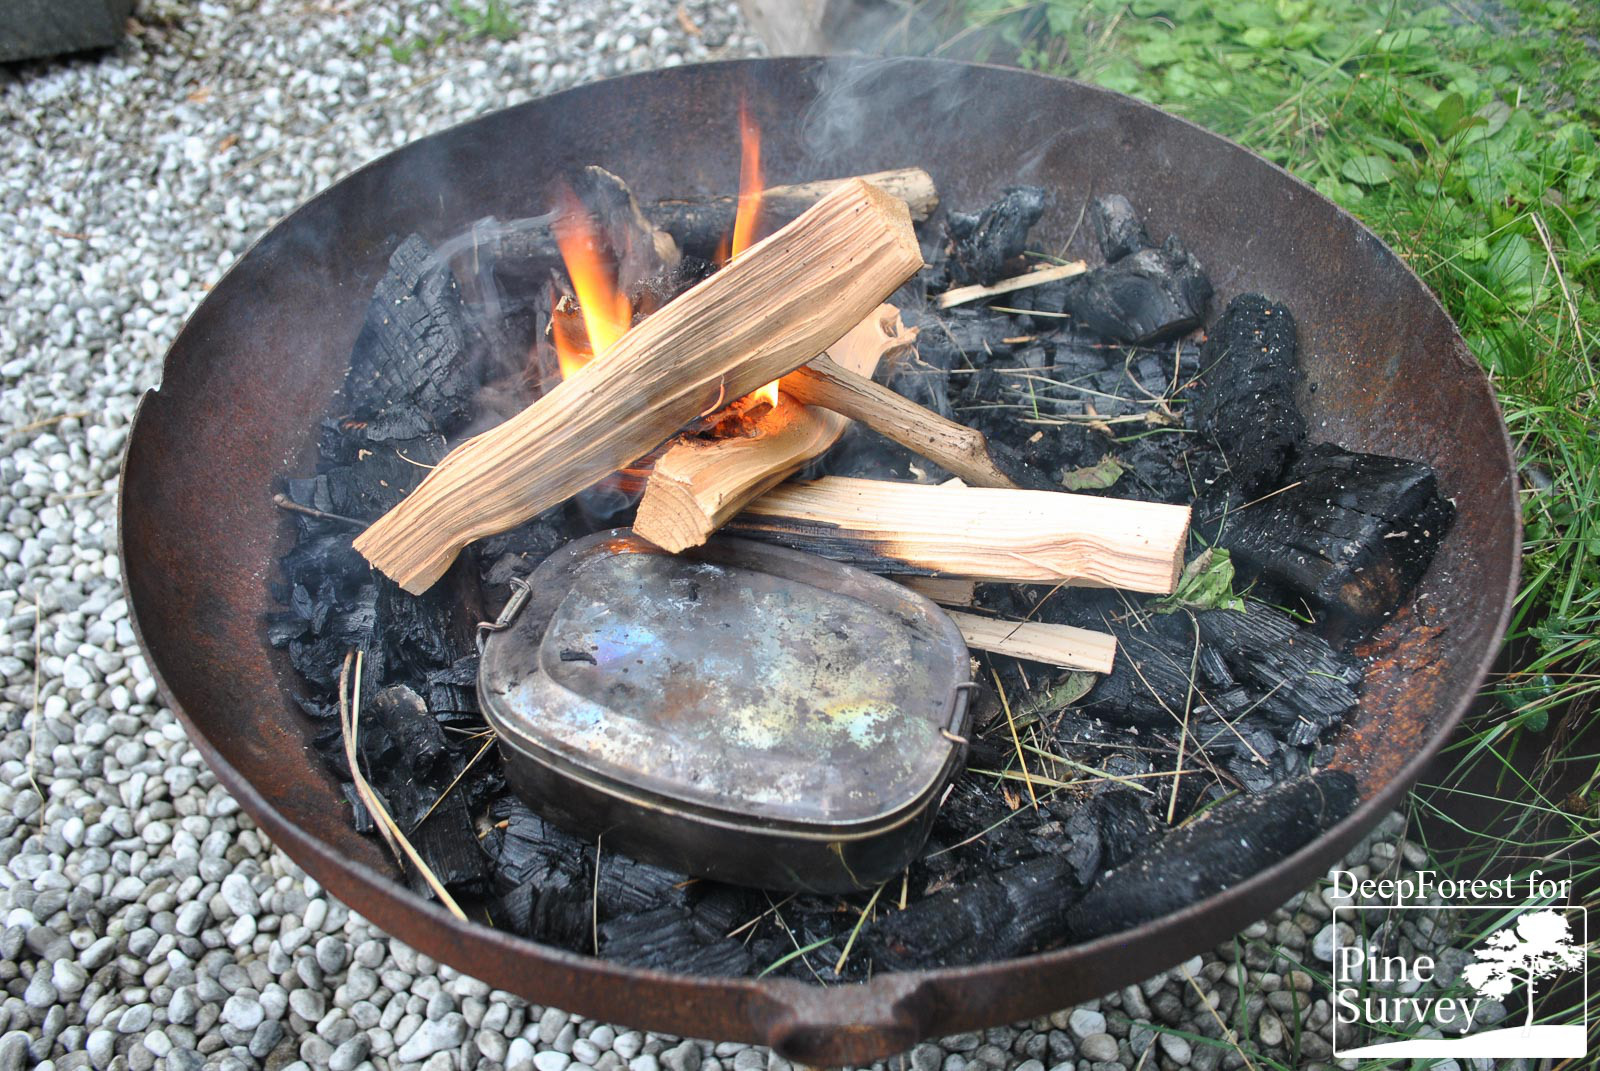
The cotton fabric is then cut into small pieces. Folding them is an option, but afterwards it is, from my point of view, easier to work with small ready cut pieces. To burn the fabric into coal, there are some options: The most comfortable is to use a small metal box (that is one of the reasons why my big “survival kit” is packed in a metal box).

The metal box used to make
You put the pieces into the box, close it tight and put it a fire. After a few minutes, you will see that smoke comes out of the box, sometimes even small flames. That’s ok, that’s just escaping gases catching fire. But the flames should not get too big. If that is the case, put it out of the fire and cool it down, the fabric itself should not burn.

The ready cut pieces
Continue this preparation until you see that no smoke is coming out of the box anymore. Depending on the temperature and the amount of fabric in the box, this can take 10 to 30 minutes usually. Afterwards, take the box out and let it cool down. When you open the box, you’ll see that the cotton fabric went completely black and is not elastic anymore, but quite fragile, it can be crumbled at the edges. If this is the case, the cotton coal is ready.
in the process of charcoaling
Now, the fabric itself has, from my point of view, three main characteristics that define good tinder material: it is very light, has a high surface-to-mass-relation (for a more detailed explanation of this key issue, see for example my prior review on artificial tinder materials) and consists of flammable material (cotton is basically flammable).
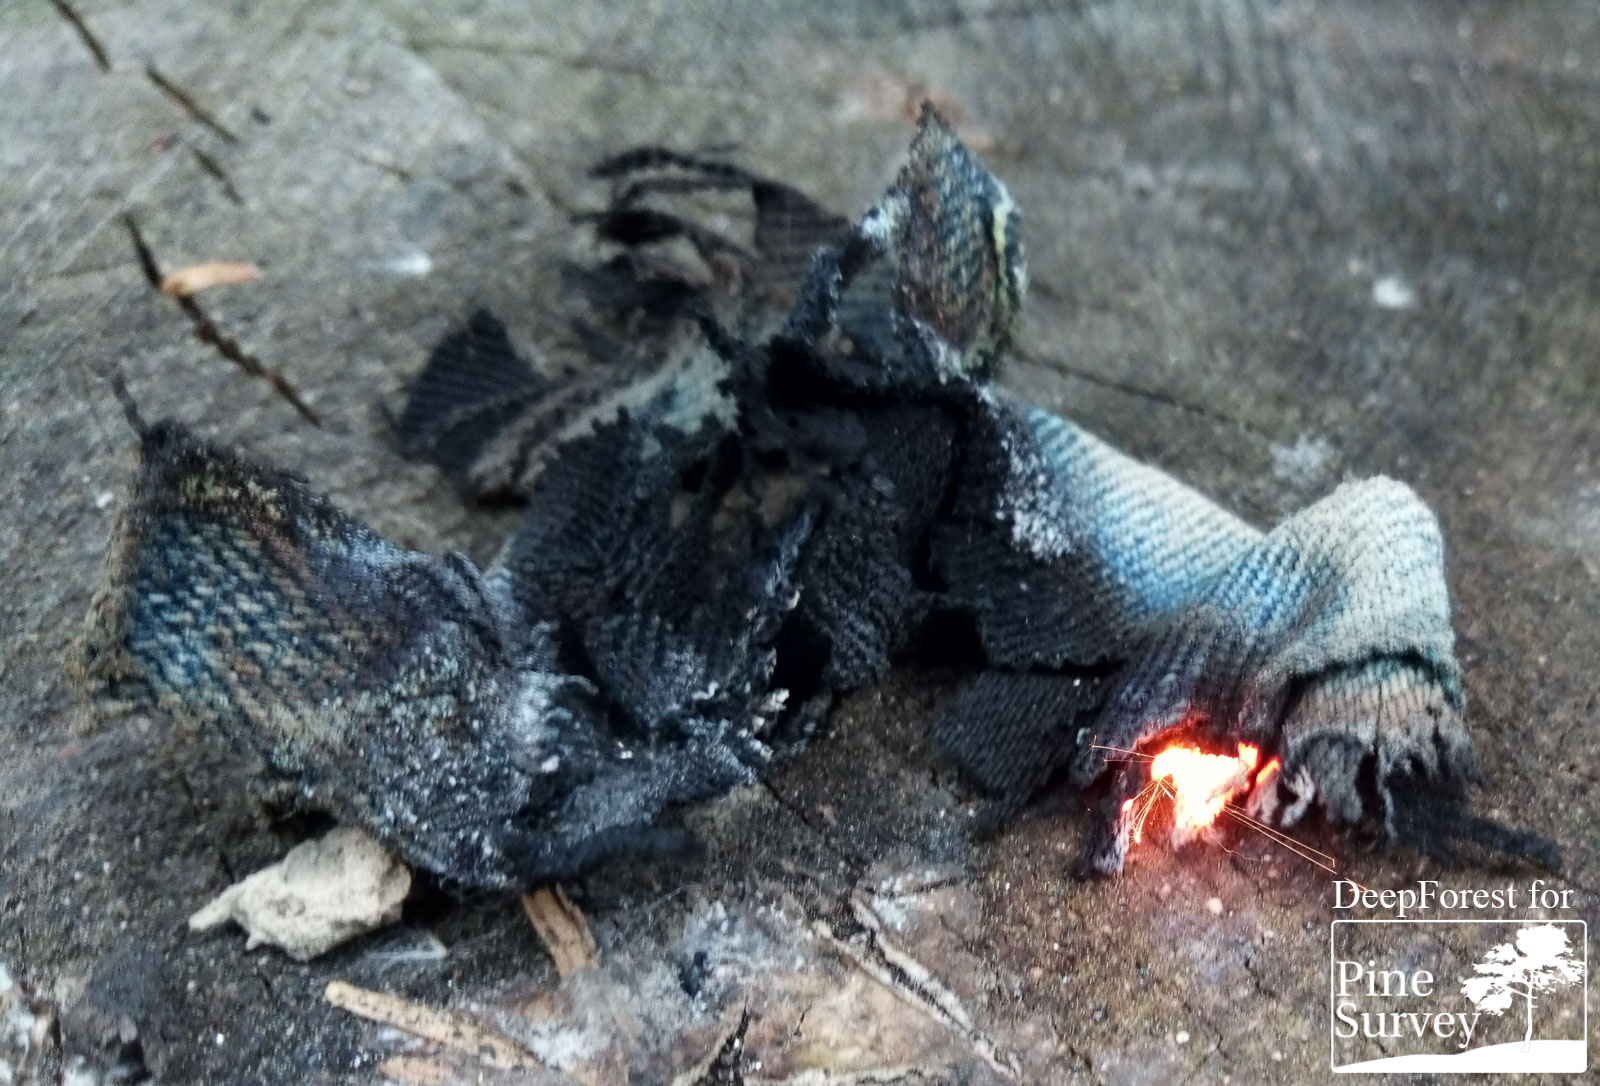
When you apply some sparks now, you’ll see that after the sparks hit the fabric, small hot spots will appear that can be enlarged by blowing on them. These hot spots look small, but can become quite hot – perfect to ignite larger cinder materials or even, if you are lucky, dry small branches.
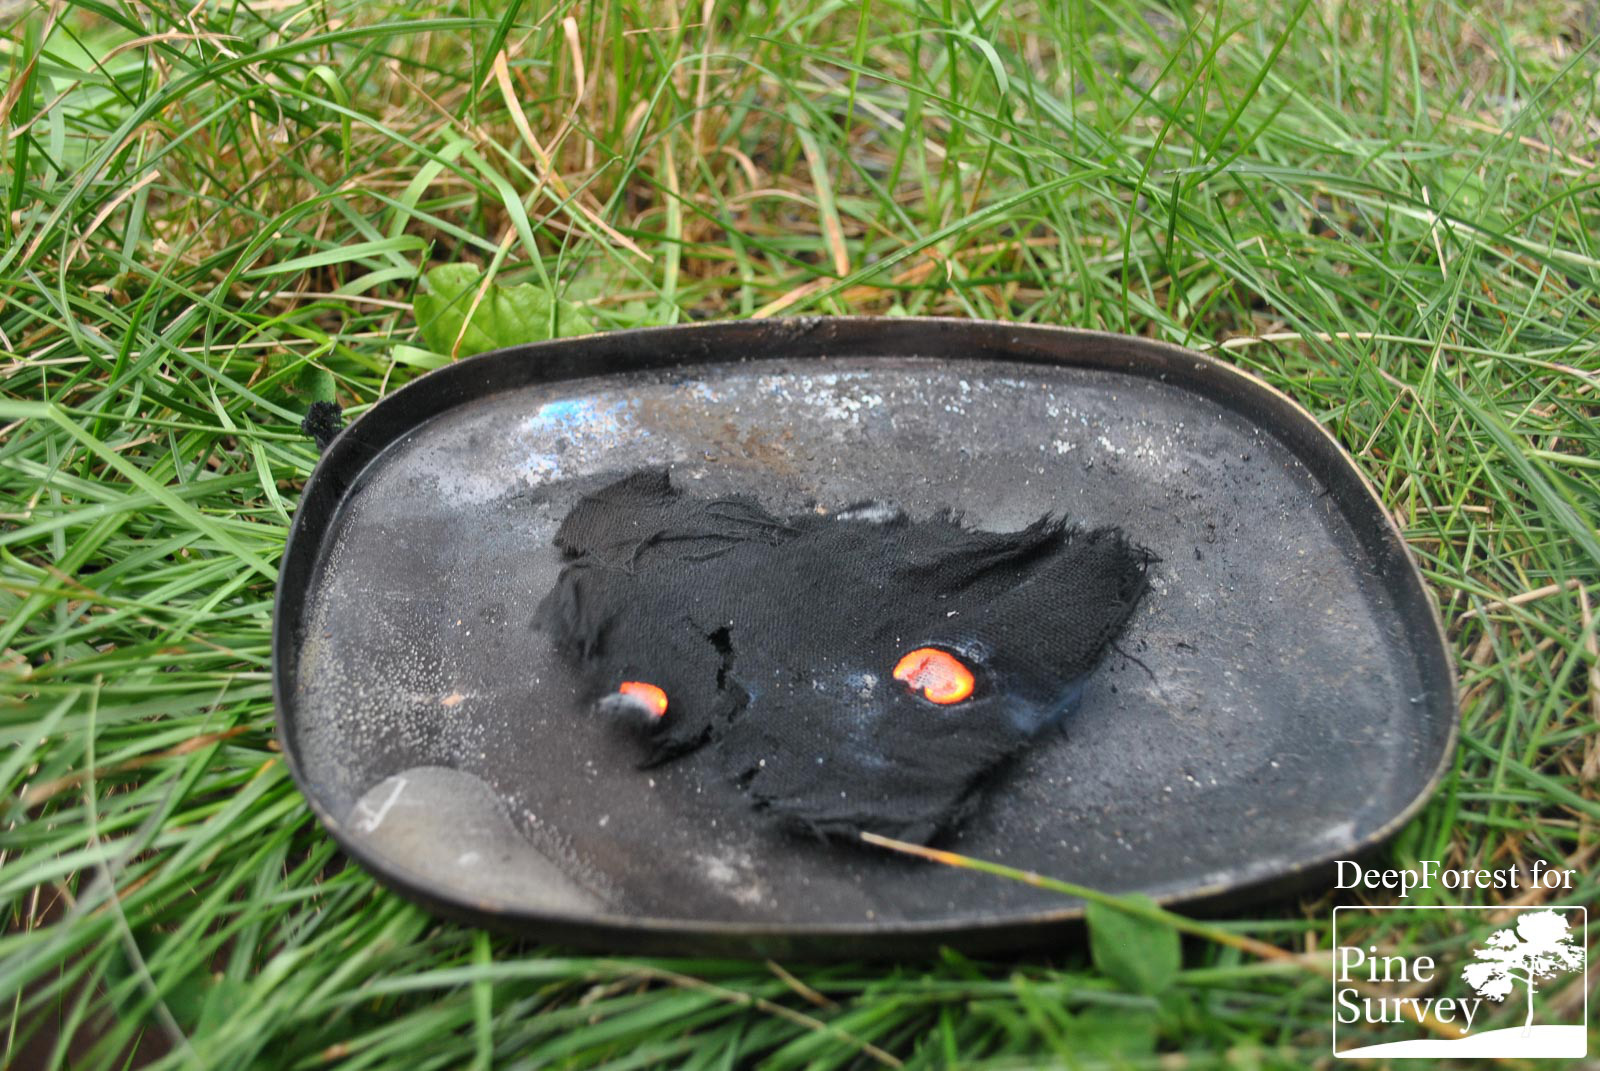
Cotton coal glowing
Let’s put it to a test
To see if this kind of artificial cinder is really worth the try, I applied my three-stage test I already used in my review on other kinds of artificial cinder:
- First, I tried to ignite the cinder with a common artificial fire steel.
- Second, I tried to ignite it with a non-stainless rasp and a stone.
- And third, I spilled water on the cinder, then pressed as much water as possible out of it, and tried to ignite it with the artificial fire steel again, simulating starting a fire under wet conditions.
I used the same technique and tried it under the same circumstances (dry, warm weather, sunny, with no wind) for several minutes, with several pieces of cotton coal each.
The results
- First, I tried the common fire steel. Already the first try was successful – several sparks fell on the fabric and caused some hot spots that could be developed further by blowing on it. Also the following attempts produced fast and good results. This showed that using a fire steel with the cotton coal works perfectly.
- Second, rasp and stone. This method needs a little more practice than a fire steel, and the sparks produced are much smaller and therefore not as hot as from the steel. The big plus here is that this method teaches you one thing: when you can find iron and a stone, you can ignite fire with it (when you have practiced it beforehand). But keep two things in mind: First, it works better with non-stainless metals than with stainless ones. And second: Even a knife can be used for this. But beware: the blade will take heavy damage when used this way, so do it only when your life depends on it! Don’t just sacrifice your knife for some heat, because you’ll likely need it for other purposes – it’s a question of priorities here.When using a rasp and a stone, the first challenge is to have the proper technique so that the sparks fall on the cotton coal. With a little practice, this works pretty well. I’m used to put the rasp upwards on a hard surface on the floor and to hit with the stone downwards towards the cinder material. There is also the method to put the cinder on the stone and to hit the stone with the metal, but my success rates with this method are, to be honest, miserable. Therefore, I prefer to use the “hit down”-technique.
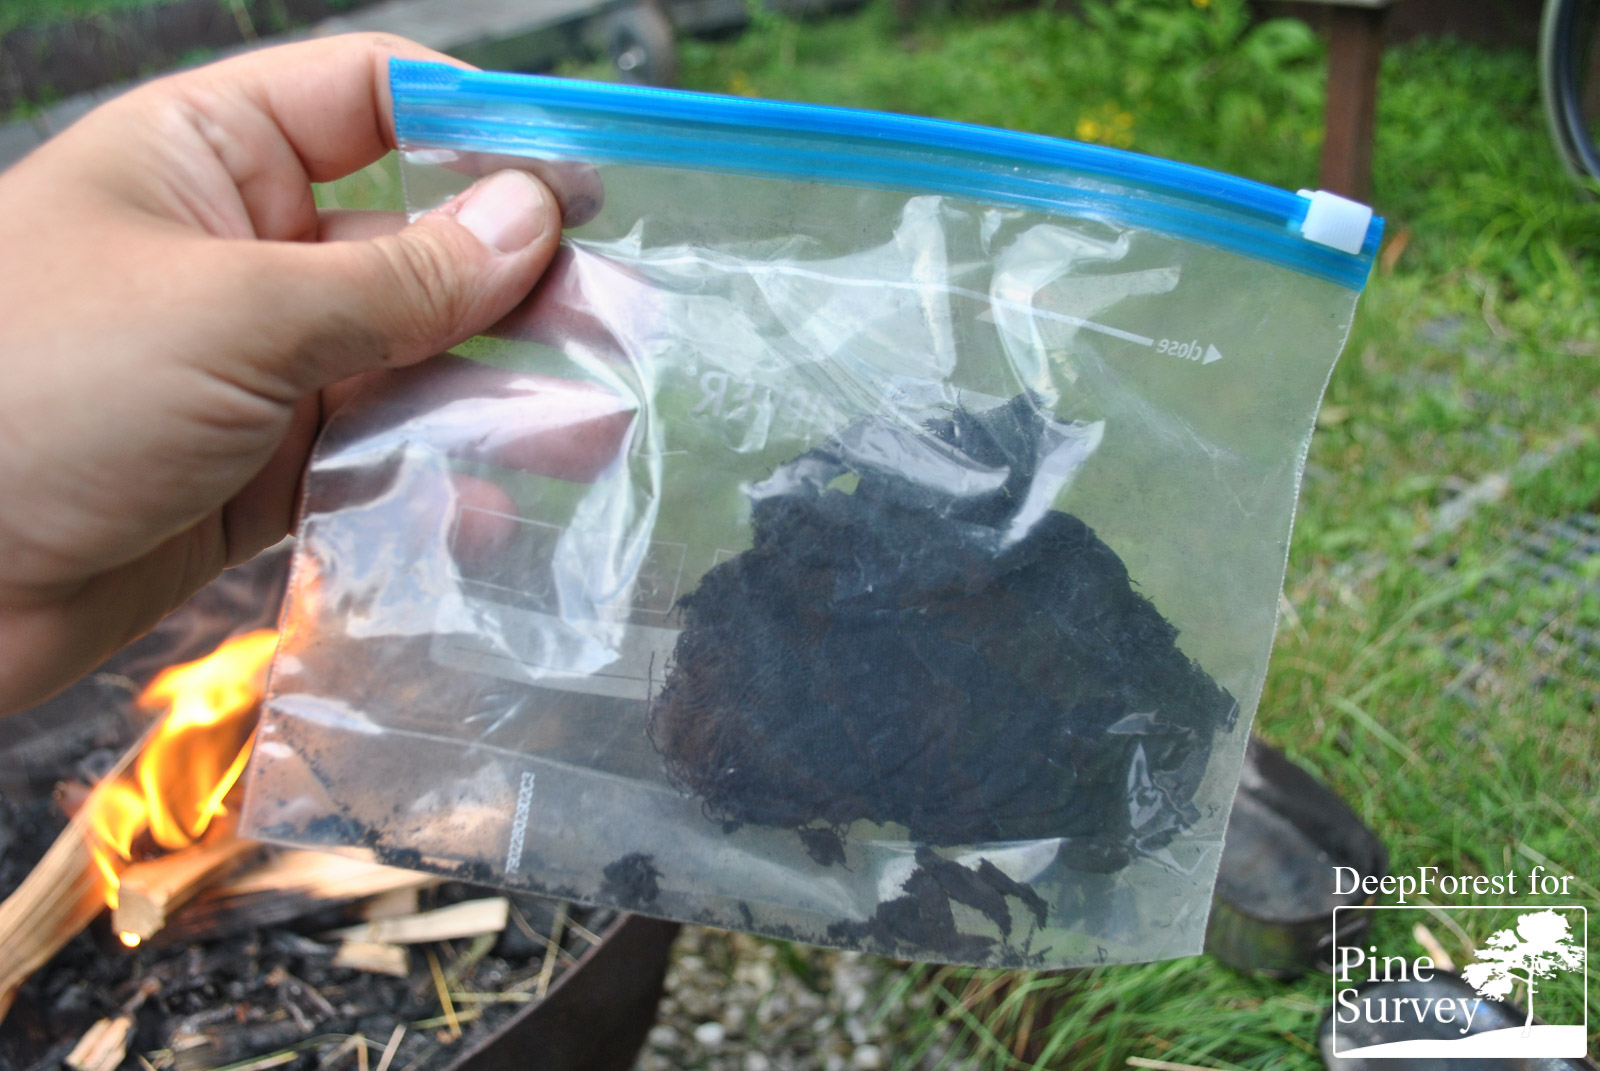
With my method, it took a few hits to get a spark on the fabric – and it produced a hot spot at once. And it was no problem to develop it further. Also with the following attempts, my success rates were nearly as good as with the fire steel- this shows how good this cinder material really is. It can be quite hard to ignite cinder material with metal and stone – but with the cotton coal, your chances of success seem to rise exponentially (at least it felt like that for me). - Thirdly, trying out a “wet” piece. And as soon as the fabric gets wet, your troubles begin. Squeezing the water out doesn’t work – all what is left then is a black wet mass of small particles, no use at all. The only chance is to lay the wet pieces out in the sun to dry out. But you have to be very careful – when wet, the charred cotton shows how fragile it really is. It takes much effort to keep it in one piece – and things like a wind gust can foil all the efforts. Needless to say that in a wet state, you can try to ignite it as long as you want, even a good fire steel and its hot sparks have no power here. And also the dried pieces seem not as good as before. Water seems to be really the “Achilles heel” of this type of cinder, thus I recommend to keep it dry at all cost. For this purpose, I have two small plastic bags in my survival kit that I use as soon as I have produced this kind of cinder with the first fire. Cotton coal and two small plastic bags make your life in cold and wet conditions a lot easier, trust me.
While trying out my cotton coal during the test, another thing to keep in mind became obvious: It is easy to catch even small sparks with the cotton coal, but when you compare the hot spots on the coal with other types of tinder, it becomes obvious that the blaze you can produce with it is not a very hot one. Compared with the blaze produced by metal wool or birch oak, the emitted heat is much less. The result is that with cotton coal alone, you will not be able to ignite small branches – you will need something in between. In other words: the cotton coal is a fantastic spark catcher, but you need other types of cinder material to be able to develop a fire. Some very dry leaves or very dry, small flakes of wood should do the trick. But still: A problem you have not when you are equipped with for example metal or cotton wool.
What to do without a metal box?
At first glance, the cotton coal seems to have yet another disadvantage: You need the right materials to produce it properly. As I already mentioned, the main disadvantage is that if you want to produce this type of spark catcher and cinder, you need a fire. Pieces of cotton fabric are usually not that hard to find – pieces of most of common clothing do the trick, as already mentioned. These two components are mandatory – without it, no cotton coal (I think that’s understandable).
But my “main method” as described above includes also a small metal box used as fireproof container for the charcoaling process. This is one of the reasons why I keep my survival kit in a small metal can. But most of the survival kits for purchase and from colleagues are not packed like this. This raises one question: What to do if no metal can or box is available?
One solution for this problem is to find a metal can. When you are near a rural or even urban area, finding an old soda can or another improvised metal container will (unfortunately) not be very difficult.
Another is the, as I call it, “stick method”. All you need for this is a wooden stick. It sounds easy: just put a piece of clothing on a wooden stick and use it to “grill” the cotton piece over a fire until it is the cotton coal you need.
To be honest: When I first read about this method, I was very sceptical about it. Producing coal is a century-old technology that works in certain ways. The “stick method” should work in a completely different way – sounded VERY strange to me. But I gave it a try, just to know if I would have this alternative at hand if I lose my metal box. The result: yes, it works, but it takes a lot more time, you cannot produce as much material simultaneously as in a metal box, and you have to be very careful not to burn the piece or destroy it after the process (as the fabric gets very fragile when charred). Also, from my point of view, the cotton coal produced this way was not as “good” as the one from the metal can as it seemed to be not charred throughout. To sum it up: It works, but I see it as an “if all else fails”-method.
Alternatives to Metal boxes
But this question kept me thinking – what alternatives do I have without a metal box? Because when you learn one thing in the outdoors, then it is “Shit happens.” In other words: You cannot rely on and be sure about anything. The only things that keep you up and running are your knowledge, your skills and your understanding. And “knowledge” sometimes needs a “look back”, to take a closer look on older, “low-tech” solutions, especially when it comes to “outdoor living”.
Also here, this approach proved useful. There was an old method for producing wood charcoal: You stack up a pile of pieces of wood, cover it with loam, and burn a fire over it. After the process, the wood under the burnt clay charred and turned to charcoal. An interesting method, that can also be applied for our cotton coal. At my “training grounds”, I’m lucky enough to have loam soil at my disposal– when you dig through about 5 to 10 cm of humus soil, you get to a layer of dry and fine loam soil. Very useful, for many things. Also for making cotton coal.
First, I dug out some loam soil and rubbed it in my hands to produce fine grains. Combined with water, this loam turns into sticky, but easy-to-form clay. Then, I took some of the clay, put some cotton fabric on it, and formed a clay ball, with the fabric in its centre.
IMPORTANT: Take care that the fabric is completely covered by the clay hull – if even some small parts of the cotton stick out, you’ll burn it in the fire, and the result will be useless.
Then, put the clay balls into the fire. They should be right in the centre of the blaze; it needs quite a heat to “bake” the cotton within the clay properly. Don’t be too anxious – if you did the clay balls correctly and the cotton is covered completely, even a very hot fire will not burn it. Keep it there for at least 20 to 30 minutes.
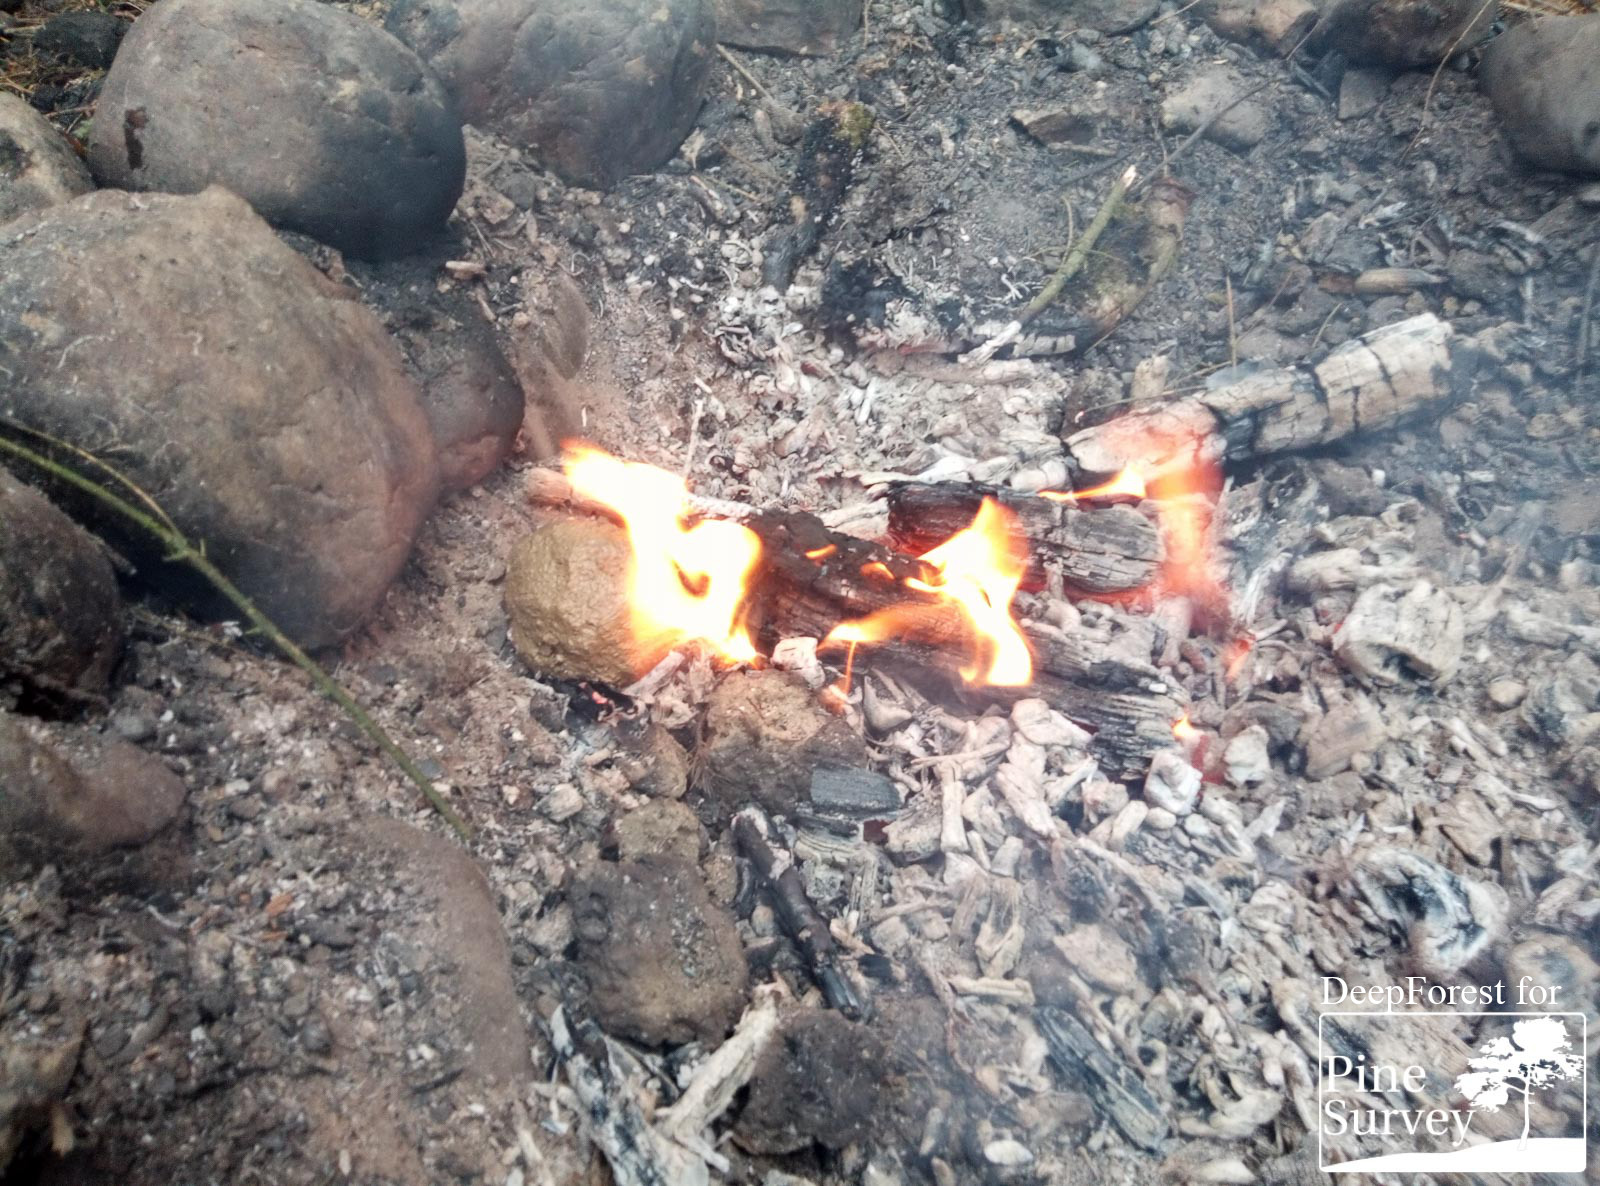
The clay ball with the cloth in the fire
Afterwards, get the clay balls out of the fire, let them cool down a bit (or cool them with some water, if you have enough of it) and break the burnt clay. You will see that the clay layer around the cotton became quite hard.
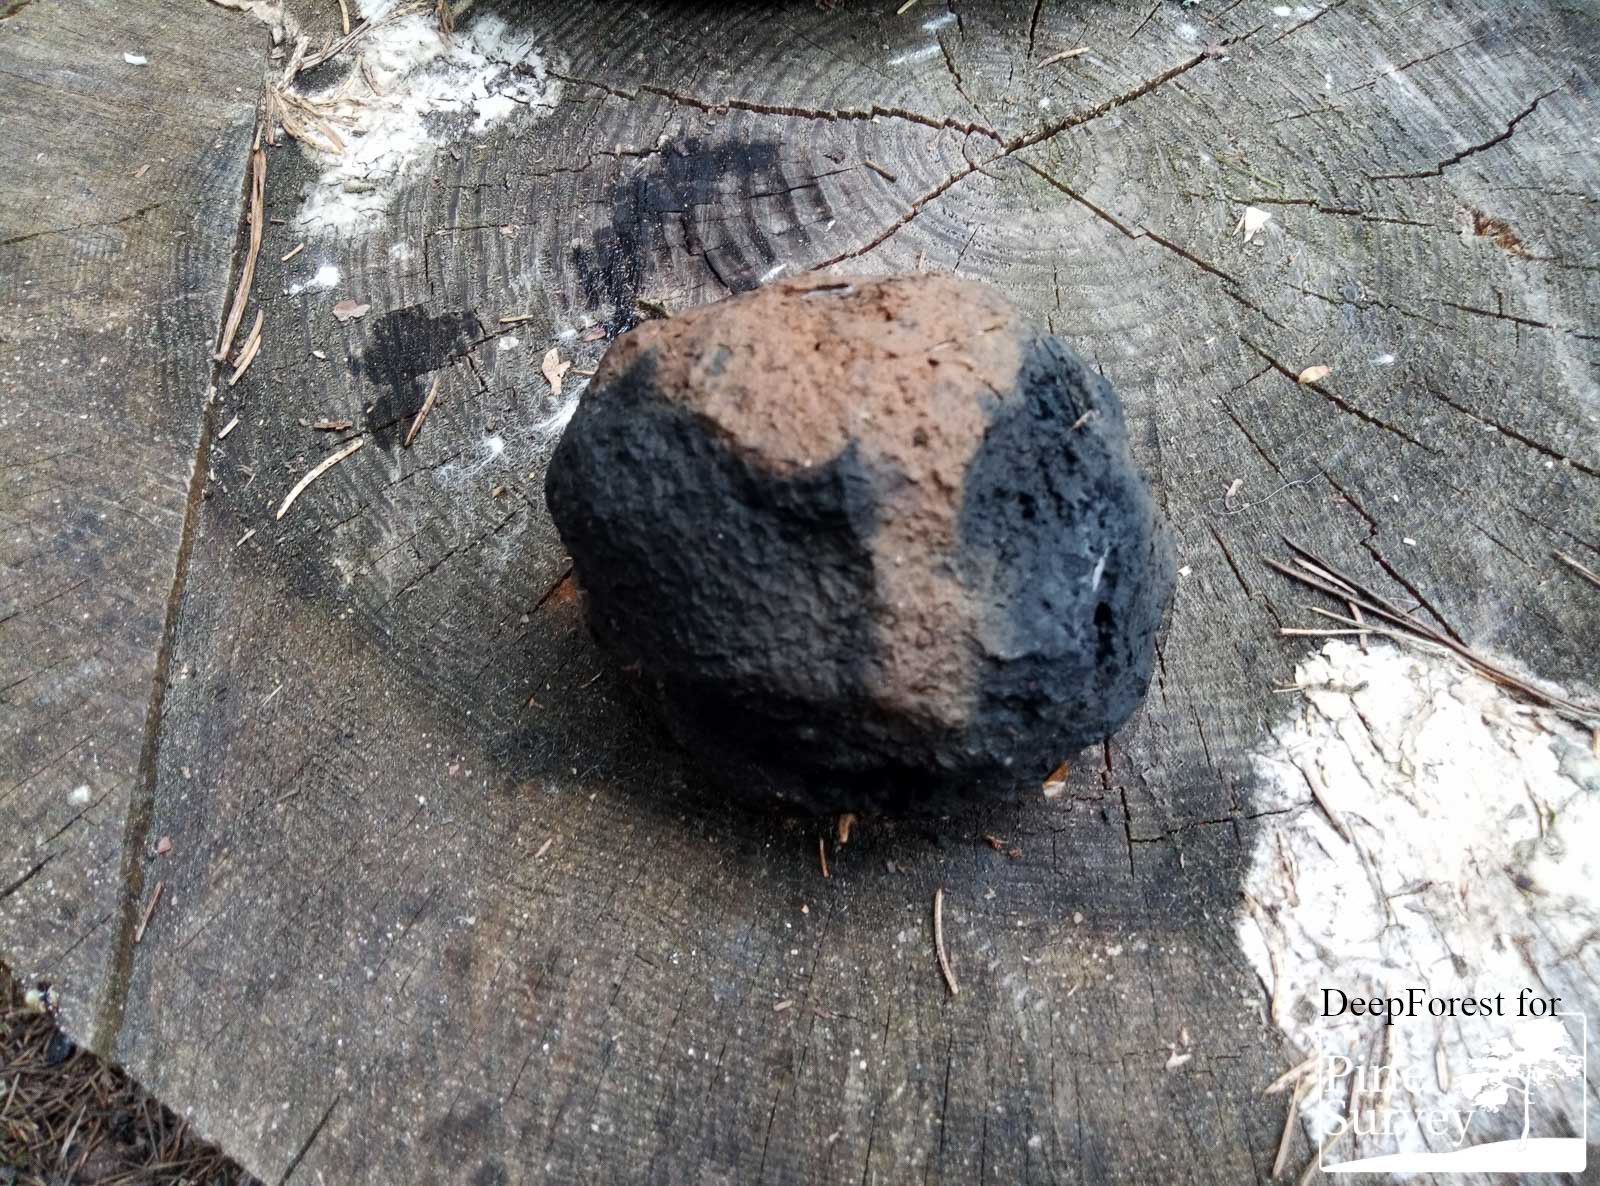
The burnt clay ball
Inside, you’ll find the charred cotton. Even as sometimes not all of the cotton is baked completely, this method worked pretty well during several attempts. It is a little more effort as using a metal can, but it is not as time-consuming and difficult to maintain as the “stick method”. The best solution, no question, is the method with the metal can – it is much easier, and you can use the can as often as you want. But also the method using clay works fine – therefore, good to know.
The results of the clay method
Conclusion
I understood quite fast why cotton coal was presented to me as the best spark catcher available. I have to say, it works very well, and it really helps when you know that you have to light some fires in the next time, as for example on a several-day hike. When you are asking yourself the question if it is worth sacrificing a small part of your T-shirt or your jeans in such a situation – do it, it is.
There are disadvantages, as we said – it gets useless when wet, you first need a fire to produce it, and you usually need additional cinder material to start a fire with it. But, with cotton coal you have a material that can catch the smallest spark and can develop a hot spot – a material that cannot be found everywhere and even if it can be found, it would take time and effort. This material, if you can produce it, means that from that point on you have a pretty reliable fire starter at hand – an advantage not to be underestimated. Therefore, I clearly recommend to learn how to produce and to use it.
No Comment
You can post first response comment.