
Phantomleaf Wasp II – Z4
Introduction
Urban camouflage is an underrepresented topic outside of military circles. And while there are many patterns out there, commercially available and/or developed by government research centers for the military, not that many of them have been fielded.
I have written about PenCott Metropolis in the past, also covering several considerations on urban camouflage in the process. What is important to take away from these observations are the issues urban camouflage has to deal with: diverse and fast changing environments, the question of solid colour versus camouflage, as well as low light versus “normal” approaches.
Taking pictures in urban environments creates several issues. Property rights, access to adequate testing grounds, being able to take pictures, without getting a fine etc. Luckily I found an ideal testing site recently, owned by an open minded and interested person. As a result I am finally able to touch on urban camouflage once more.
Phantomleaf Wasp II – Z4
The German company Phantomleaf introduced its WASP II family of patterns in 2019, offering several colorations. While I have already portrayed the Z3A and Z2 variant, I did not plan on looking at Z4, because of the above mentioned issues with urban locations. Since that changed, I decided to take a run at it to give you guys a decent impression about its effectiveness.
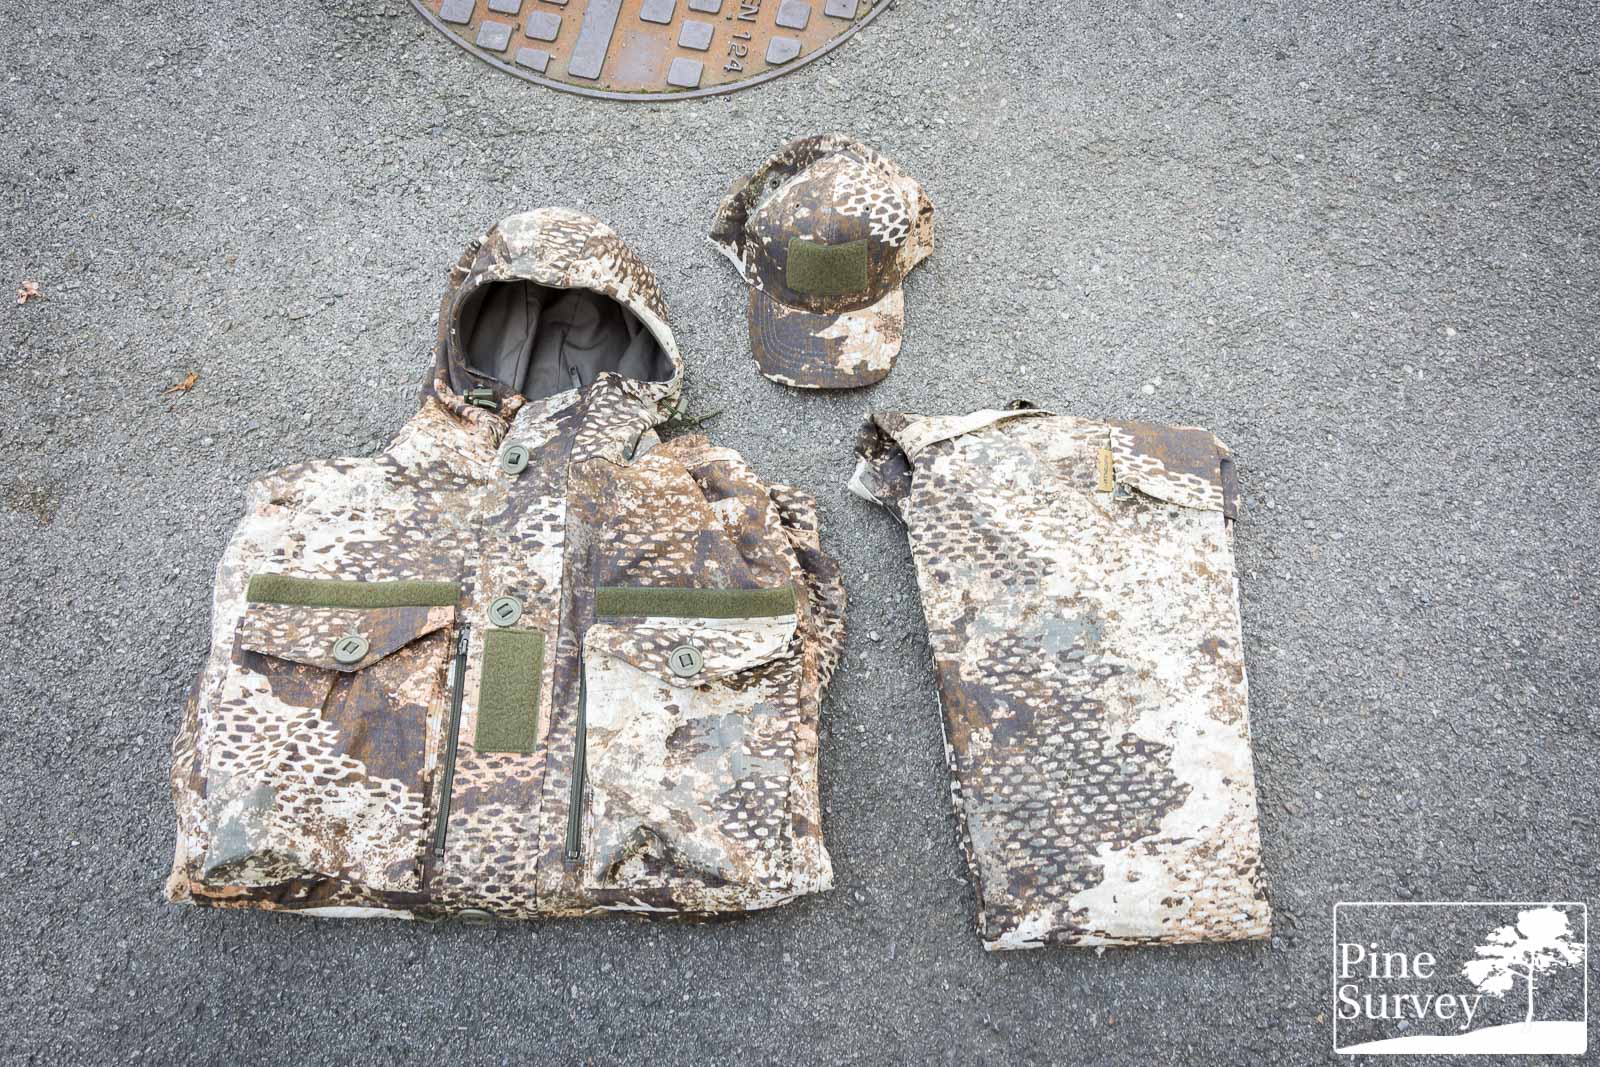
Phantomleaf WASP II Z4 was created for man made structures. The colours feature bright contrasts, ranging from ivory whites to rust red or anthracite/browns. Making use of the same pattern elements as Z2 and Z3A, you will find micro, midi and macro elements, which not only provide concealment at close range, but also a meaningful visual disruption at long range.
Phantomleaf WASP II Z4
Looking at WASP II Z4 you immediately see its potential for industrial areas, featuring concrete, white crumbled paint and rusty steel elements. And while the bright ivory white might irritate at first glance one has to be reminded, that in dirty and dusty urban environments these colours quickly darken. To guarantee the silhouette breaking contrast, this has to be considered and taken into account.
Because of its colours, WASP II Z4 also works for rocky/mountainous environments. So even though there is a variant planned for rock desert and alpine regions (Z1B), several users have already put Z4 to test and made fascinating pictures with it in rocky environments. Reason enough for me to touch that topic as well in this field test.
With that being said, let’s go over the usual methodic caveats, before looking at the actual field test.
Methodic Remarks
As always I want to point out several important aspects beforehand. First of all, I do not claim any scientific standard with my camouflage comparisons. Also, I conduct them with my best knowledge and the available resources.
The pictures are usually taken at the same locations I always use to make my camouflage comparisons. That way you can compare the various field tests I have done so far with each other.
Before I start, please consider the following – as always:
I did not edit the pictures in any special way, except the following:
- Lens correction
- Watermark
- Blurred my face out if necessary
- .jpeg compression to make it web compliant
- I always do a proper white balance to make colours appear the way they are.
A short explanation to the environment and the procedure:
The pattern was tested in a Central European urban environment (urban environments differ from country to country, region or continent). Information about the various locations will be stated in the subsections. The pictures portray three different positions:
- Standing in the open (to get an idea of the pattern in this particular surroundings and if the colours match it)
- Kneeling
- The prone position (to mimic basic, up to ideal concealment without using enhancements)
As always I photographed the pattern with a wide angle lens at first and then with 35mm focal length, which mimics the actual picture the human eye would perceive at this distance. Having in mind the three different positions mentioned before, I usually end up with 6 pictures of each location.
Furthermore:
Given the amount of pictures in my field tests, I will continue with my modus operandi from previous camo reviews and not describe or comment on each picture. Instead I will give a more thorough analysis at the end of each location subsection.
With that being said, let’s take a closer look at the pictures themselves.
PHANTOMLEAF Wasp II Z4
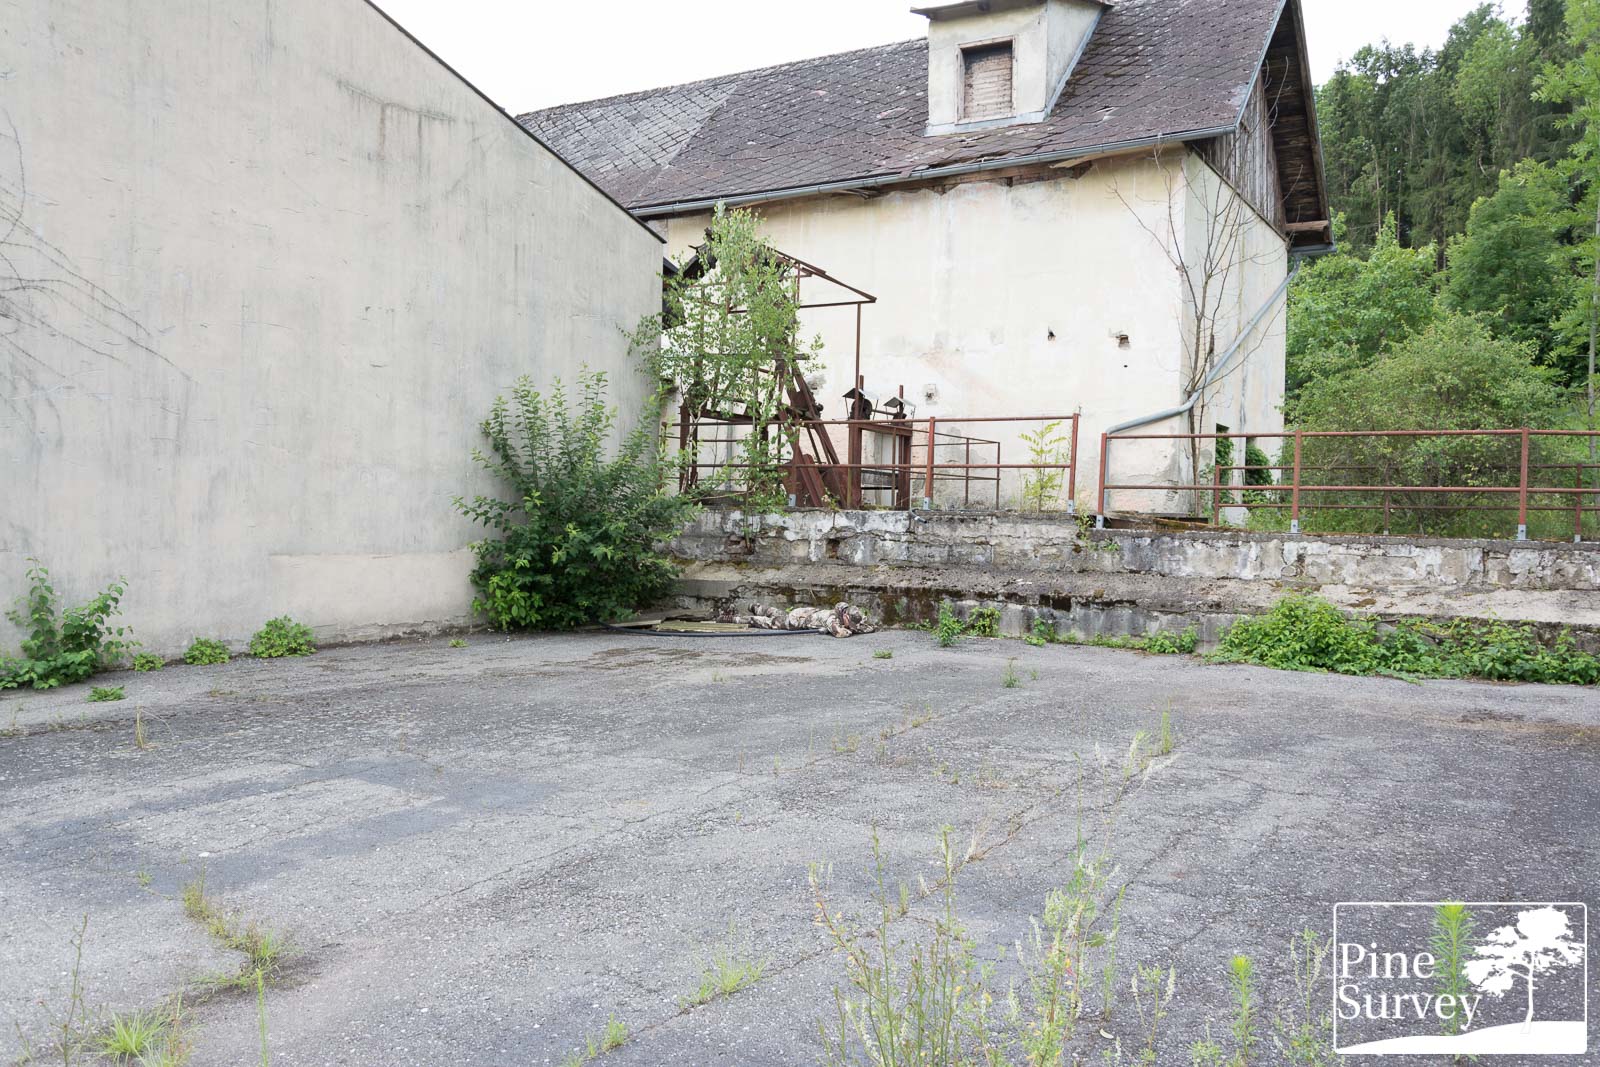
Location 1
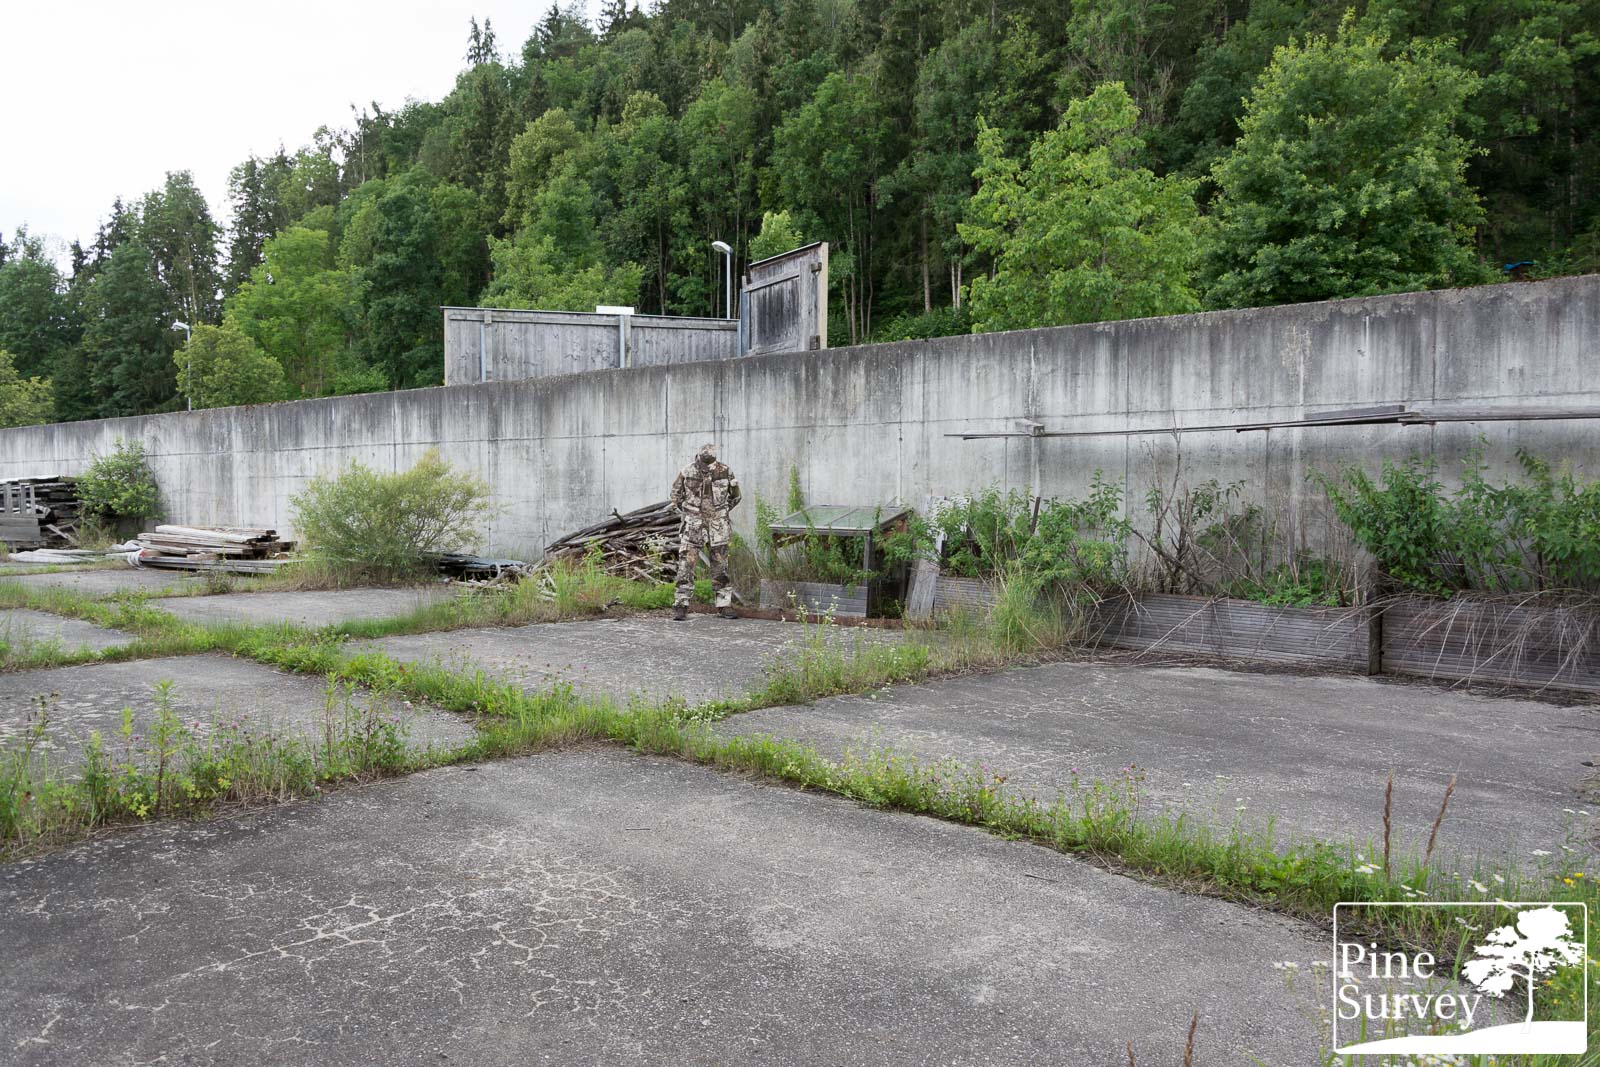
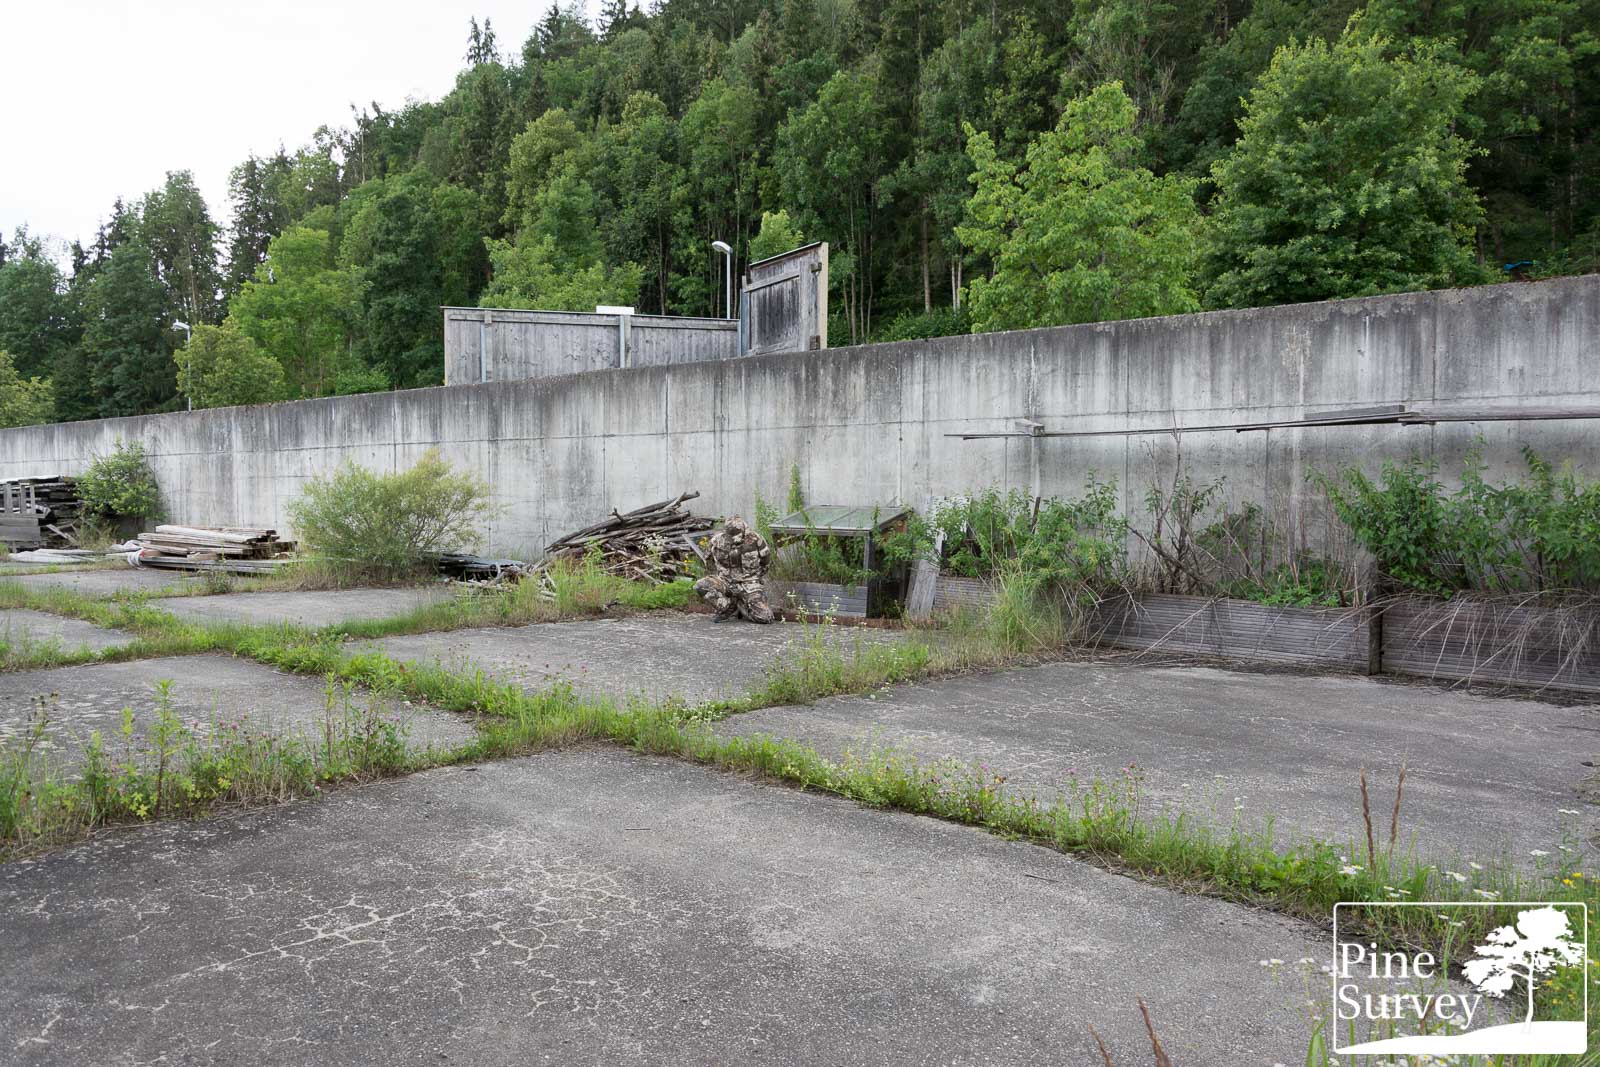
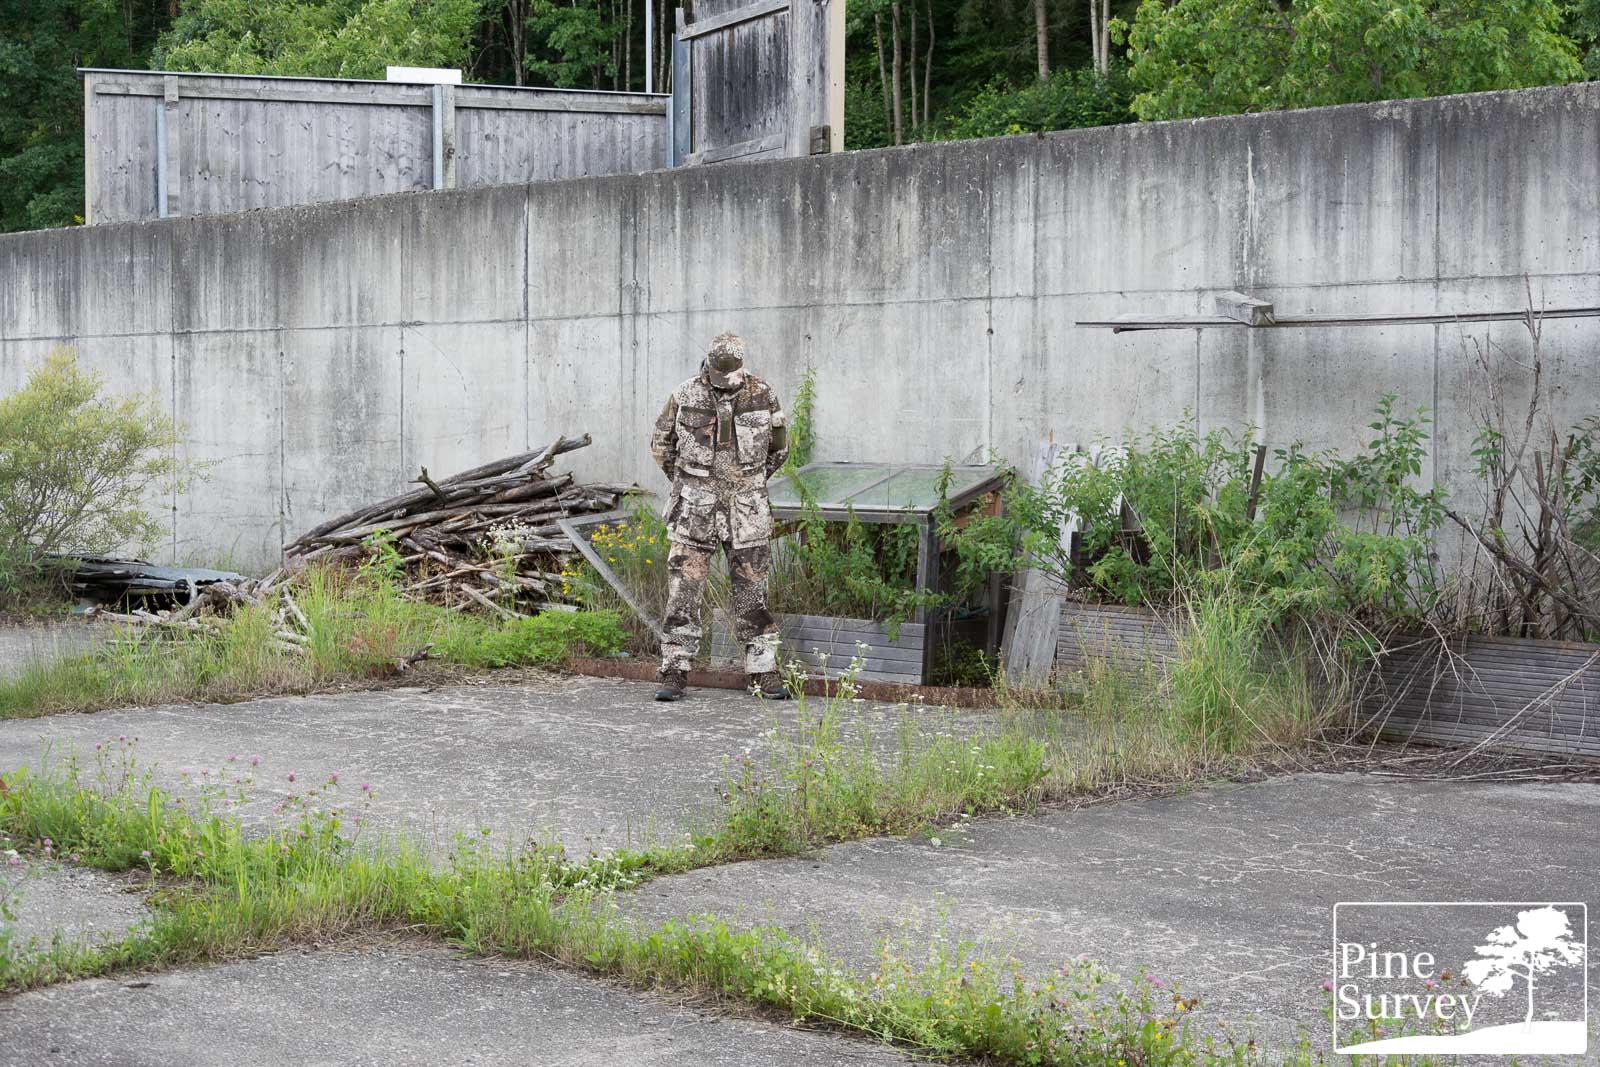
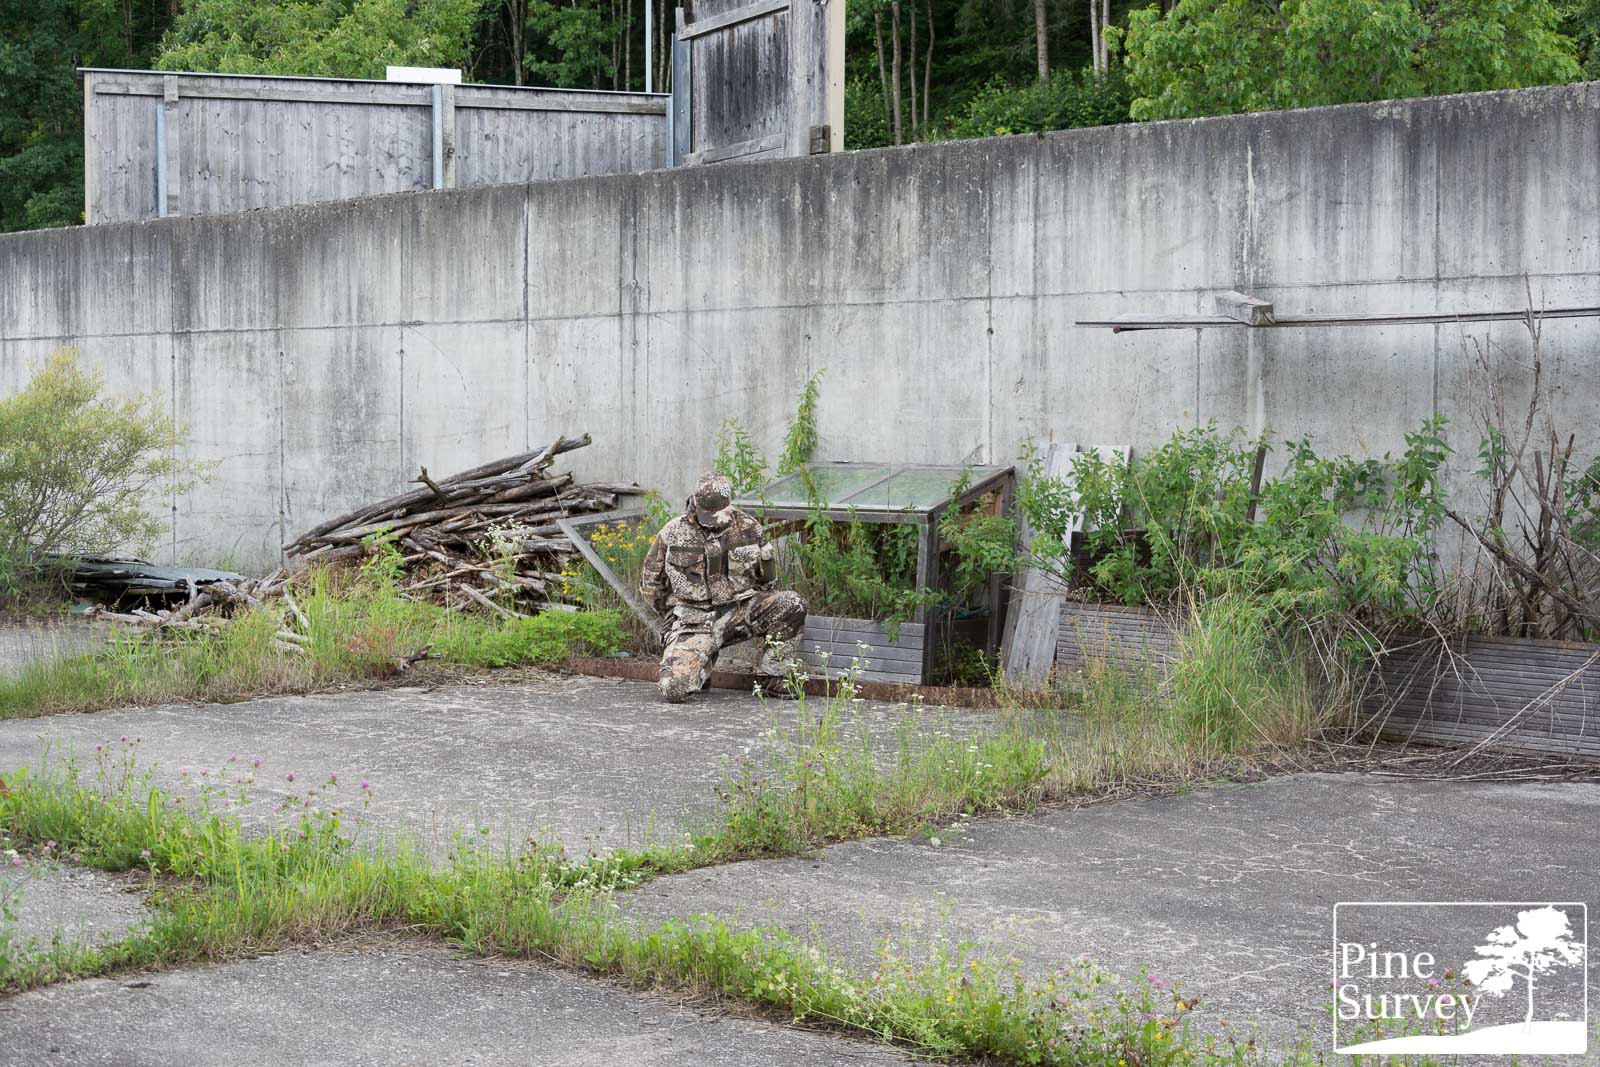
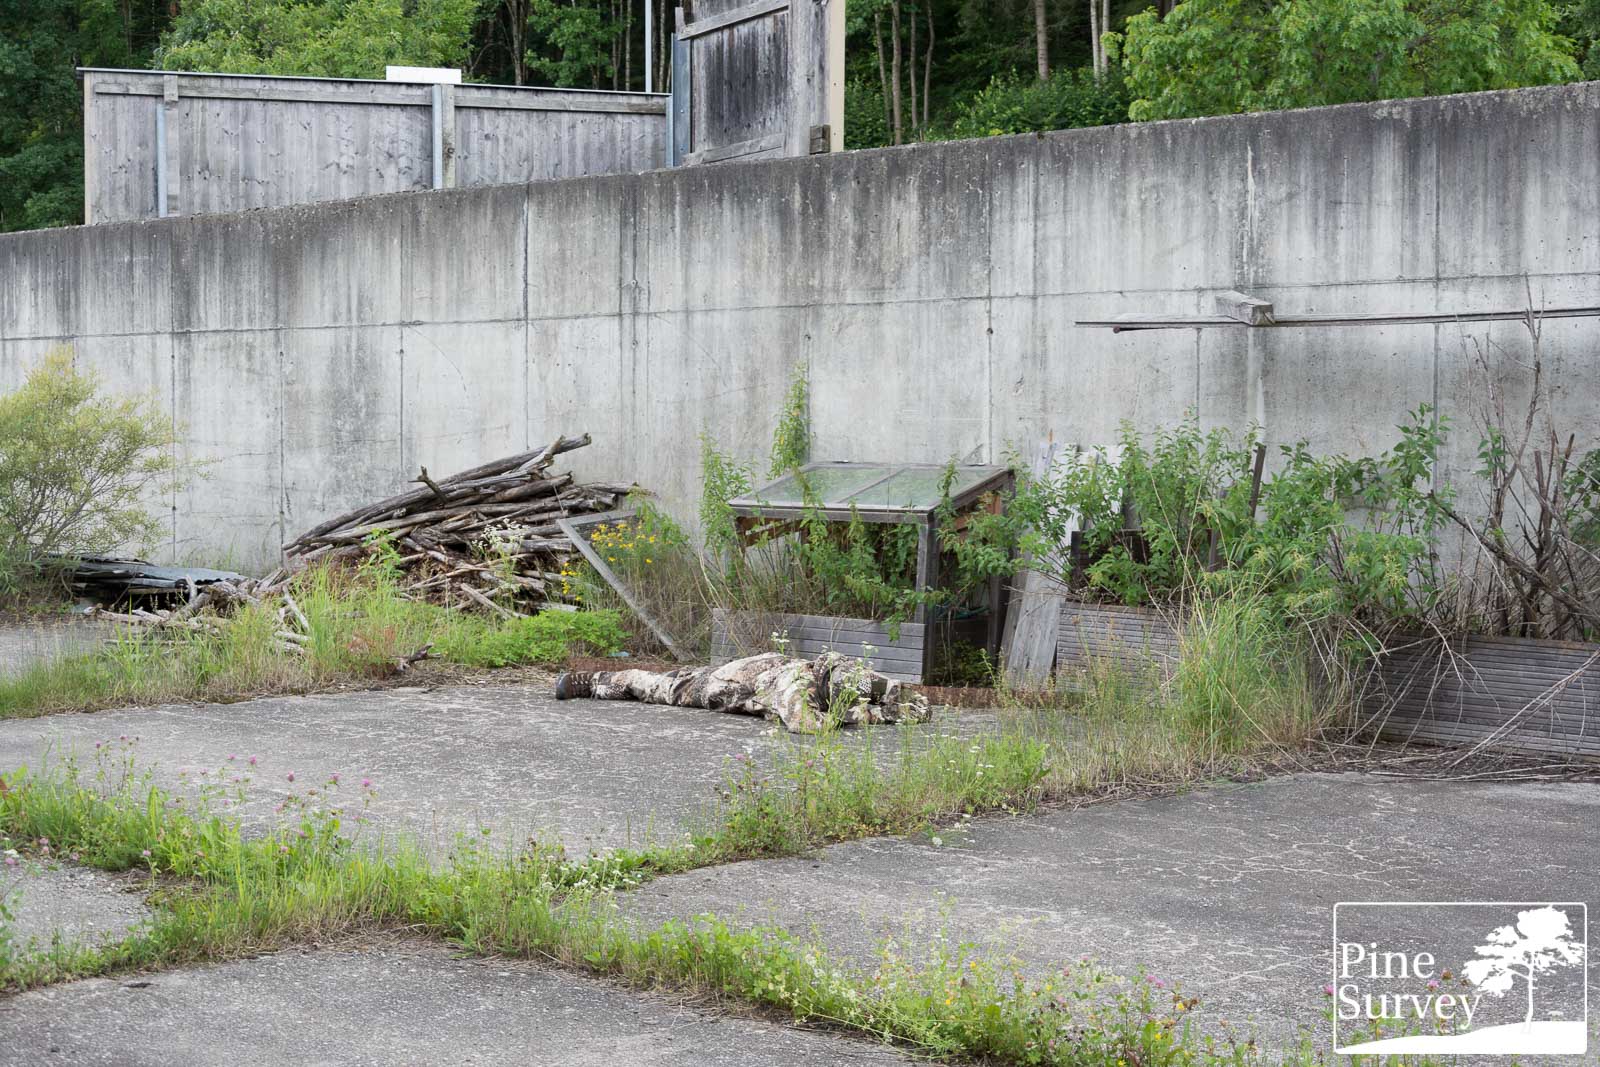
Location 1 is an abandoned sawmill which is partly overgrown with vegetation. You can find everything from tarmac areas, to concrete walls, stone walls or white painted walls. That plus the occasional rusted iron debris.
As a result, a very diverse urban environment is at display here. The distance to the camera is roughly 10m. The weather was cloudy with soft light – so shadows are no issue at this point.

Phantomleaf WASP II Z4 – wide angle – standing

Phantomleaf WASP II Z4 – wide angle – kneeling
Phantomleaf WASP II Z4 – wide angle – prone

Phantomleaf WASP II Z4 – 35mm focal length – standing

Phantomleaf WASP II Z4 – 35mm focal length – kneeling

Phantomleaf WASP II Z4 – 35mm focal length – prone
Observations – Location 1
As always I am starting with the standing position, using the picture made with the wide angle lens.
Just like in previous tests of the Phantomleaf WASP II pattern, the Z4 variant displays the same distinctive micro, midi and macro elements. Adding to that is the wide variety of matching colours, which can be found in an urban and/or industrial environment. Having that in mind, it comes to no surprise that the pattern effectively disrupts the human silhouette (using the midi and macro elements), while at the same time blending into the background, which is the disintegrating wall. Usually, the standing position is the biggest give away. In this case however, a very effective concealment is being provided.
Going into a kneeling position improves the effect even more so (as always), since the human silhouette is minimized and the disruption and blending of the pattern (in this case WASP II Z4) can begin to work properly.
The effectiveness of the makro elements is best shown in the prone position. Torso and legs are radically broken apart, while the colours do an effective job by blending into the close environment.
Speaking of the colours. When looking at the pictures of the 35mm focal length, you can clearly see what excellent choice of colours can be found in WASP II Z4. The ivory white blends in perfectly with old paint, while the various greys resemble the stones and the concrete. The various pinkish/reddish elements are an excellent match for rusting steel, but also decaying vegetation, which can be found in cracks.
Having that in mind and looking again at the standing position, you can clearly see how the edges of the silhouette seamlessly blend into the wall. Especially the net like midi elements further provide an excellent blending effect.
The same can be said, when kneeling down. Just like with the prone position, the above mentioned statements apply.
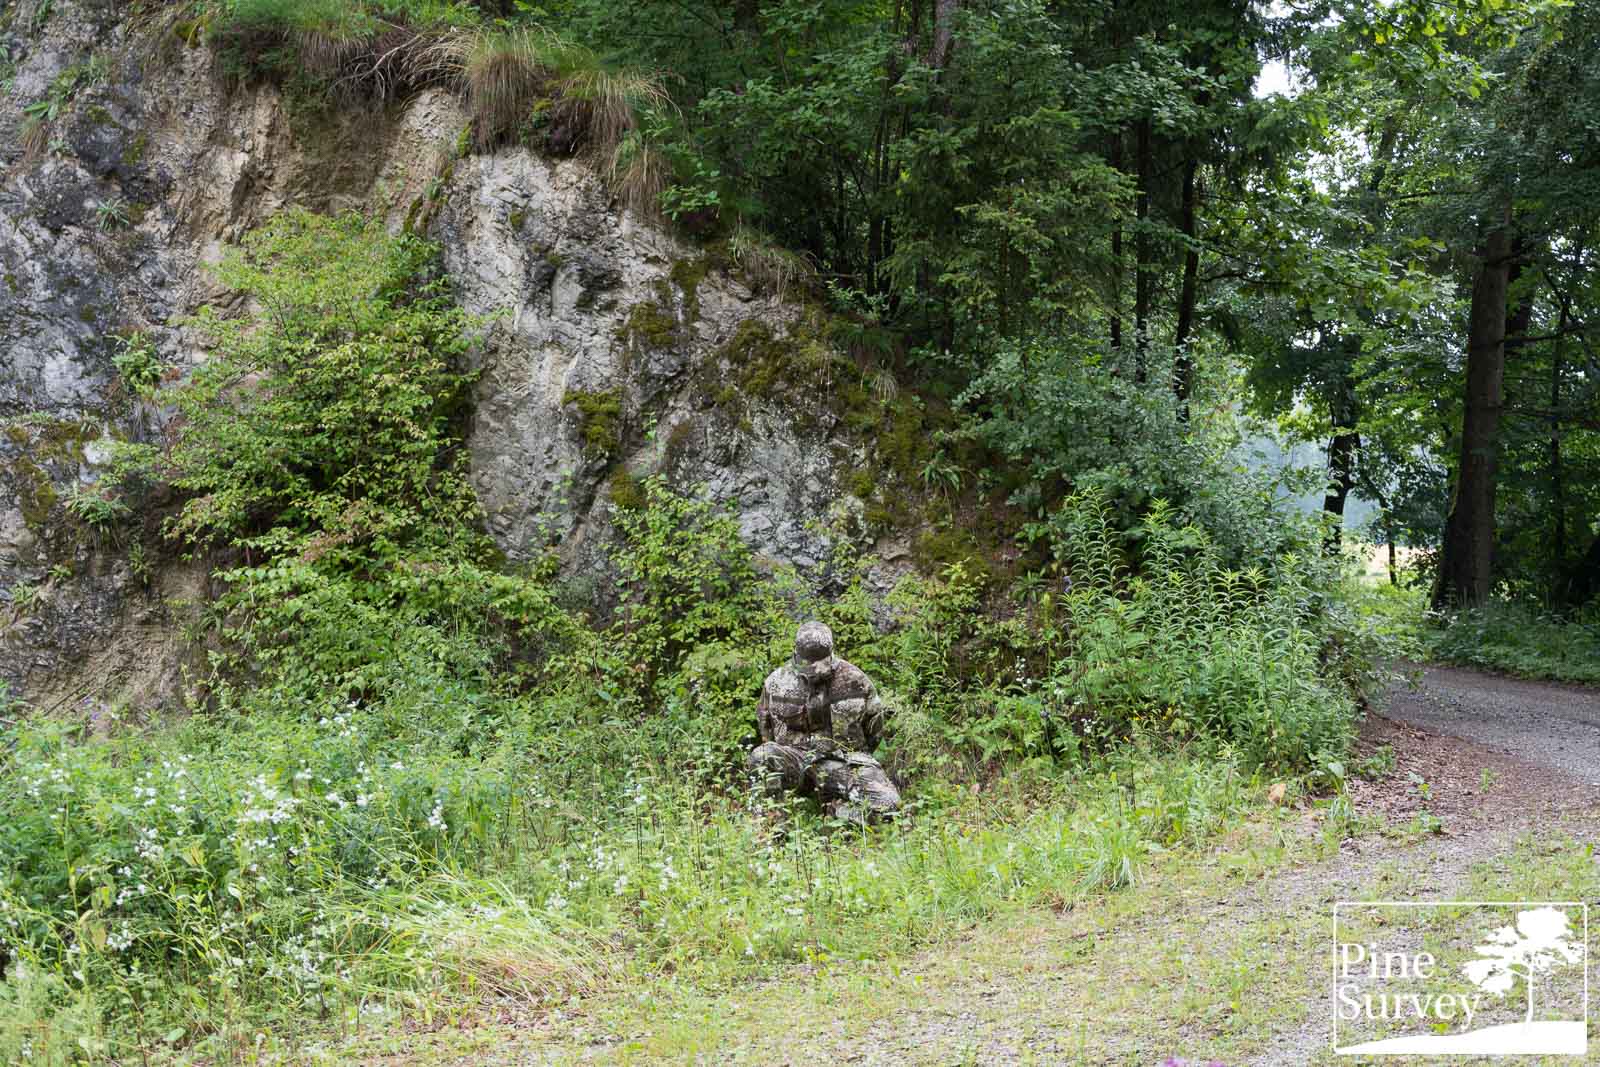
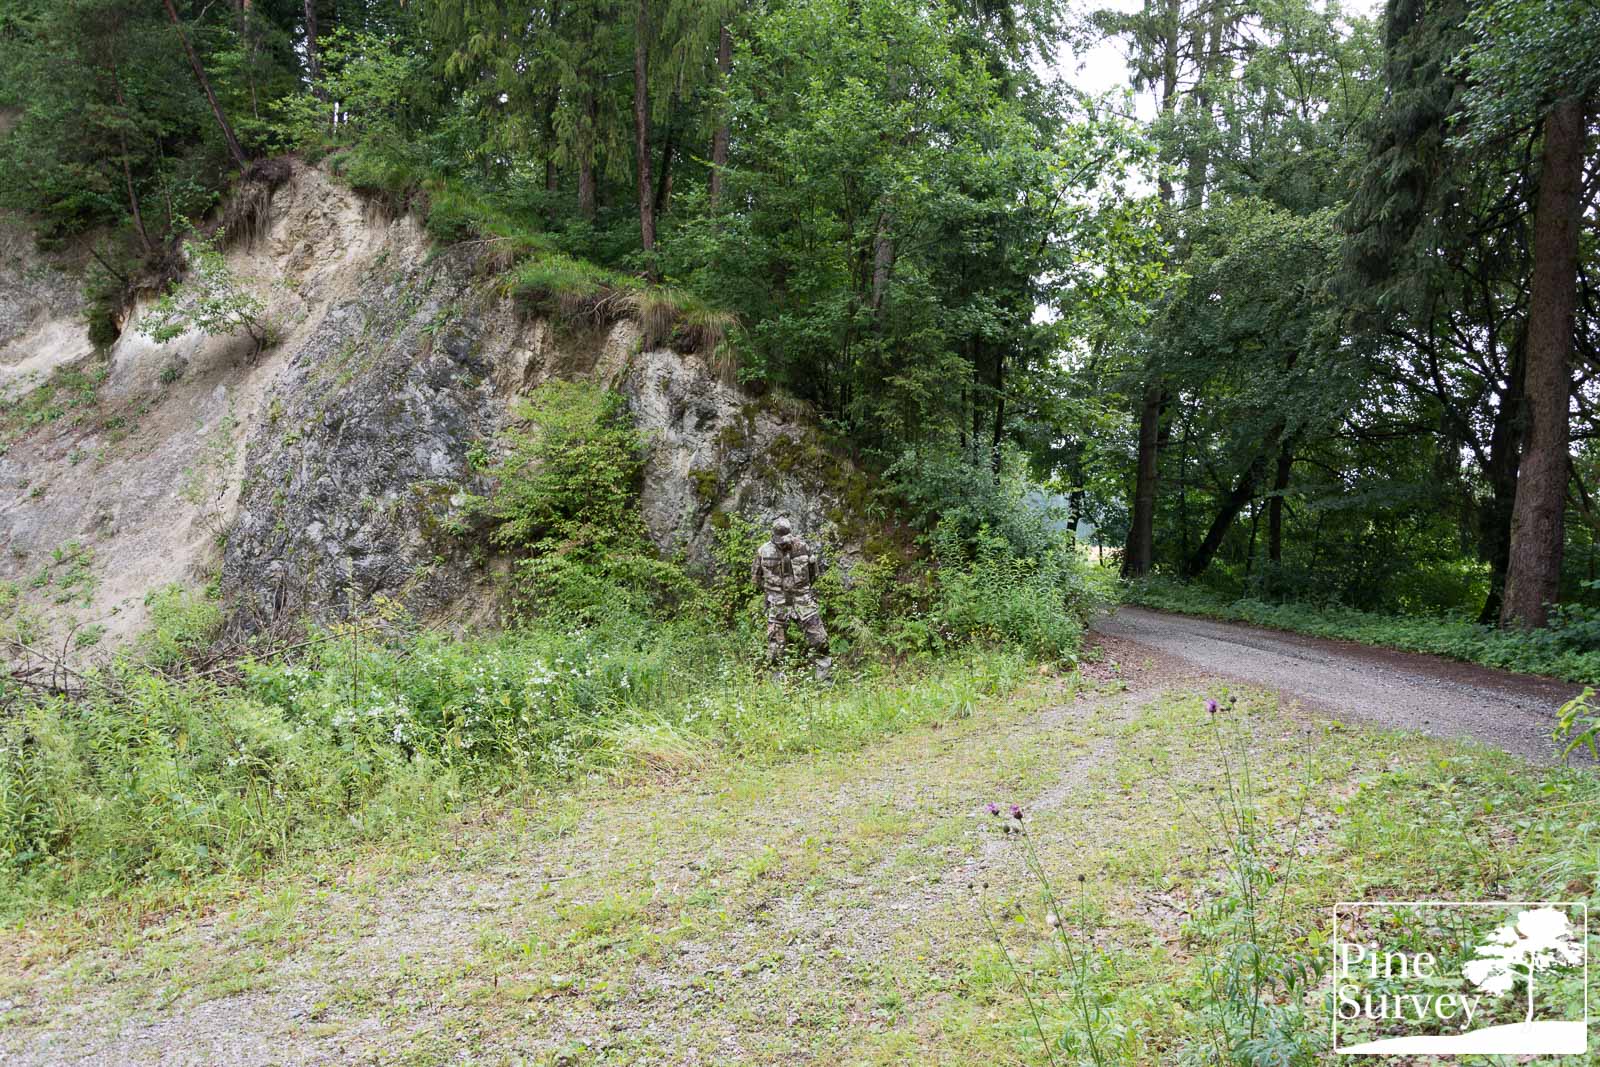
Location 2
This location is also at the abandoned lot, but at a spot where material was stored. The floor is of tarmac, while the wall is concrete. Again, nature has found its way back and together with the debris in the back, as well as remnants of boxes and the like, you will find a diverse setting. The distance here is between 5-10m and the weather conditions are the same, since I did the pictures on the same day: cloudy with soft light, no shadows.
Phantomleaf WASP II Z4 – wide angle – standing
Phantomleaf WASP II Z4 – wide angle – kneeling

Phantomleaf WASP II Z4 – wide angle – prone
Phantomleaf WASP II Z4 – 35mm focal length – standing
Phantomleaf WASP II Z4 – 35mm focal length – kneeling
Phantomleaf WASP II Z4 – 35mm focal length – prone
Observations – Location 2
This location perfectly demonstrates the issue of solid coloured environments in an urban setting. Already the last location could have been different, having the solid grey wall in mind.
In this case it is the dark grey/anthracite tarmac ground, as well as the grey concrete walls behind the scene. This problem is slightly reduced, because of the debris.
So again, starting with the wide angle picture and the standing position, you can see the matching colours of the pattern, as well as the disrupting effect. At this point the psychological aspect of Phantomleaf has to be mentioned once more. The choice of shapes makes it harder to pinpoint the silhouette, since the macro elements prevent the brain from detecting the usual indicators for a body shape. So even while the torso is partly in front of the solid coloured wall, it takes a critical second or more to identify what is what.
When kneeling down, it gets even harder, since the usual silhouette is gone and the midi and macro elements disrupt the rest of the shapes. All this, while the colours are again a wonderful match for the surroundings.
Last but not least, the prone position gives the impression of a pile of rotten sacks or stones. Already here you can see the reddish elements matching the surrounding and decaying vegetation, as well as the rusty metal on the floor.
A better look at these observations can be seen at the pictures using 35mm focal length. At this short distance, which has to be considered close quarters, the matching colours can be observed much better. All the macro, midi and midi elements are visible.
This blending effect, that was already mentioned, works in this location just as much, when kneeling down. The macro elements really work aggressively in breaking up the silhouette, which is even more apparent at this short distance.
The prone position has already been described – with no much further comments necessary.
Alpine and Rocky environment
Just a few words beforehand. Phantomleaf WASP II Z4 is not an alpine or mountain camouflage pattern. There is a different version (Z1B) specifically designed for it, however not yet released. Given the fact that the dominant colours of Z4 also match everything that has to do with stones (for apparent reasons) it can be used in these environments as well of course. Reason enough to test it out.

Quick pause…
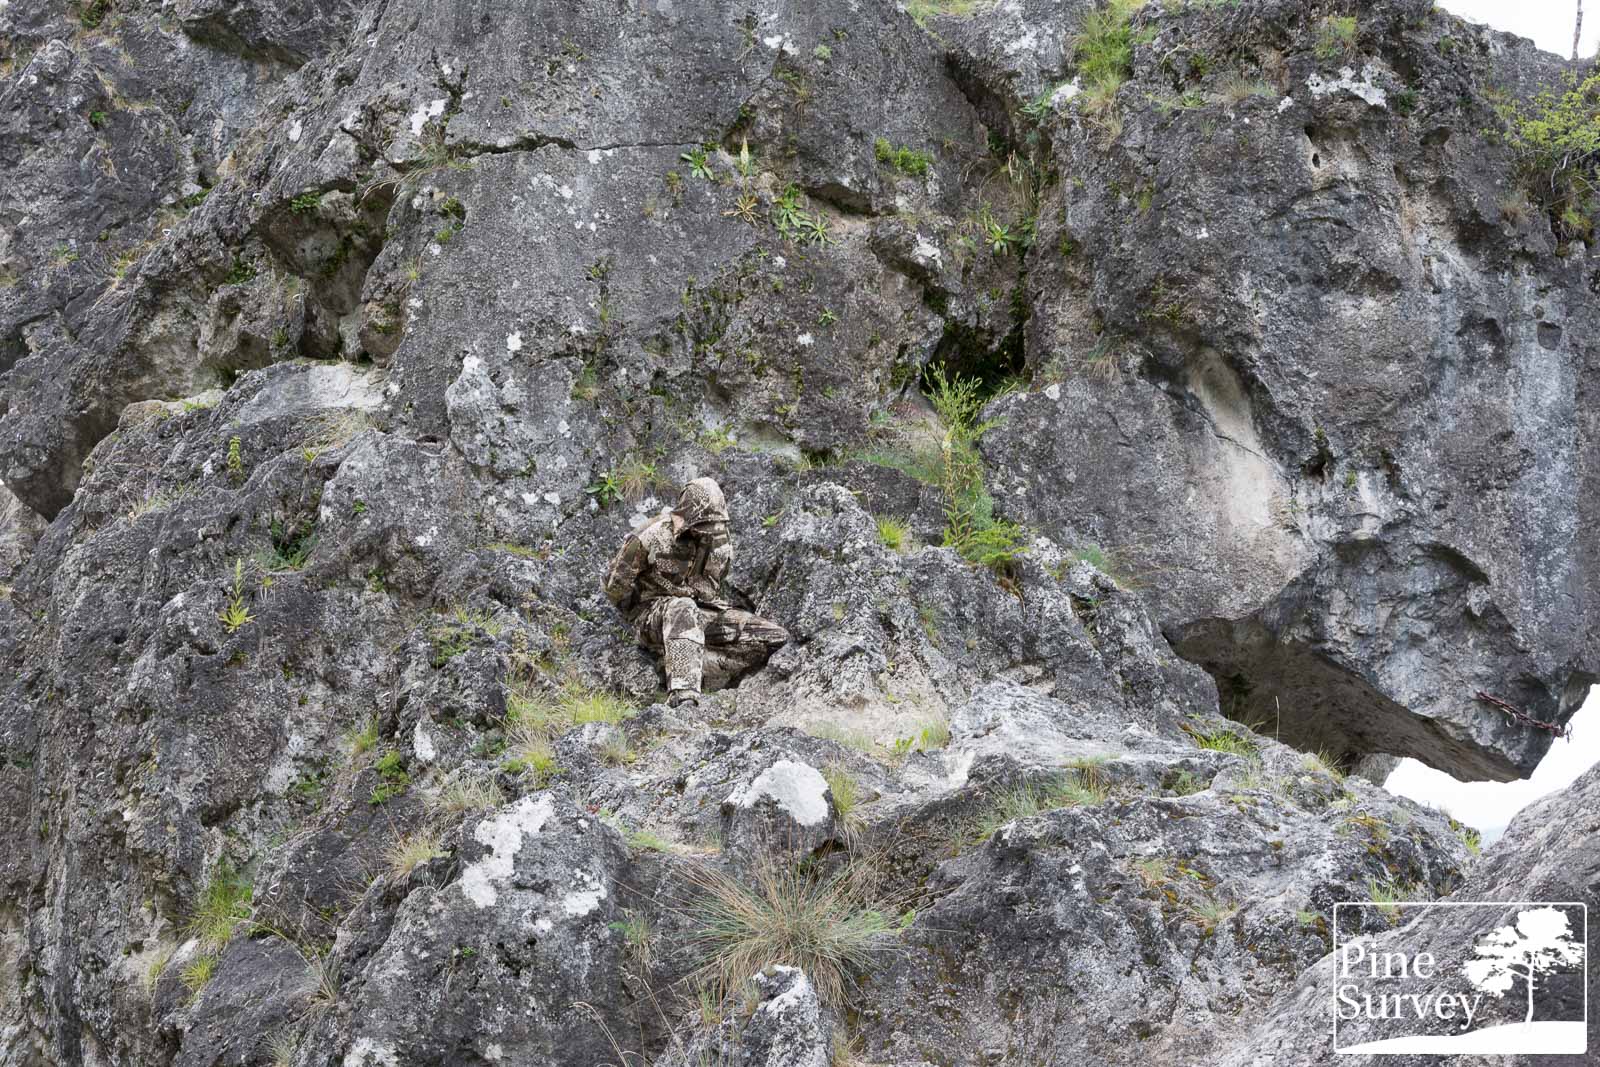
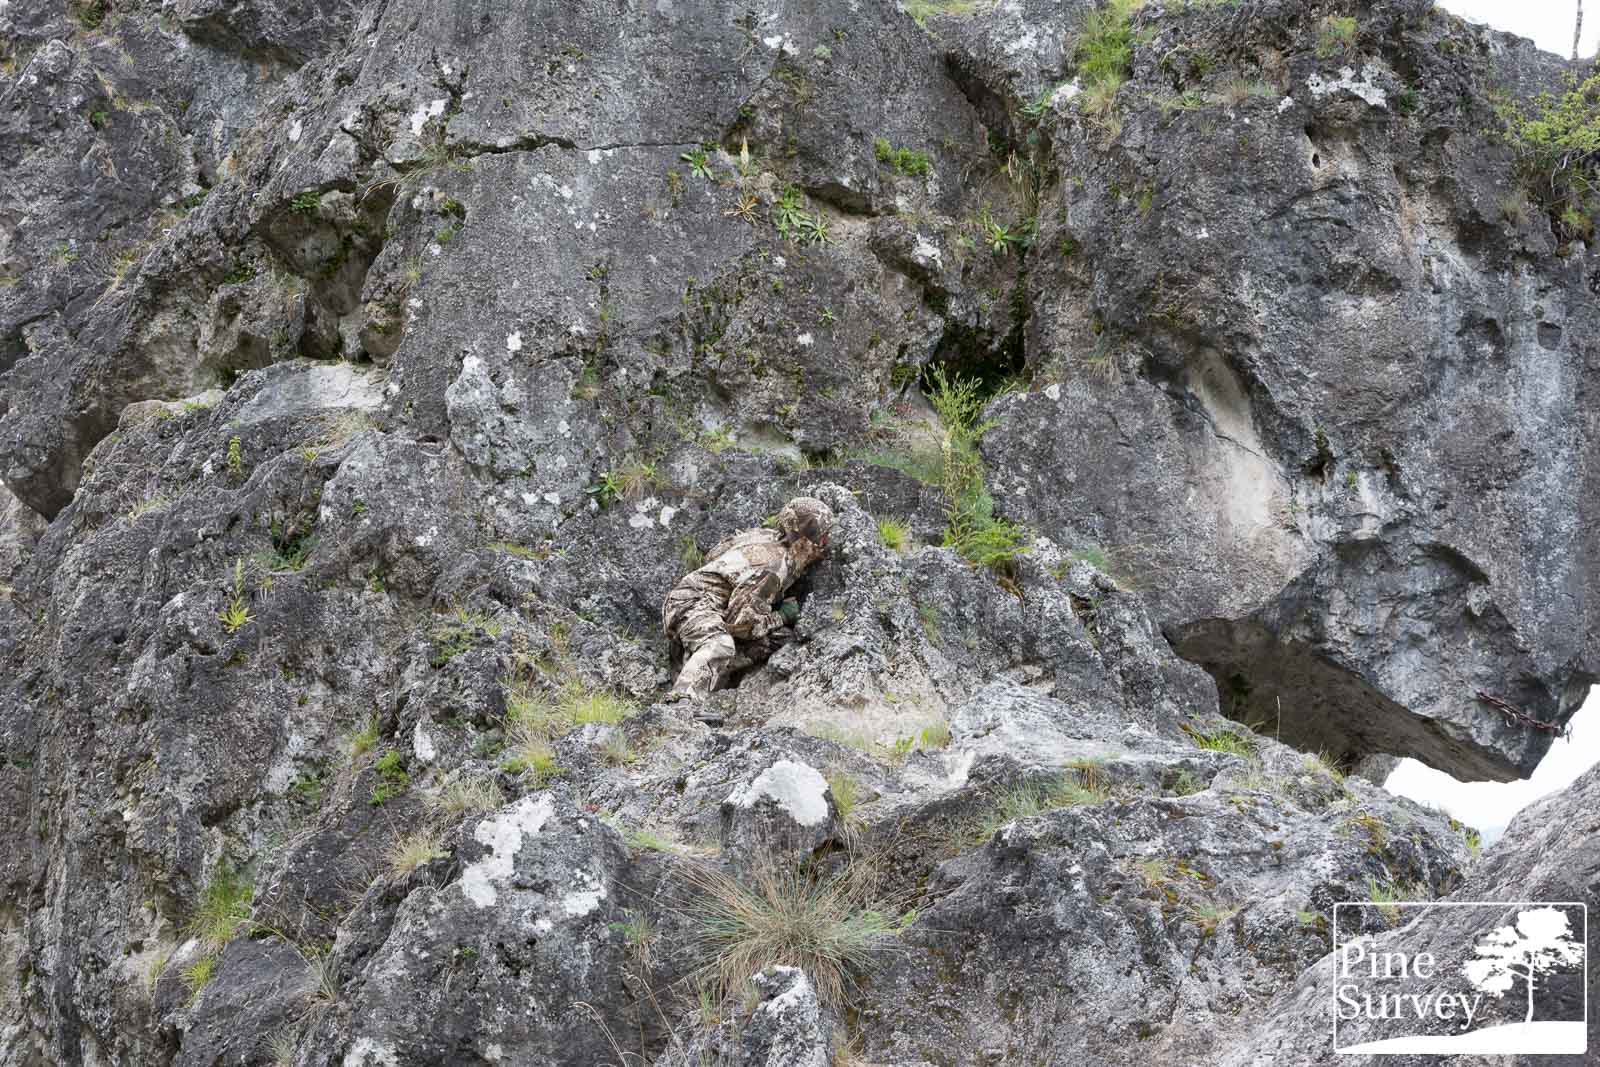
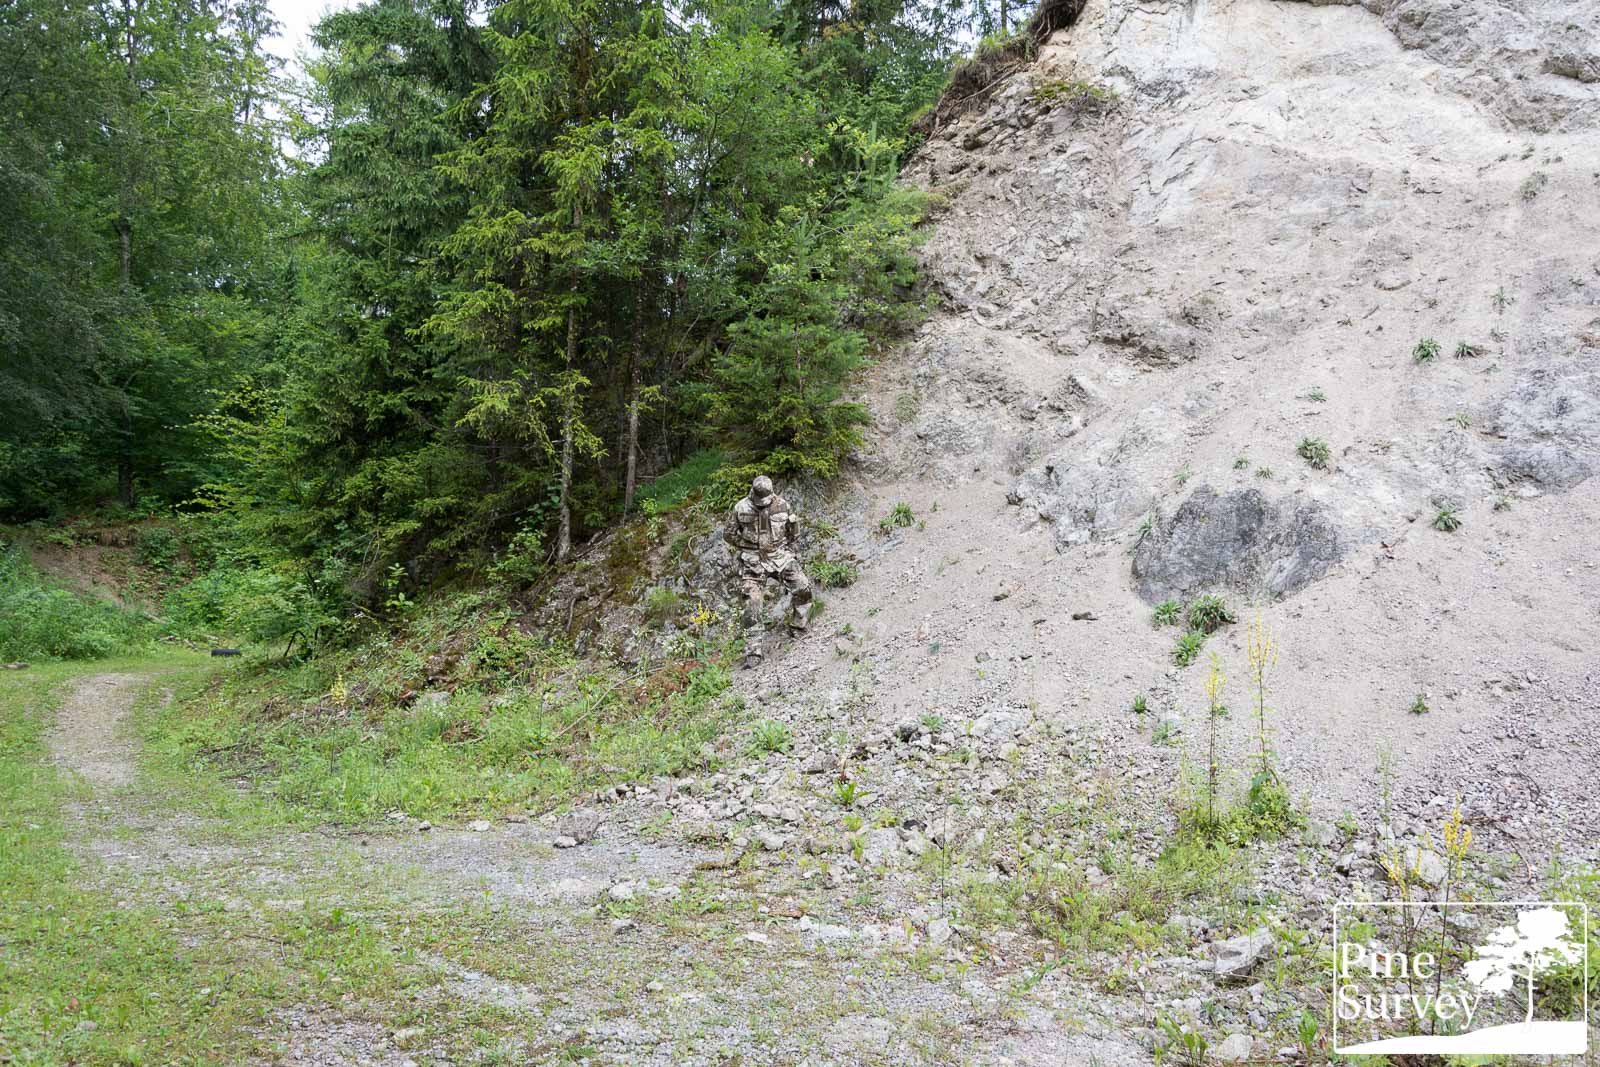
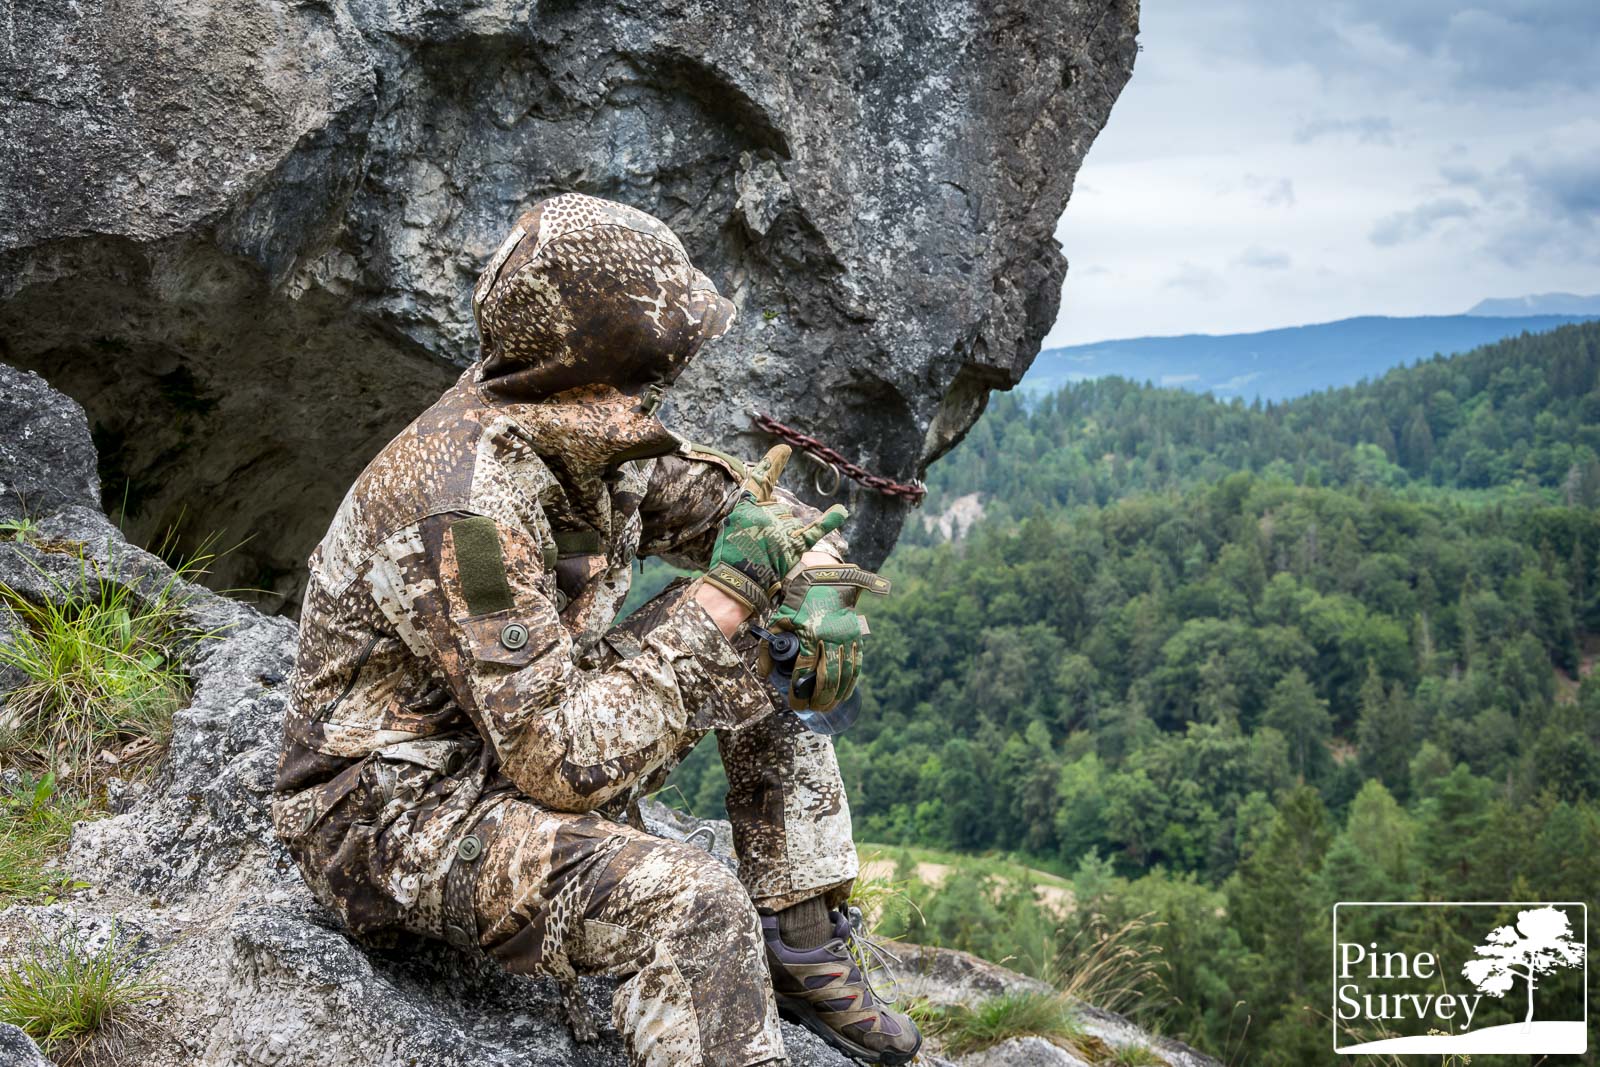
Location 3
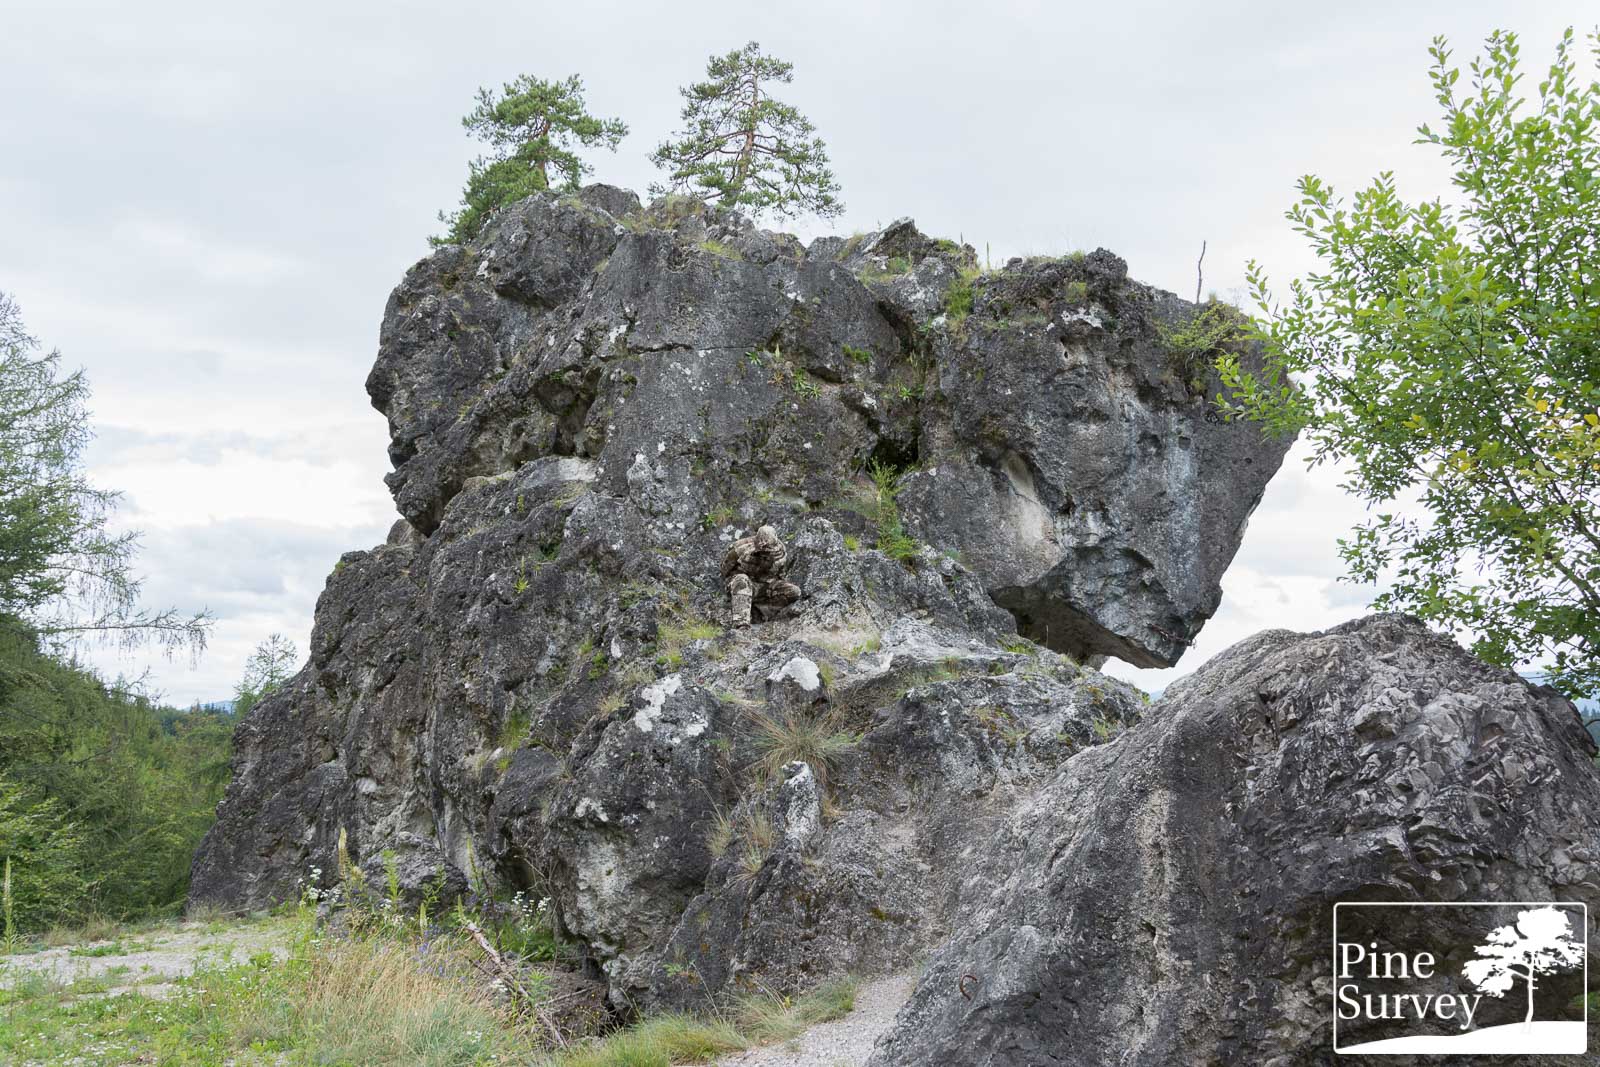
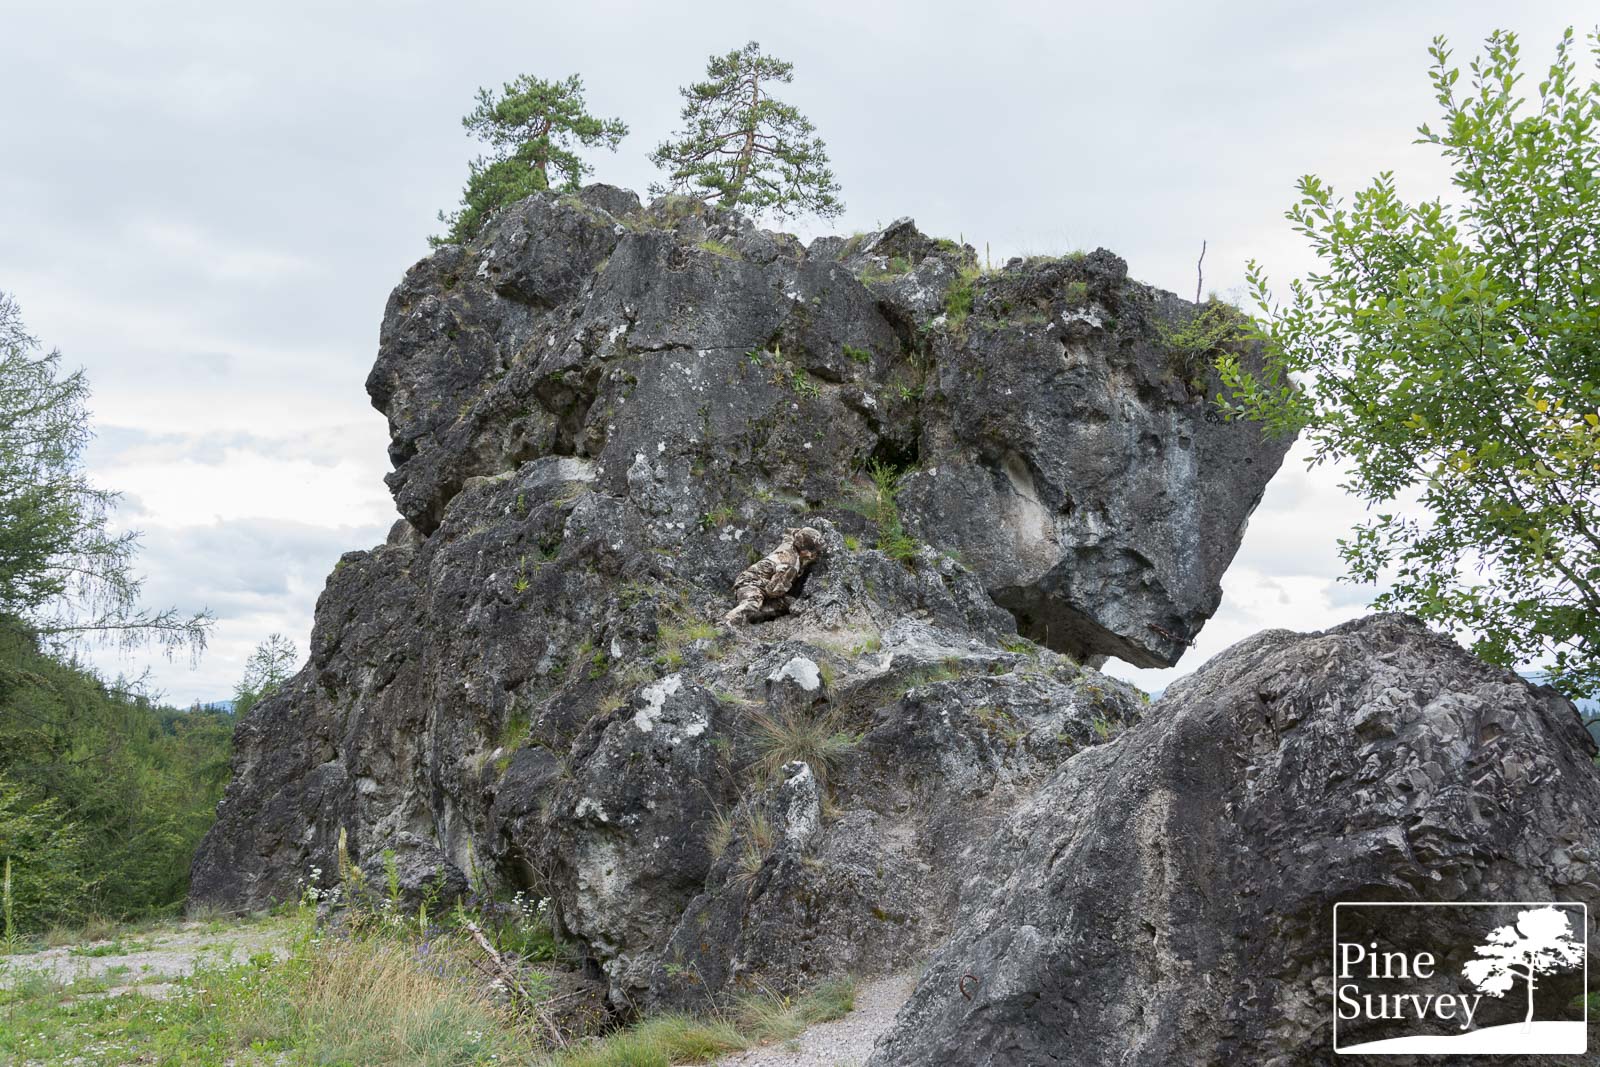
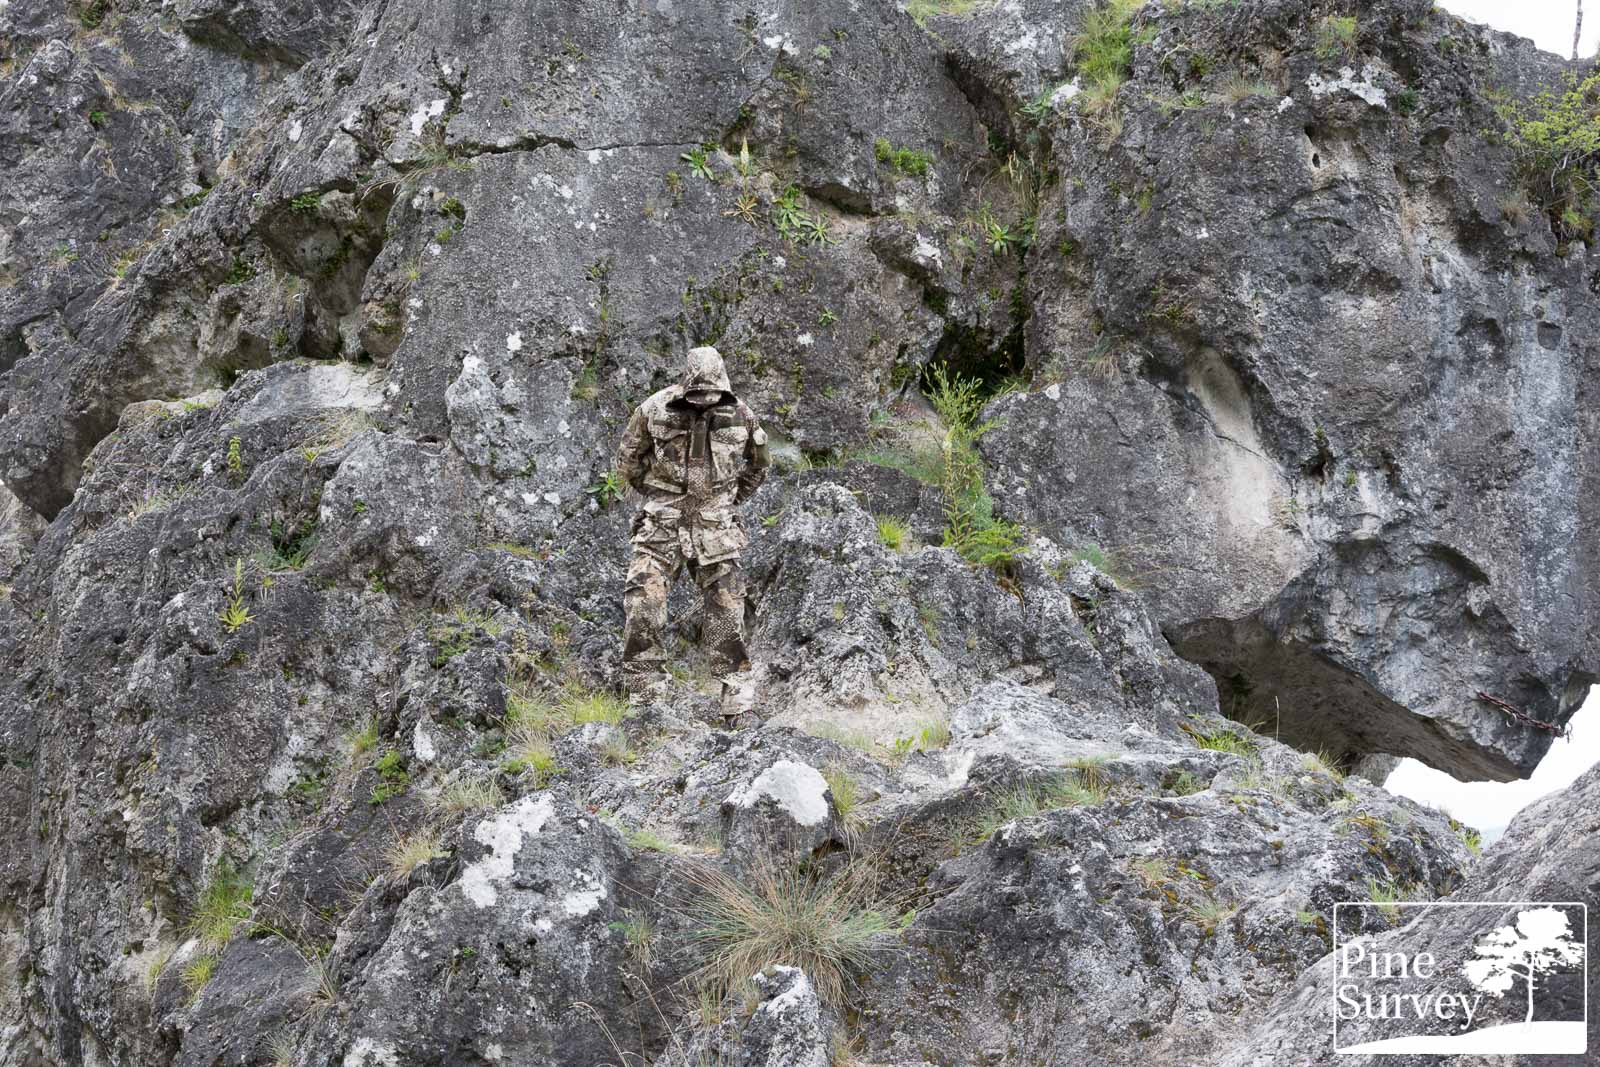
This location is the one of my “alpine camouflage” reviews. It is a typical rock formation you would find in mountainous or alpine regions, with the occasional vegetation.
The distance to the camera is 15-20m, the weather was cloudy, rainy, resulting in soft light.

Phantomleaf WASP II Z4 – wide angle – standing
Phantomleaf WASP II Z4 – wide angle – kneeling
Phantomleaf WASP II Z4 – wide angle – leaning
Phantomleaf WASP II Z4 – 35mm focal length – standing
Phantomleaf WASP II Z4 – 35mm focal length – kneeling
Phantomleaf WASP II Z4 – 35mm focal length – leaning
Observations – Location 3
How well it performs can already be seen in the standing position (wide angle picture). Basically the whole leg on the right side has disappeared, while parts of the torso do as well. The macro elements disrupt the silhouette effectively, and the colours mostly match the background. So this is an obvious fit for this environment. When kneeling down, this becomes more obvious, even though the dark shadows are somewhat of an eye catcher. Legs and torso are however hard to see, given the working macro elements.
Since there is no real prone position possible, I leaned to the wall, and again, the colours match the surroundings to a certain extent, enough to blend in. Most of the camouflage work is being done by the midi and macro elements however, which clearly break the torso apart using distinctive elements and strong contrast.
Looking at the 35mm pictures, the slight difference in colours can be observed. Especially in this case the blueish grey of the rock cliff is a different shade than the greys used in the WASP II Z4. However the ivory white, the reddish midi elements, as well as the strong macro elements using anthracite are doing a great job by disrupting and blending. The picture in the standing position is a good example for this.
The kneeling position perfectly demonstrates the relevance of the net structure, which complements the midi and macro elements, by providing an organic look and additional shades.
Finishing up with the leaning position, one can see the good fit of the ivory white in this setting and how the reddish elements match the decaying vegetation.
Location 4
Last but not least – location number 4 is a gravel pit. You know this one already from previous pics. I will post two different spots in the same pit without the prone position.
Again, cloudy weather and soft light. Distance to camera: 10m.

Phantomleaf WASP II Z4 – 35mm focal length – standing
Phantomleaf WASP II Z4 – 35mm focal length – kneeling
Phantomleaf WASP II Z4 – wide angle – standing

Phantomleaf WASP II Z4 – wide angle – kneeling
Phantomleaf WASP II Z4 – wide angle – standing

Phantomleaf WASP II Z4 – wide angle – kneeling

Phantomleaf WASP II Z4 – 35mm focal length – standing

Phantomleaf WASP II Z4 – 35mm focal length – kneeling
Observations – Location 4
Not all rock areas are alike and not all of them feature a bluish tint. This can be seen in this gravel pit. By now I would only repeat myself and I think the shown pictures speak for themselves. While the prone position was not necessary or possible in these settings, the standing and kneeling positions clearly demonstrats how good the performance of Phantomleaf WASP II Z4 is in this particular setting. Both blending and disrupting, even with lush green vegetation next to it.
Which brings up straight to the conclusion.
Conclusion
It was no surprise for me that Phantomleaf WASP II Z4 would perform that well. Since the Z3A and Z2 variants already performed remarkably well, I had no doubts Z4 would as well.
The strong contrast of the macro and midi elements really provide the strong disruption one needs in a diverse urban environment. Especially when having strong lines, diverse colours and debris in mind. Disruption is key, especially at longer distances and the Phantomleaf WASP II family of patterns is one of the few camouflage patterns out there, providing these strong and necessary macro elements.
The psychological research regarding human perception clearly had an impact in developing this pattern – this is a no brainer (pun intended), when looking at the background of the designer, Florian Lenz.
yep…
With that being said, Phantomleaf WASP II Z4 is an effective urban camouflage pattern, which is also very adaptable when it comes to mountainous regions. So this is a clear recommendation from my side, to everyone in dire need of such a pattern.
As always I hope I was able to give you a decent overview of this camouflage pattern.
Many thanks for the continuing support from all sides!
Take care!