Please take a second and take a look at this GoFundMe, if you want to support Pine Survey. Thank you!
I remember stumbling upon Vanquest Gear in late 2014/early 2015, when a friend made me aware of the company and I did some reading on them. At first glance the company looked like another branch of Maxpedition and I was wondering what that was all about, considering the fact that at that moment MP became less and less popular over here in Europe.
After a bit of Internet research I realised there was more to the matter. In fact Vanquest Gear was founded by the guys in charge of R&D at Maxpedition. They had left the company for personal reasons and started their own brand, taking some of their designs with them. Since then they continuously came out with updated versions for their products and of course new ones. For some this might be the end of an interesting industry anekdote, but in this case, it just got interesting – bear with me and find out why.
Overview
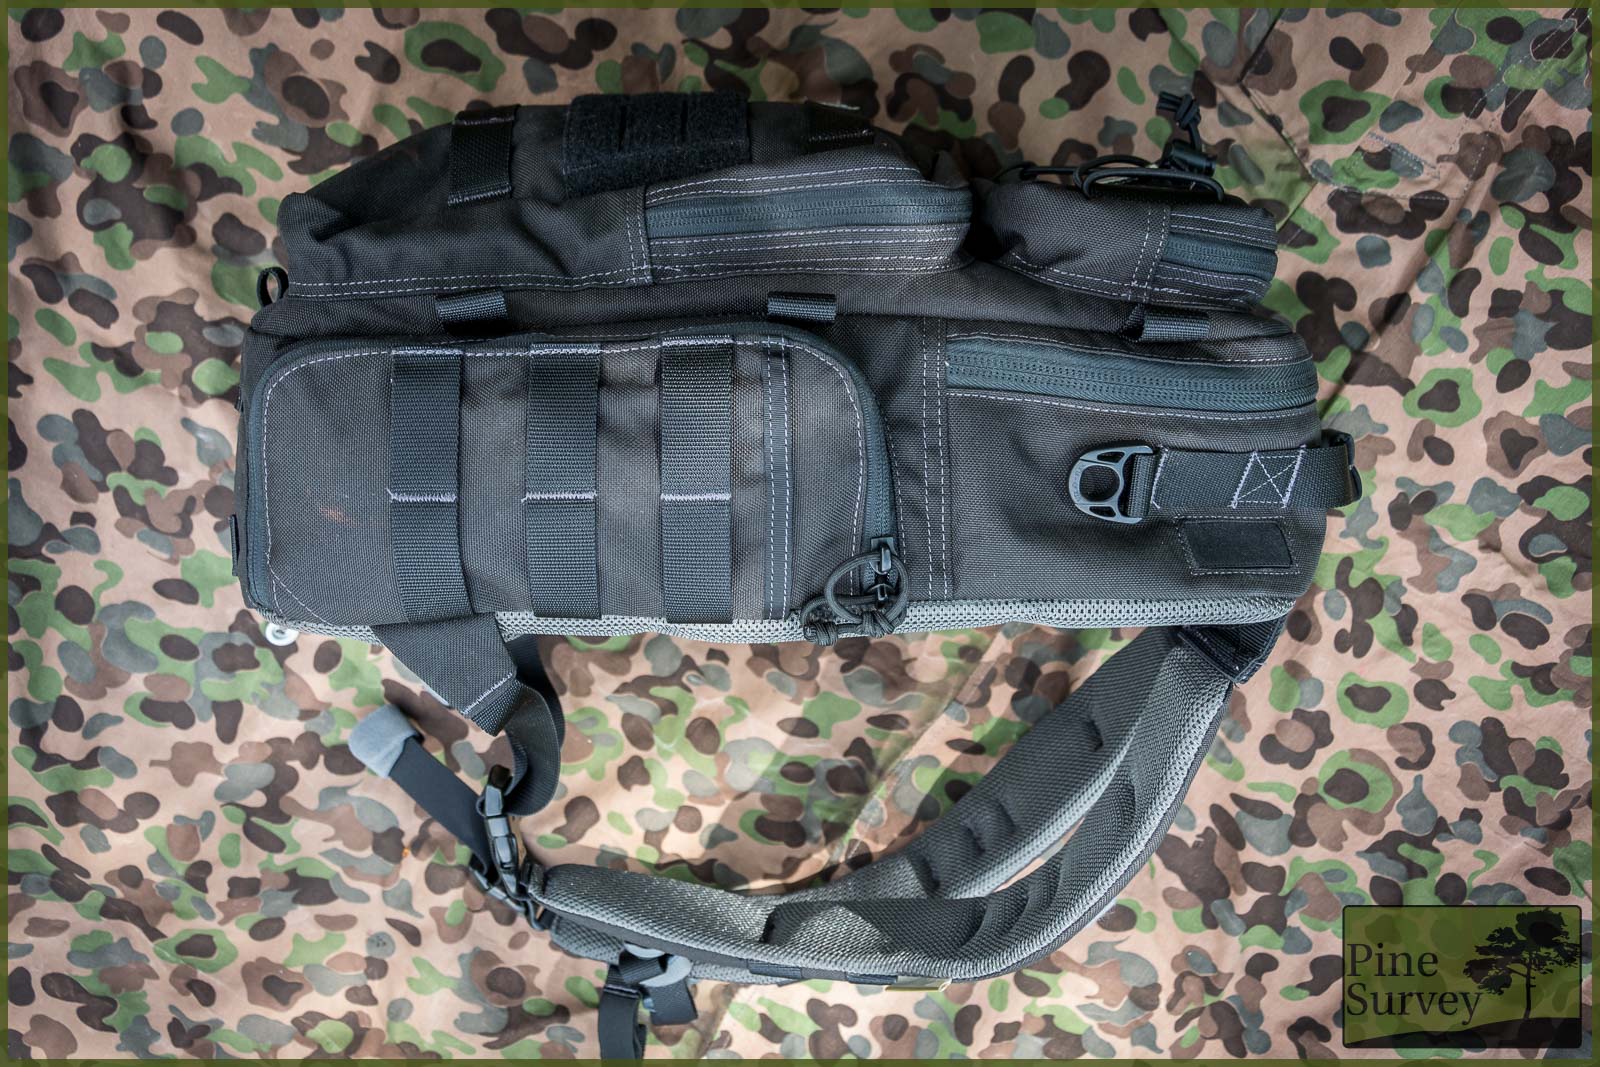
The Trident-20 is a 21l backpack with a specific focus on carrying camera gear. It is an evolution of the Vanquest Javelin slingpack and designed to be worn as a normal backpack, but with the ease of accessibility of a slingpack. It features three outer pouches and a main compartment. In total the pack has 34 pockets and slots to carry your EDC gear. The inside can be adapted to your particular use of the pack and features a high visibility interior.
Detachable dividers offer organisation of camera and range equipment, the pack is CCW usable and incorporates several improvements to Gen 1. of the Trident-20 (infos on the updates can be found on Vanquests homepage).
Before we go into more detail, here are some specs:
Specs
- HxWxD: 18” x 11” x 9” = 45,72 cm x 27,94 cm x 22,86 cm
- Materials: 1000D Cordura (500D Multicam-Black models), YKK zippers, ITW and Dura-Flex Hardware
- Volume: 21l
- Weight: 1,45kg
Even more detailed specs can be found here: https://www.vanquest.com/products/trident-20-gen-2-backpack.html
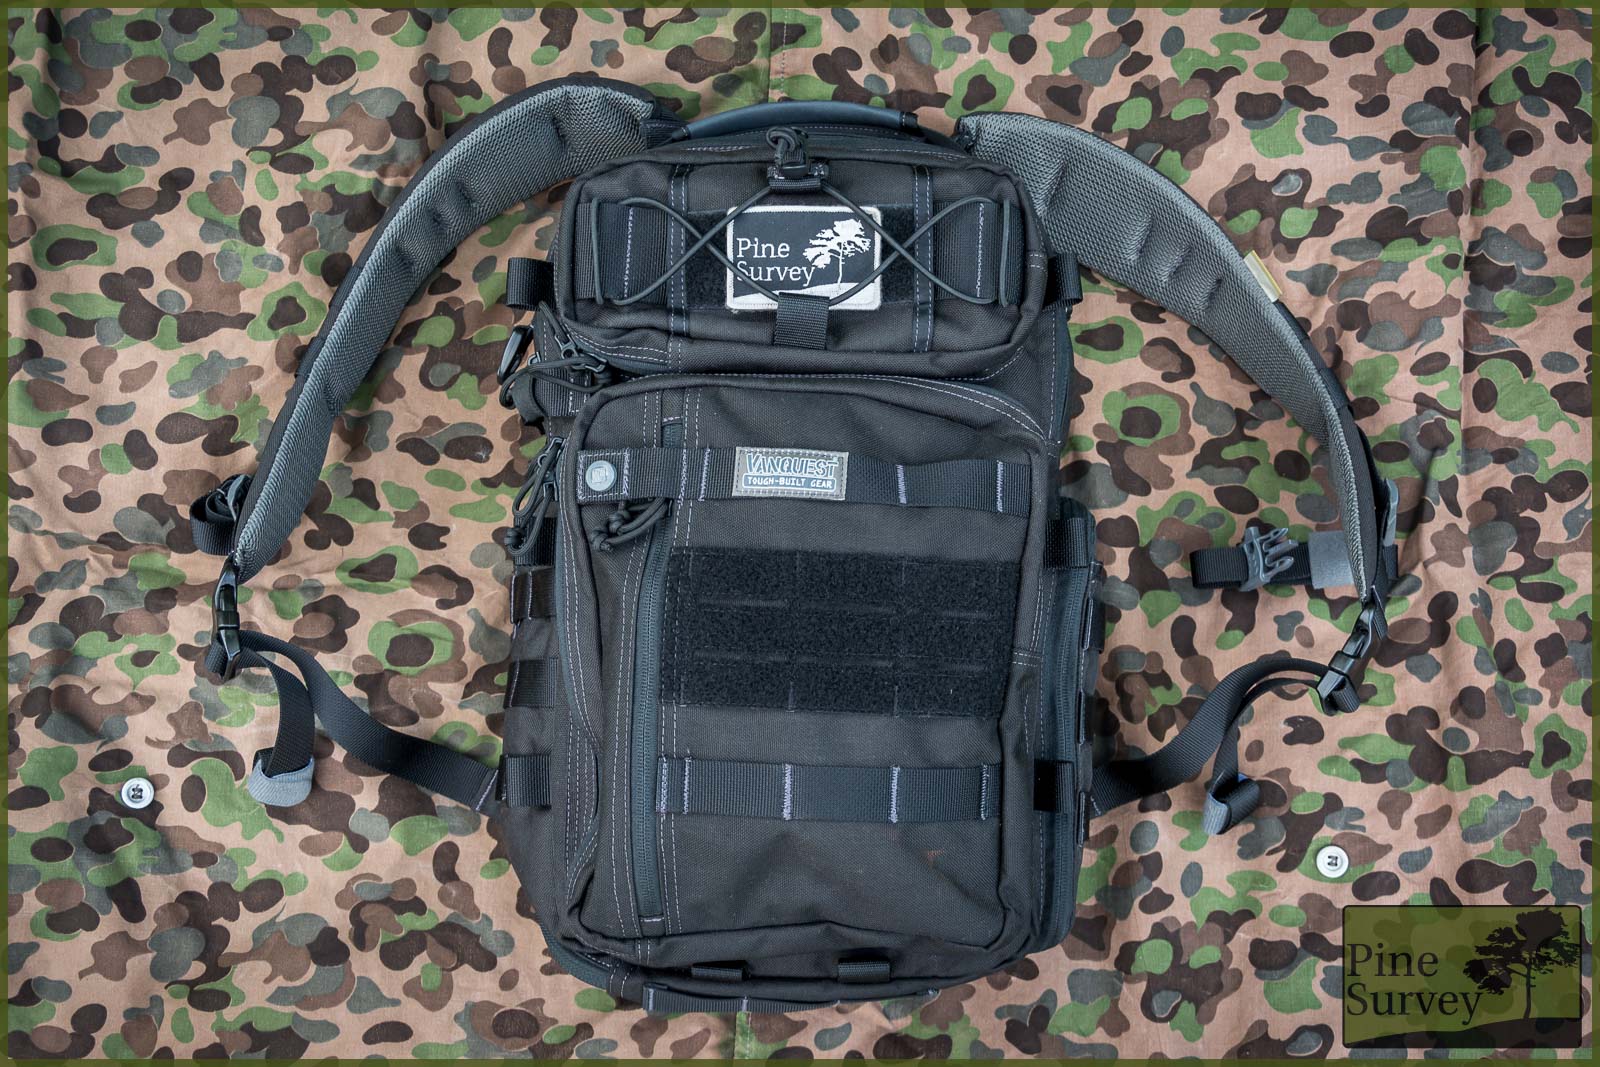
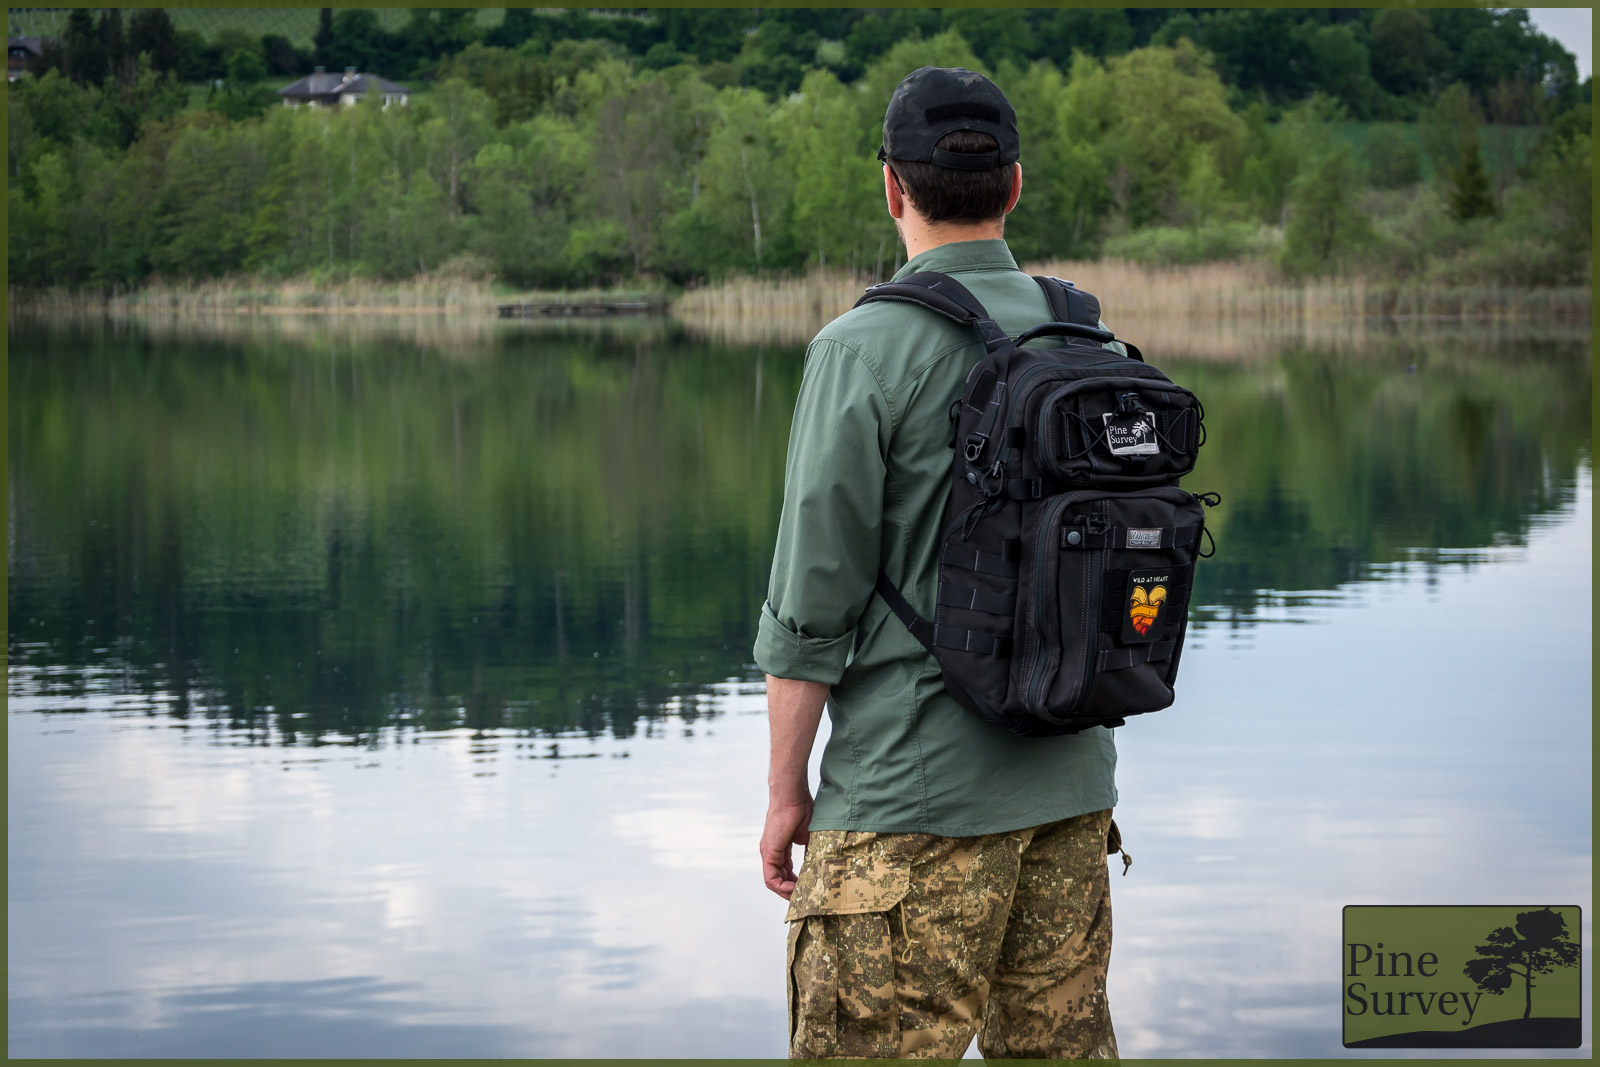
The Vanquest Gear Trident-20, Gen.2
Set-Up
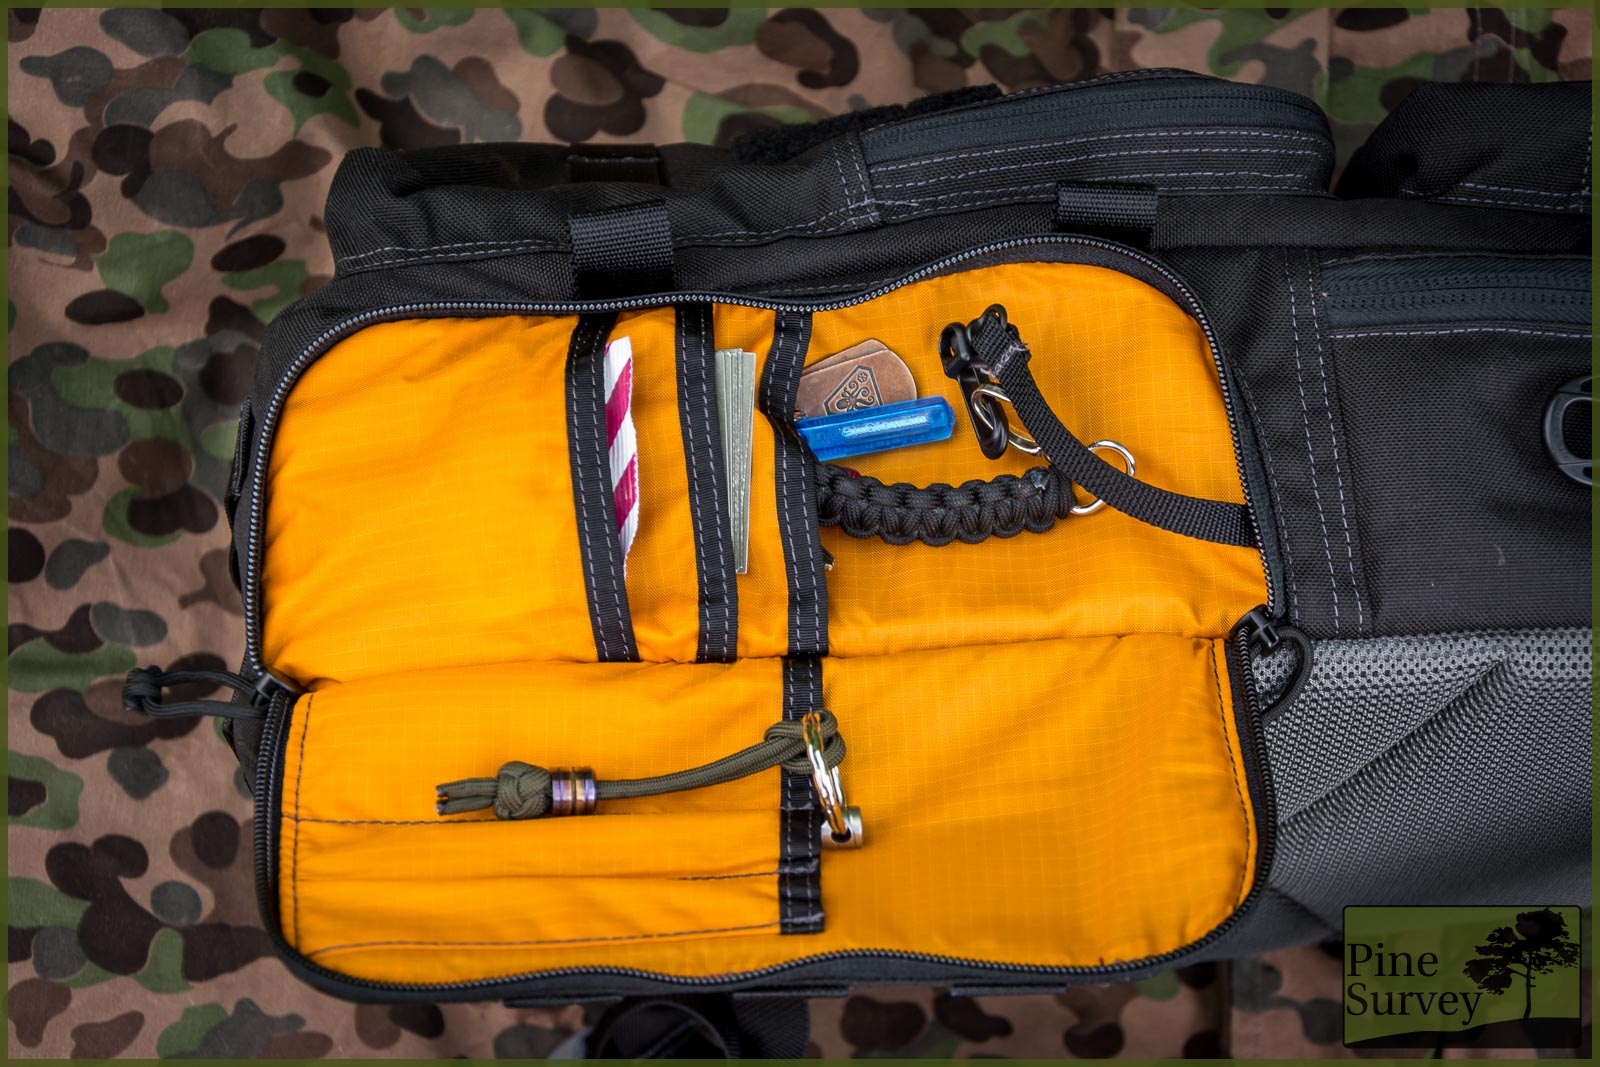
Upper Front Pouch
Starting with the upper front of the Trident-20, you will find a small zippered pouch that offers various attachment and organisational options. First of all you will notice a sleeve on the outside, combined with several loops that have shock cord laced through them. With this you can either slide items through and fix them with the cord, or you just use the cord itself. I did use this once to carry my gorilla pod, but other than that am only using the shock cord.
Another detail is a velcro area to attach patches, insignia and the like.
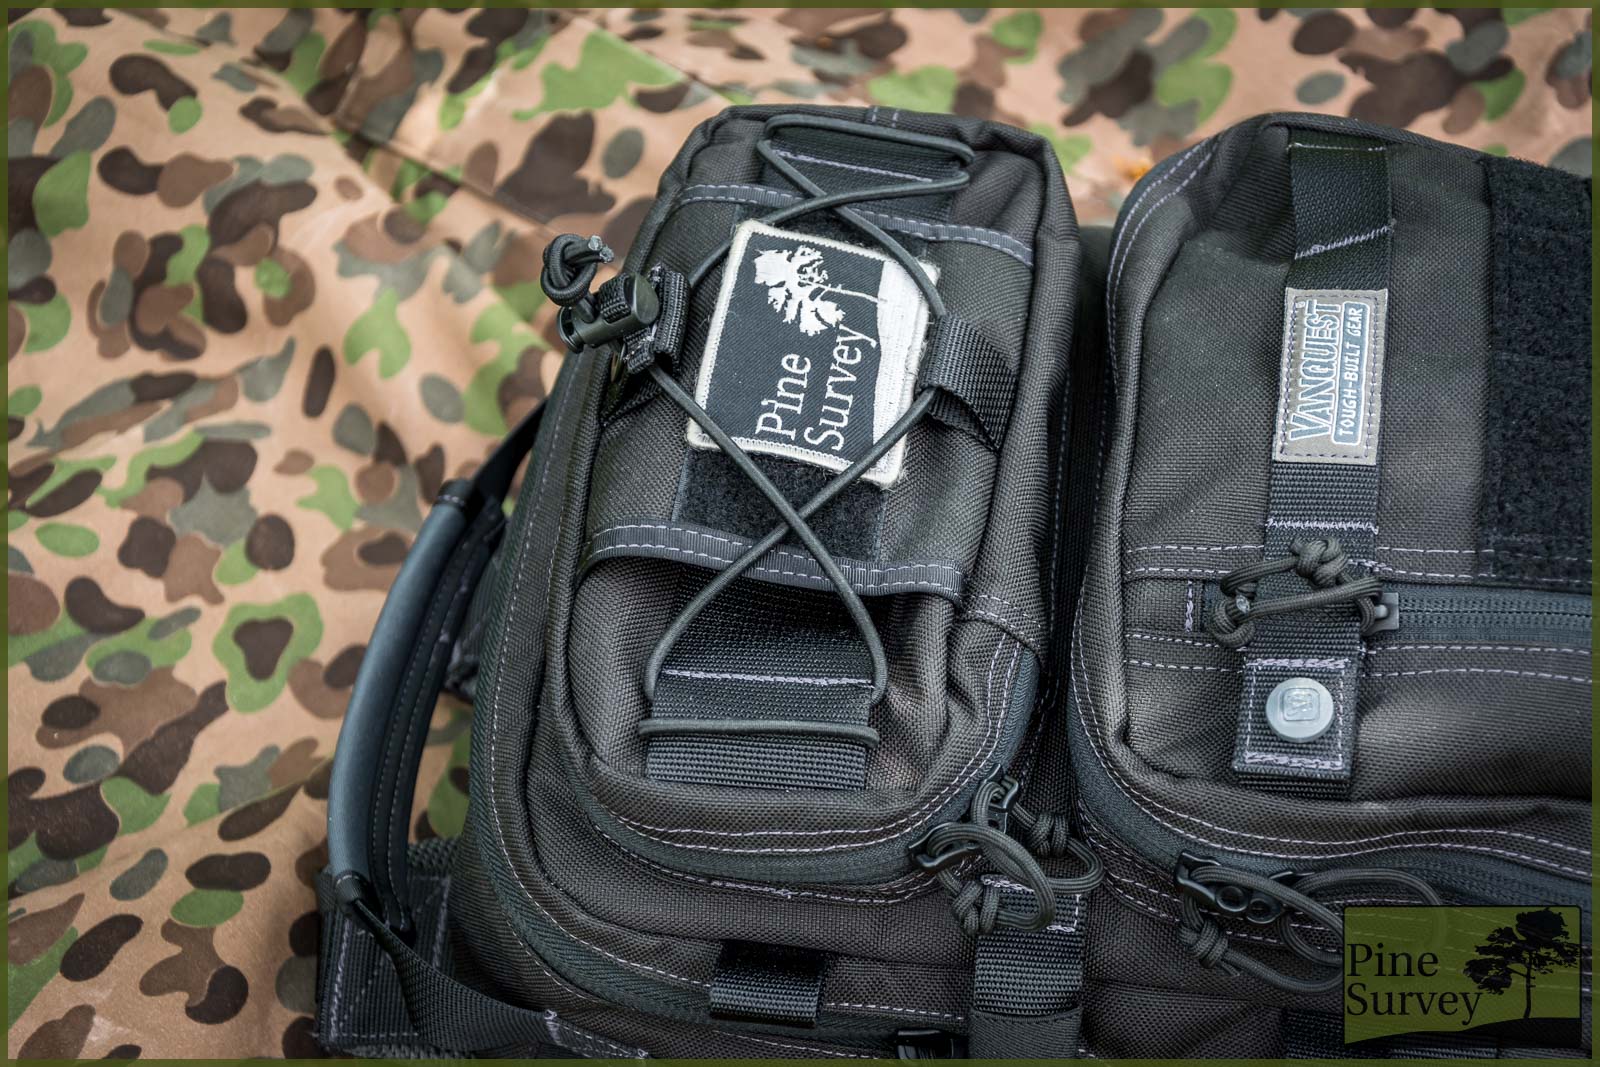
Upper front pouch with sleeve, shock cord and velcro area
The interior of the pouch offers several organisational options. To the inner backside you will find a slit pocket, and attached to it elastic webbing that features four large loops to carry cables, smaller flashlights, lighters and other EDC gear.
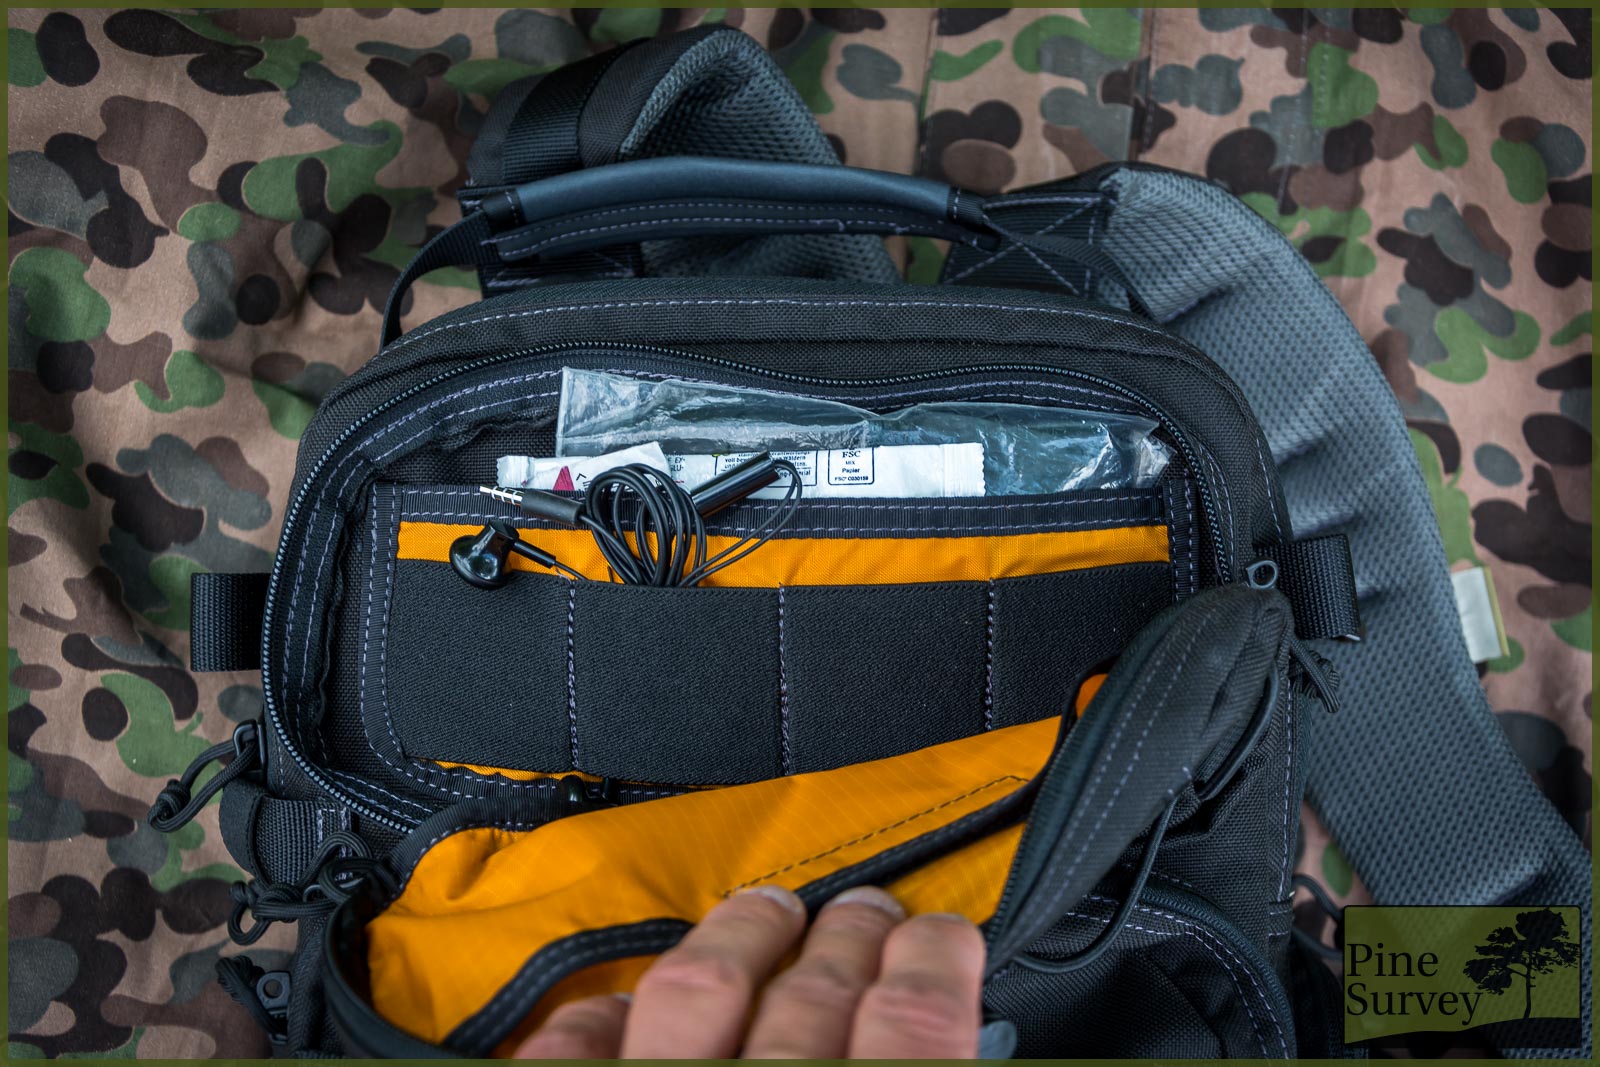
Inside of the upper front pouch
To the inner front there is another slit pocket, but this one can be closed by a small velcro tab. I have come to realize, that sometimes this velcro is in the way, so I started to only carry longer items in it horizontally, like pens, glass breakers etc.
Since the whole pack is designed to be opened hanging from your left shoulder, the zipper of this pouch is attached in a way that it opens more to this particular side.
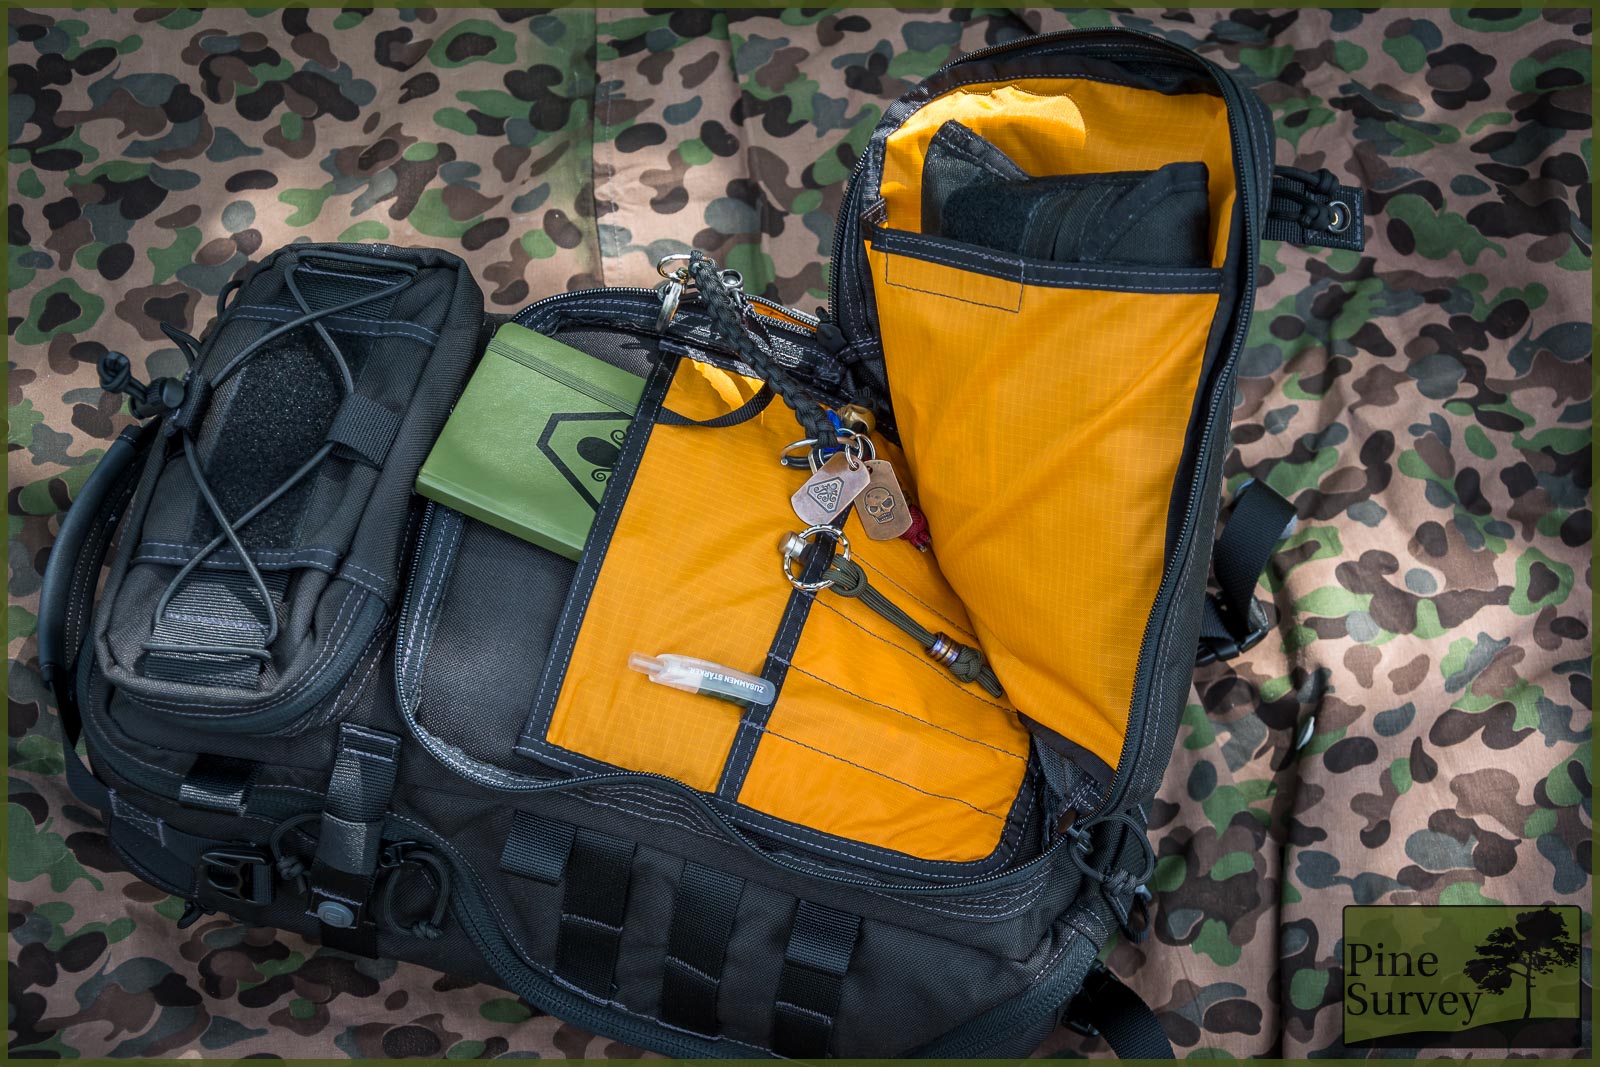
Lower Front Pouch
The front of this pouch offers a zippered compartment for flat items, like notebooks, IDs, or other documents. The zipper can be secured by a strap that features a bush button. If you lace the paracord of the zipper pulls through the strap, you can prevent or prolong an opening by third parties in a crowded environment.
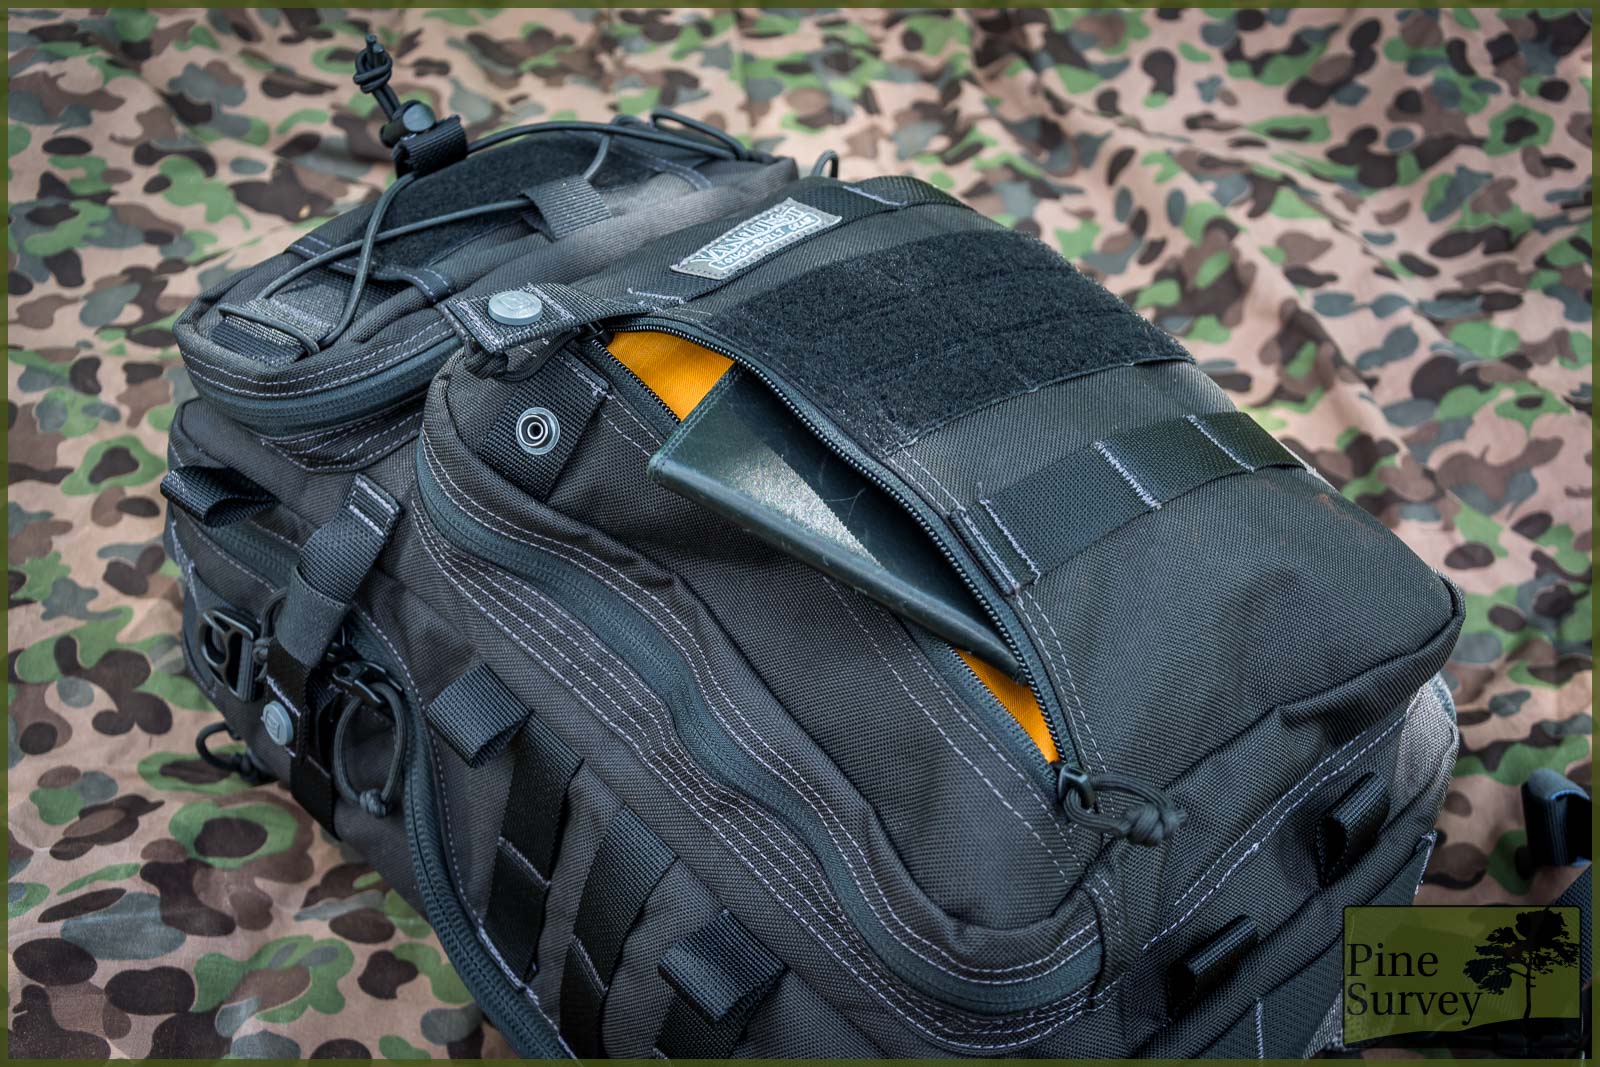
Small zippered pocket on the lower front pouch
Other than that the front of the pouch features a large velcro area which has laser-cut MOLLE compatible slits, and also two webbing straps above and below that velcro area.
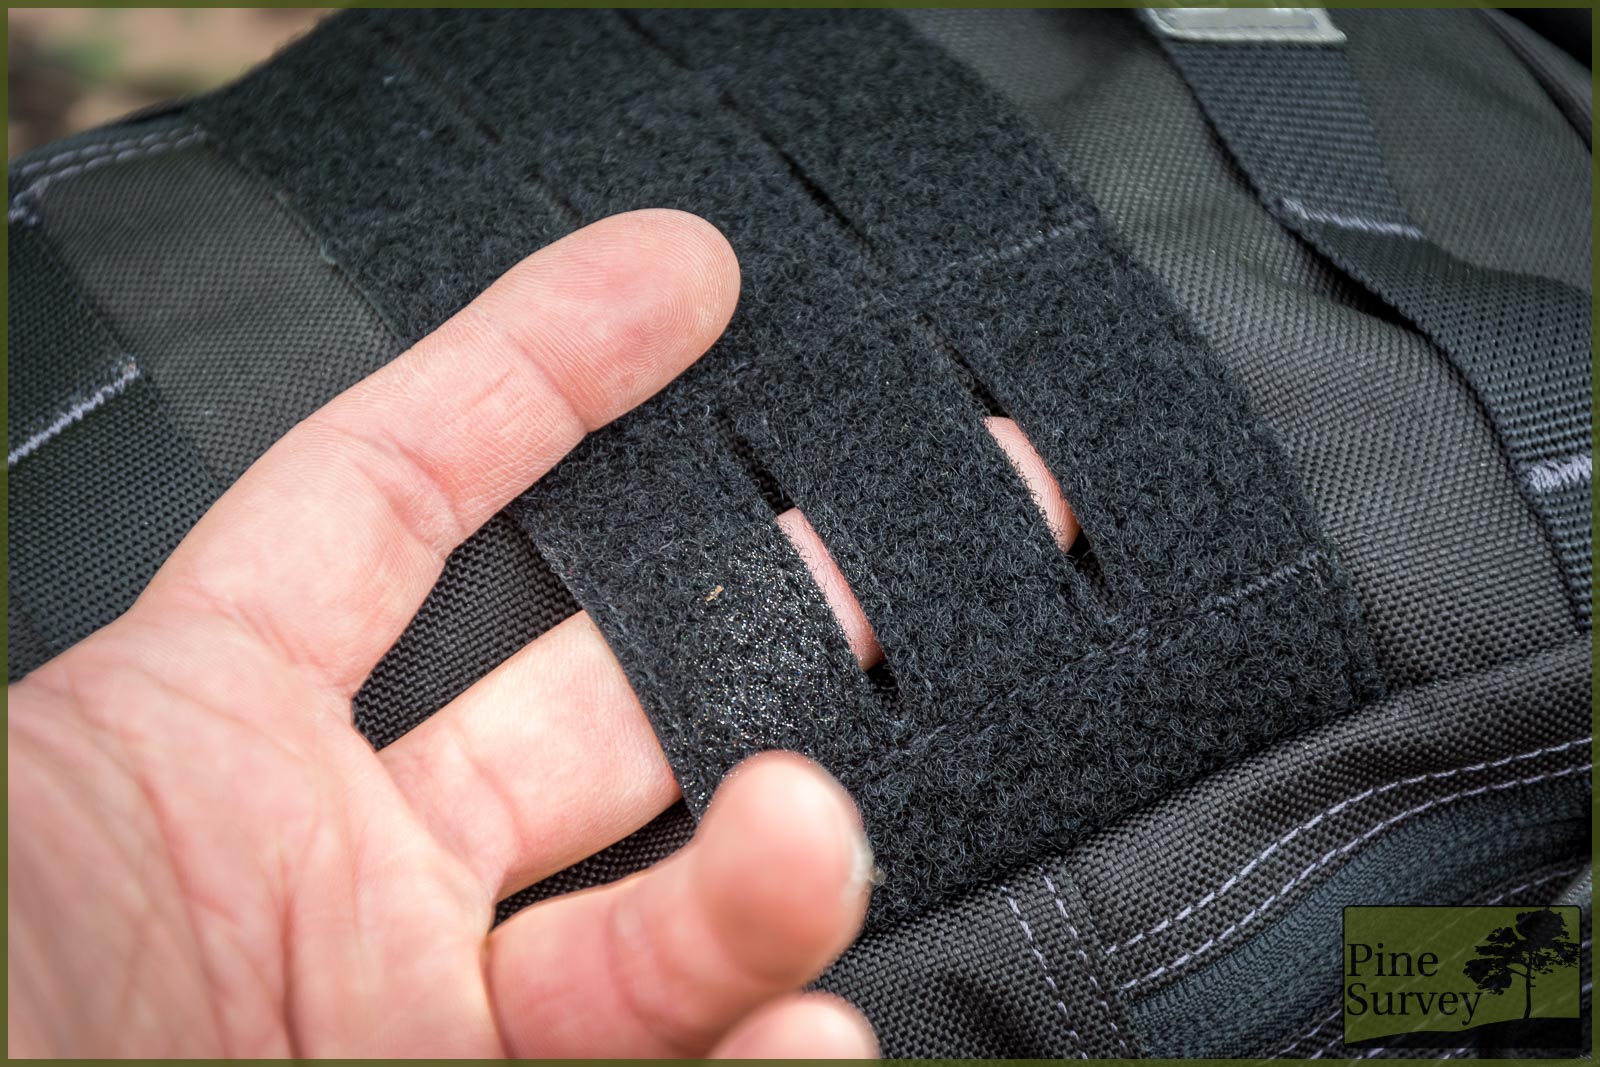
laser-cut MOLLE on the front
The upper strap features a larger opening for your hand and works as a handle in order to hold the pack more comfortably, when bringing it to your chest, and the lower webbing features three channels. As a result you would be able to mount another MOLLE accessory to the front if you wish to do so.
Lower front pouch
The interior is packed with admin options. To the back you have a large slit compartment for larger flat items, like documents etc. Right on it are four pen slots and one larger slit pocket for bigger items like markers, flashlights or your keys. For the latter you will find a key-fob practically attached over the larger slit pocket.
The inside of the lower front pouch
The inner front side features another large slit pocket. This covers the whole front area of the pouch and is closed by a velcro tab. Just like the upper front pouch, the lower one is designed to open more to the left, to improve access to the inside while bringing the pack to your chest.
Main Compartment
The heart and soul of this pack is the main compartment. It is designed to be used in many different variations, according to the needs of its user.
First of all it needs to be said, that the main compartment opens a quarter of the full height of the pack on one side (the users right side, when carrying), and fully opens up on the other side (the left side of the user, when carrying). This way you can bring the pack to the chest from the left, and have full access to the inside, without putting it down.
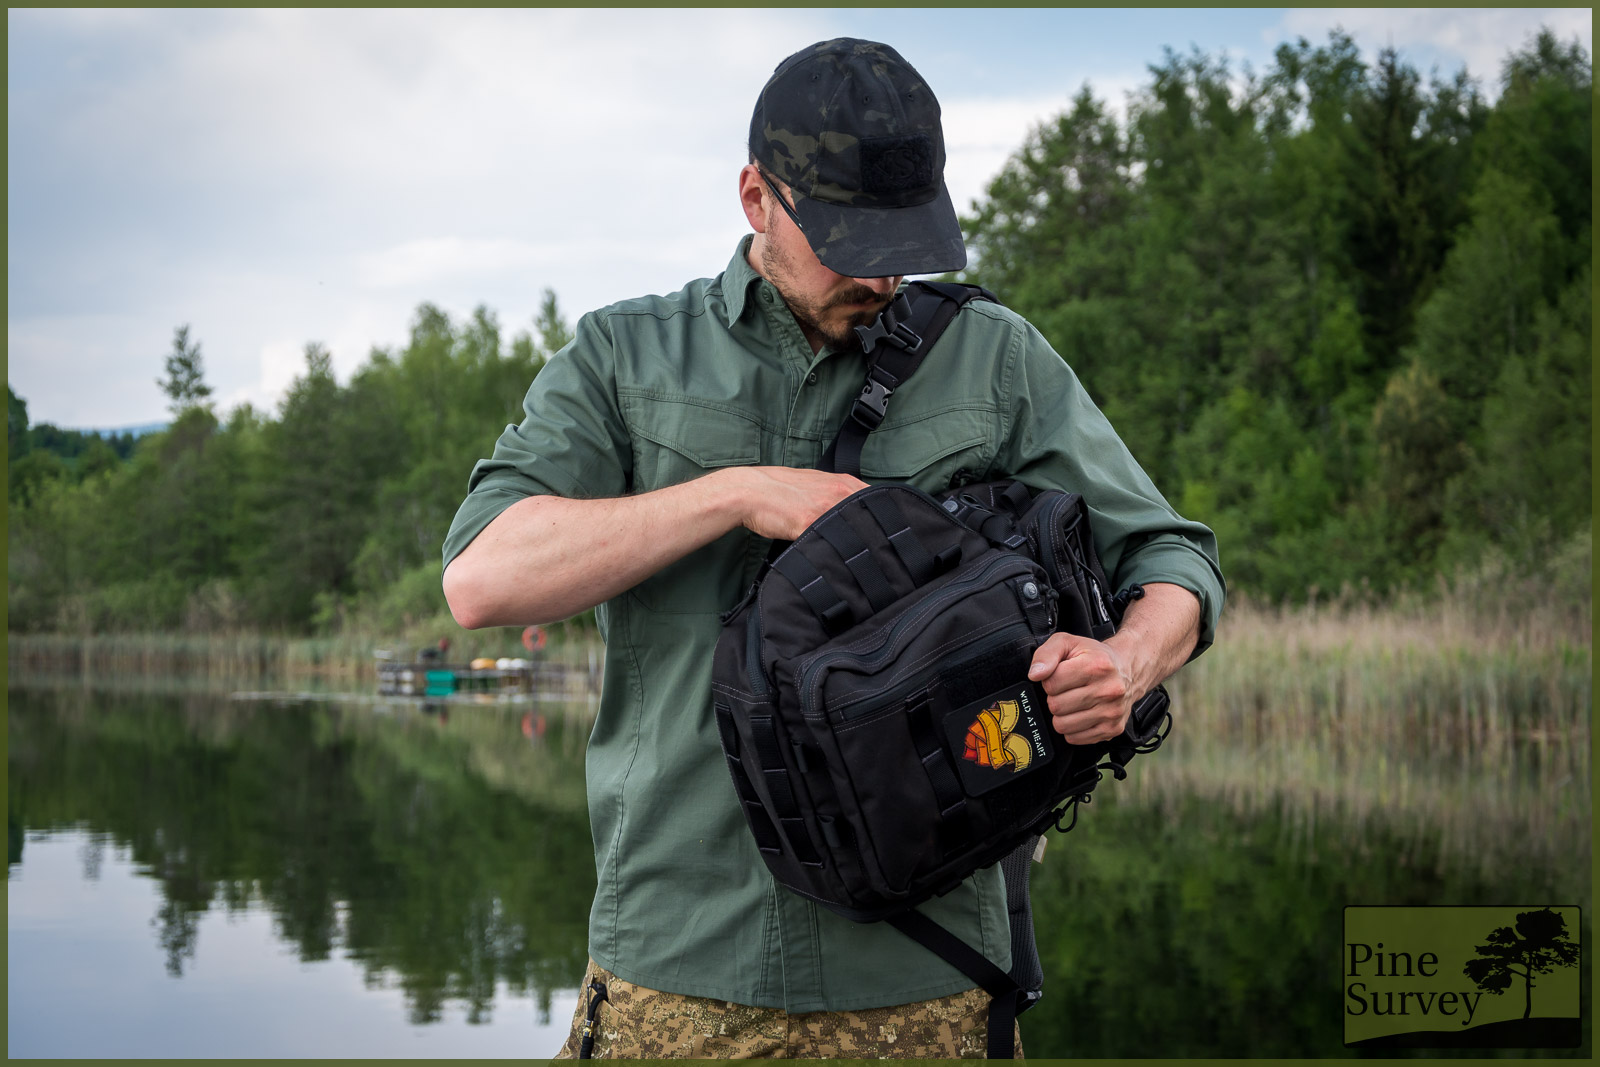
One way to use the Trident-20, bringing it to the front
The whole setup on the inside is designed accordingly!
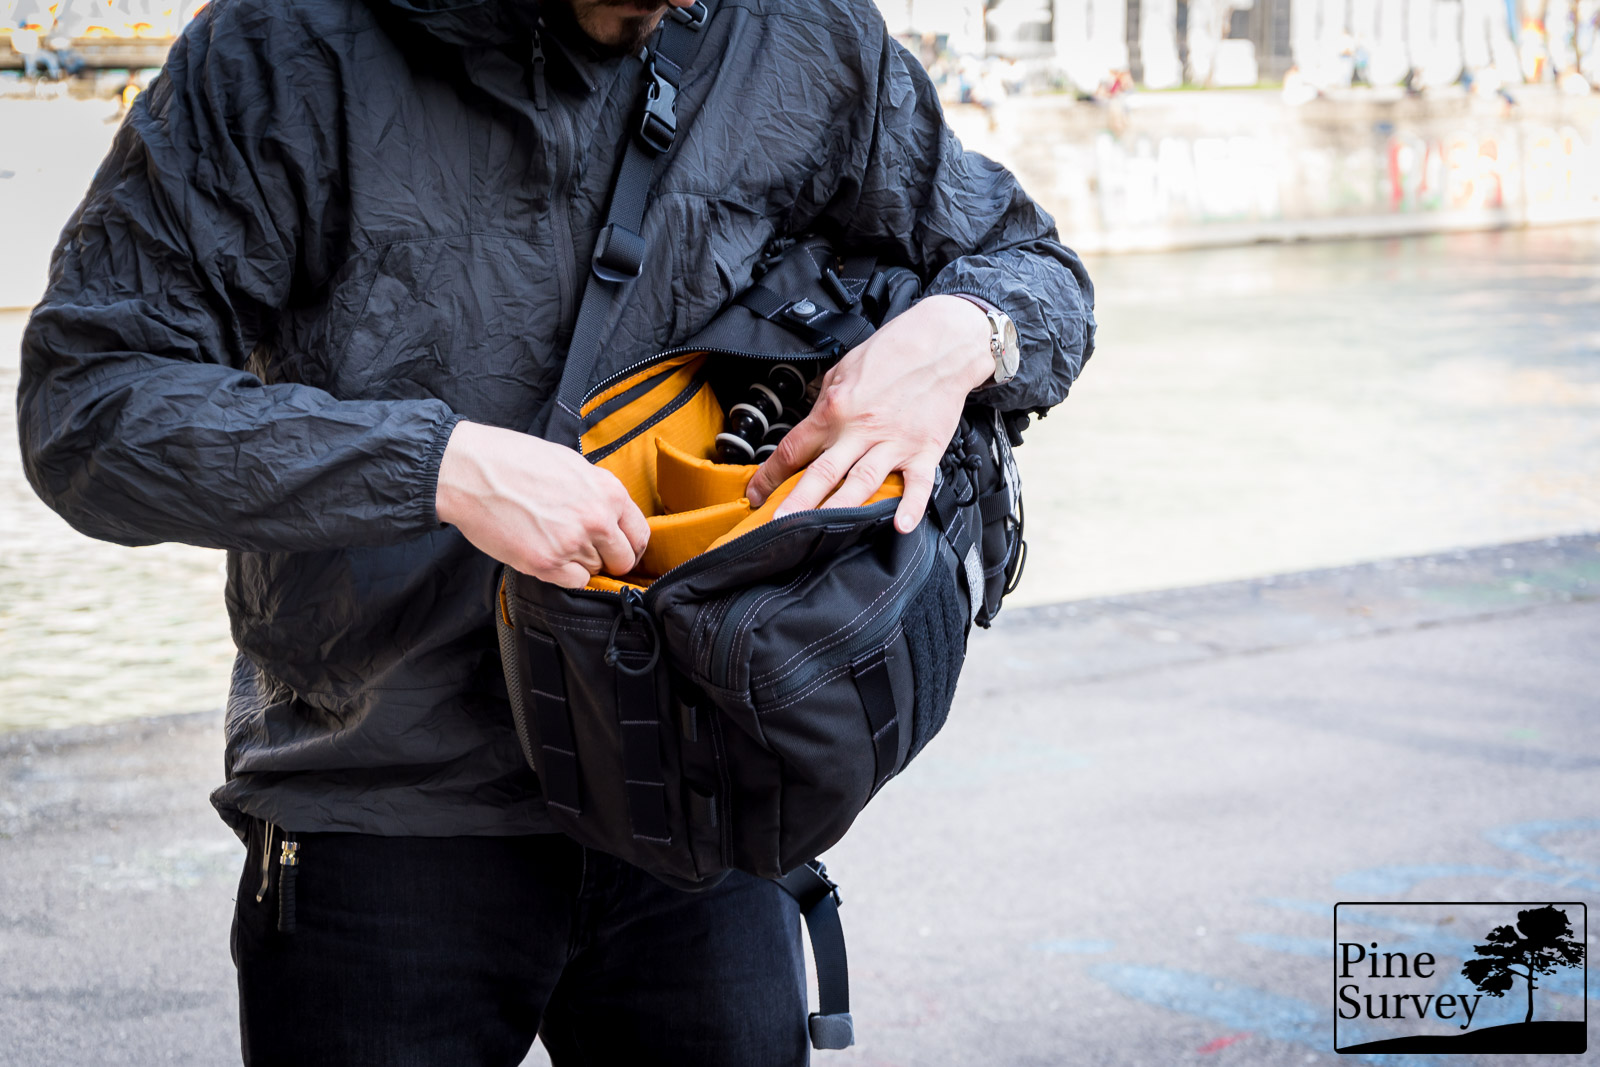
If you want to set up the pack for your camera gear, you can individually adjust three padded velcro dividers on the large velcro areas on the inside. That way you can create 3 padded compartments for your camera gear, while still having enough room to the top of the main compartment for other gear.
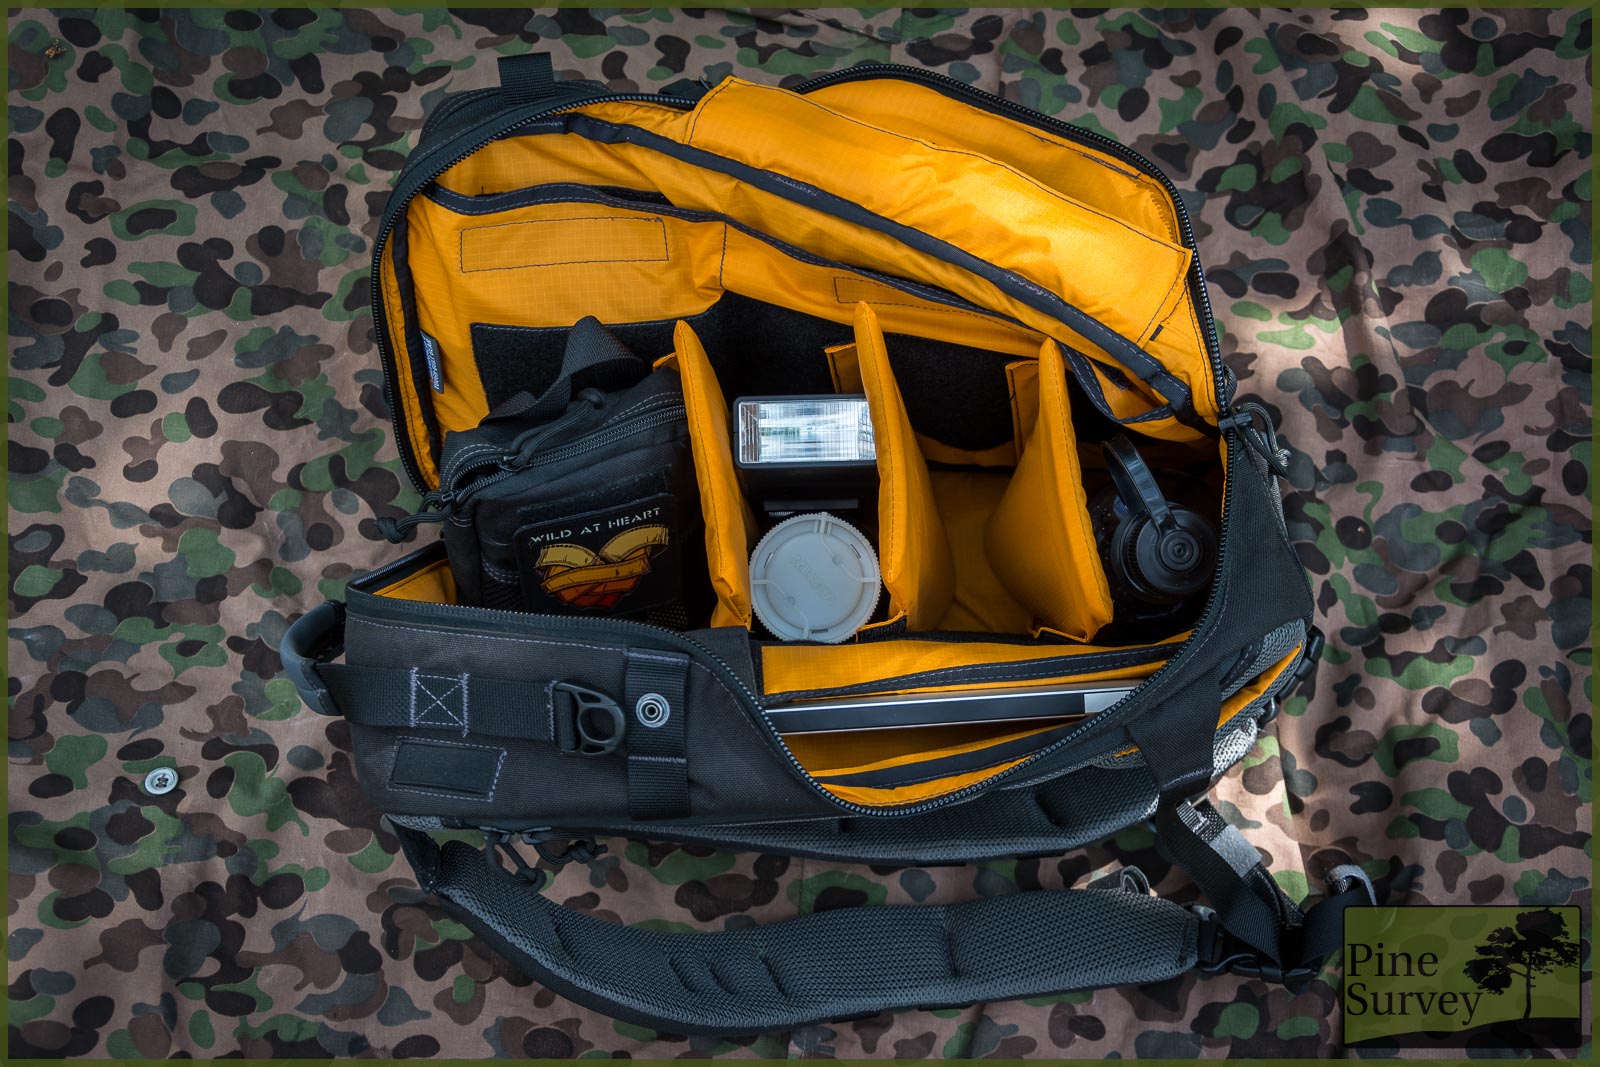
Set up for your camera gear
Of course you can also use one of the dividers all the way to the bottom for additional padding, even though you will find a decent padding also in the bottom of the pack.
To the inner front you will find two slit compartments, which are closed with velcro. One is bigger than the other, but both will hold Din A5 sized documents (the larger one even more, but not Din A4).
The smaller slit pocket on the inside
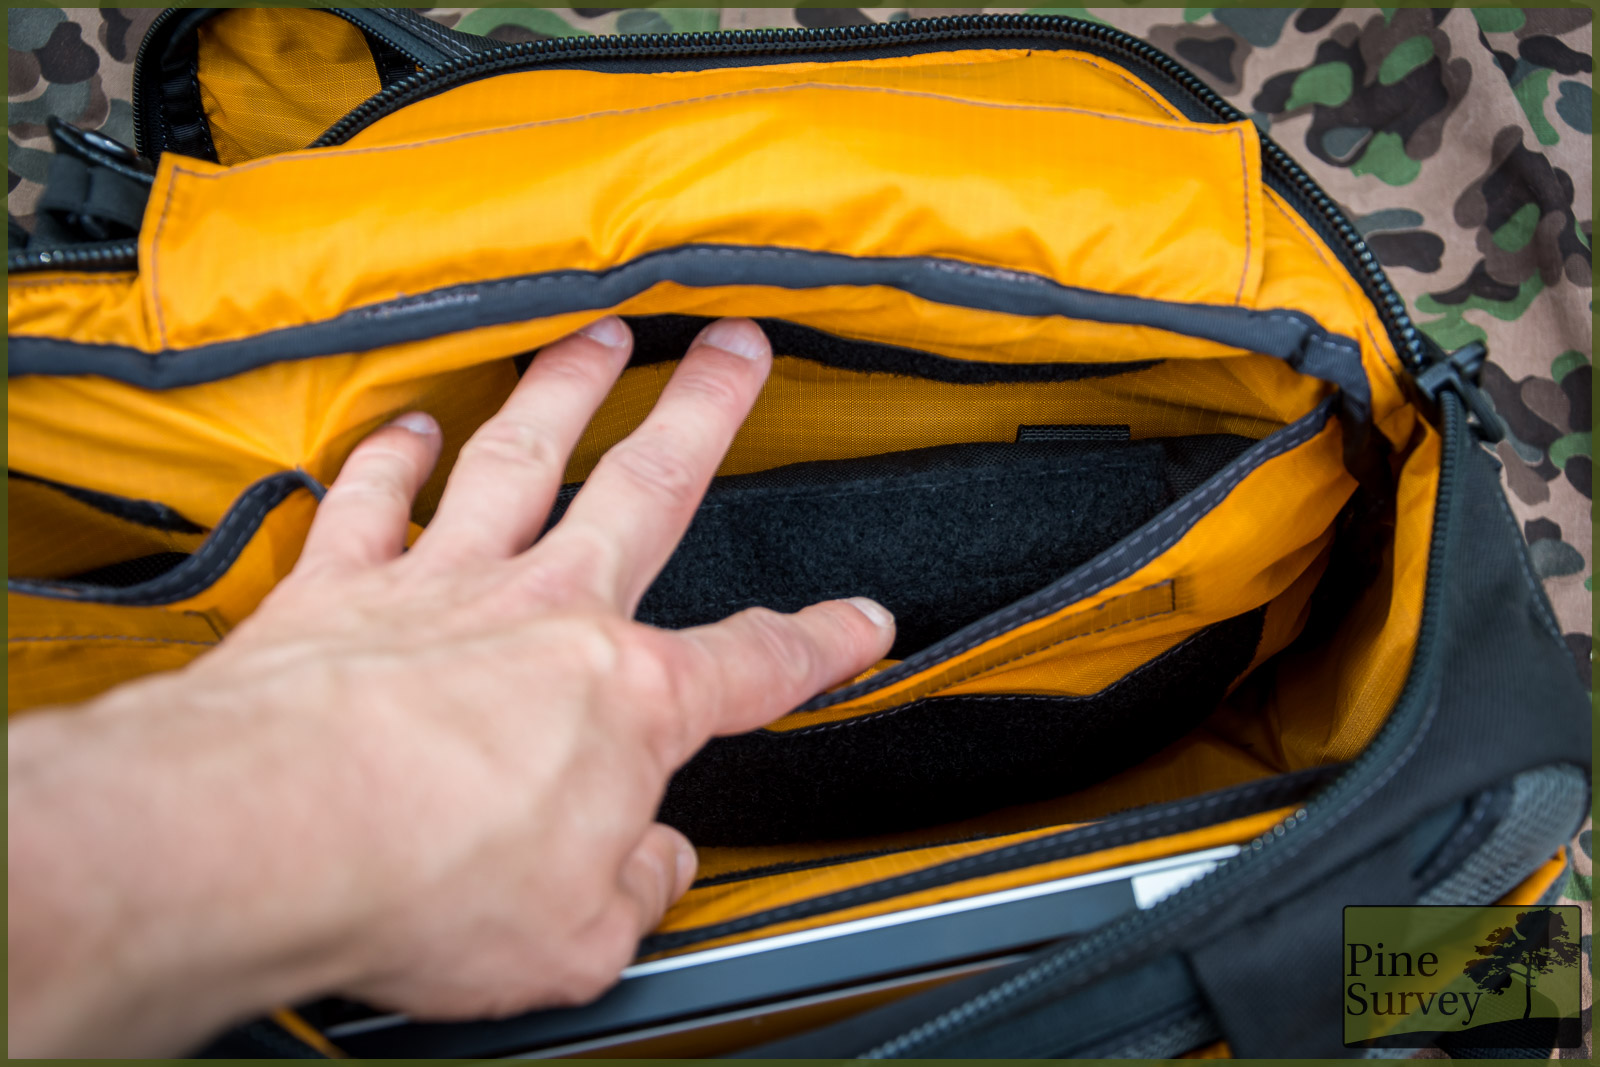
The bigger slit pocket on the inside
As you will have noticed by now from the picture, the pack opens with a slight curve to the side. This gives full access when using the pack as camera pack. This curve was also efficiently used to give you more carrying options.
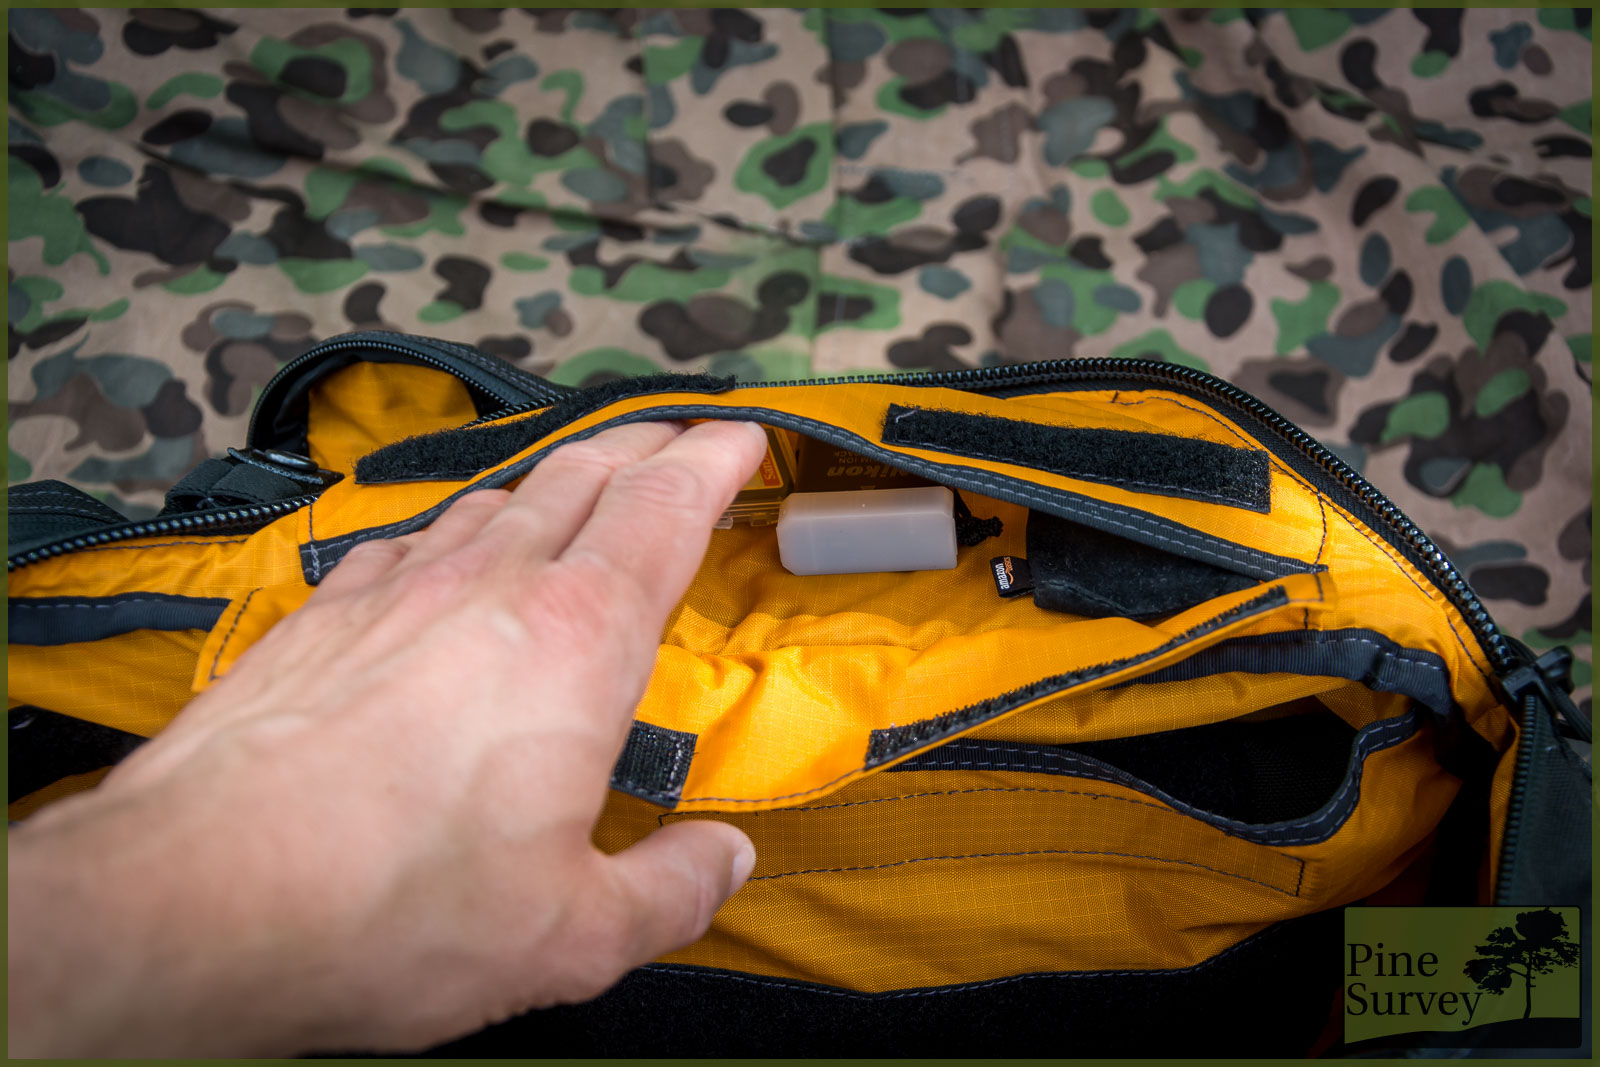
The small accessory pocket in the flap
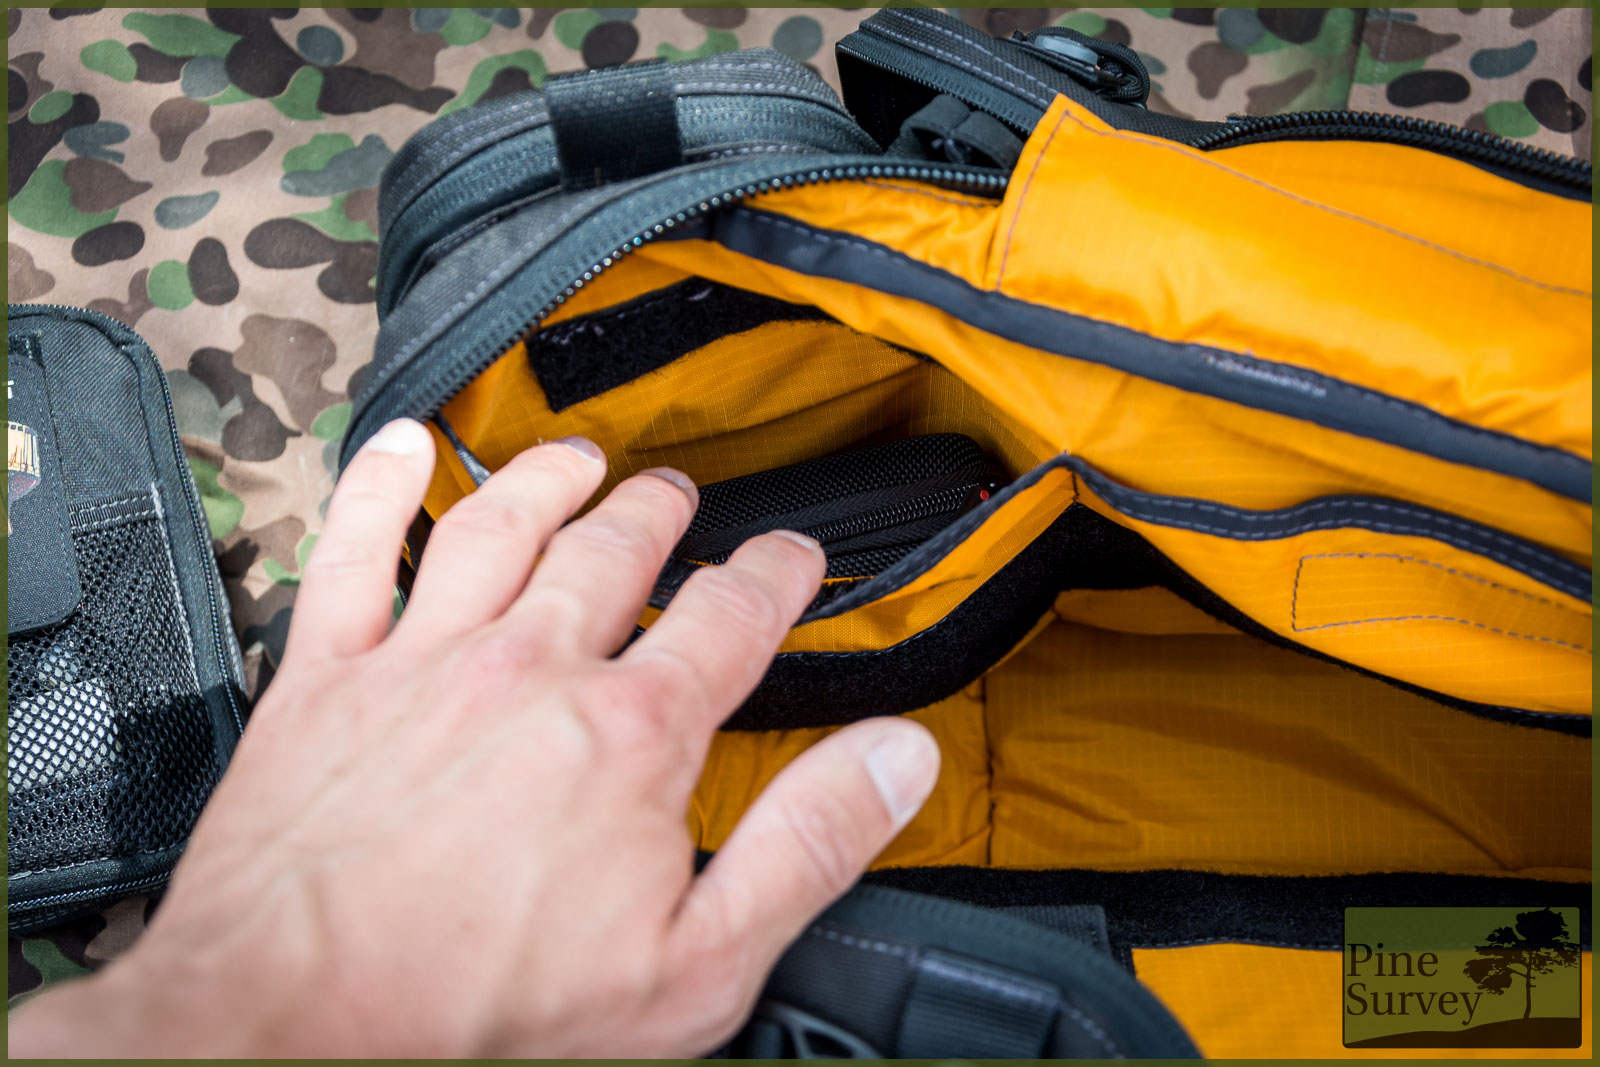
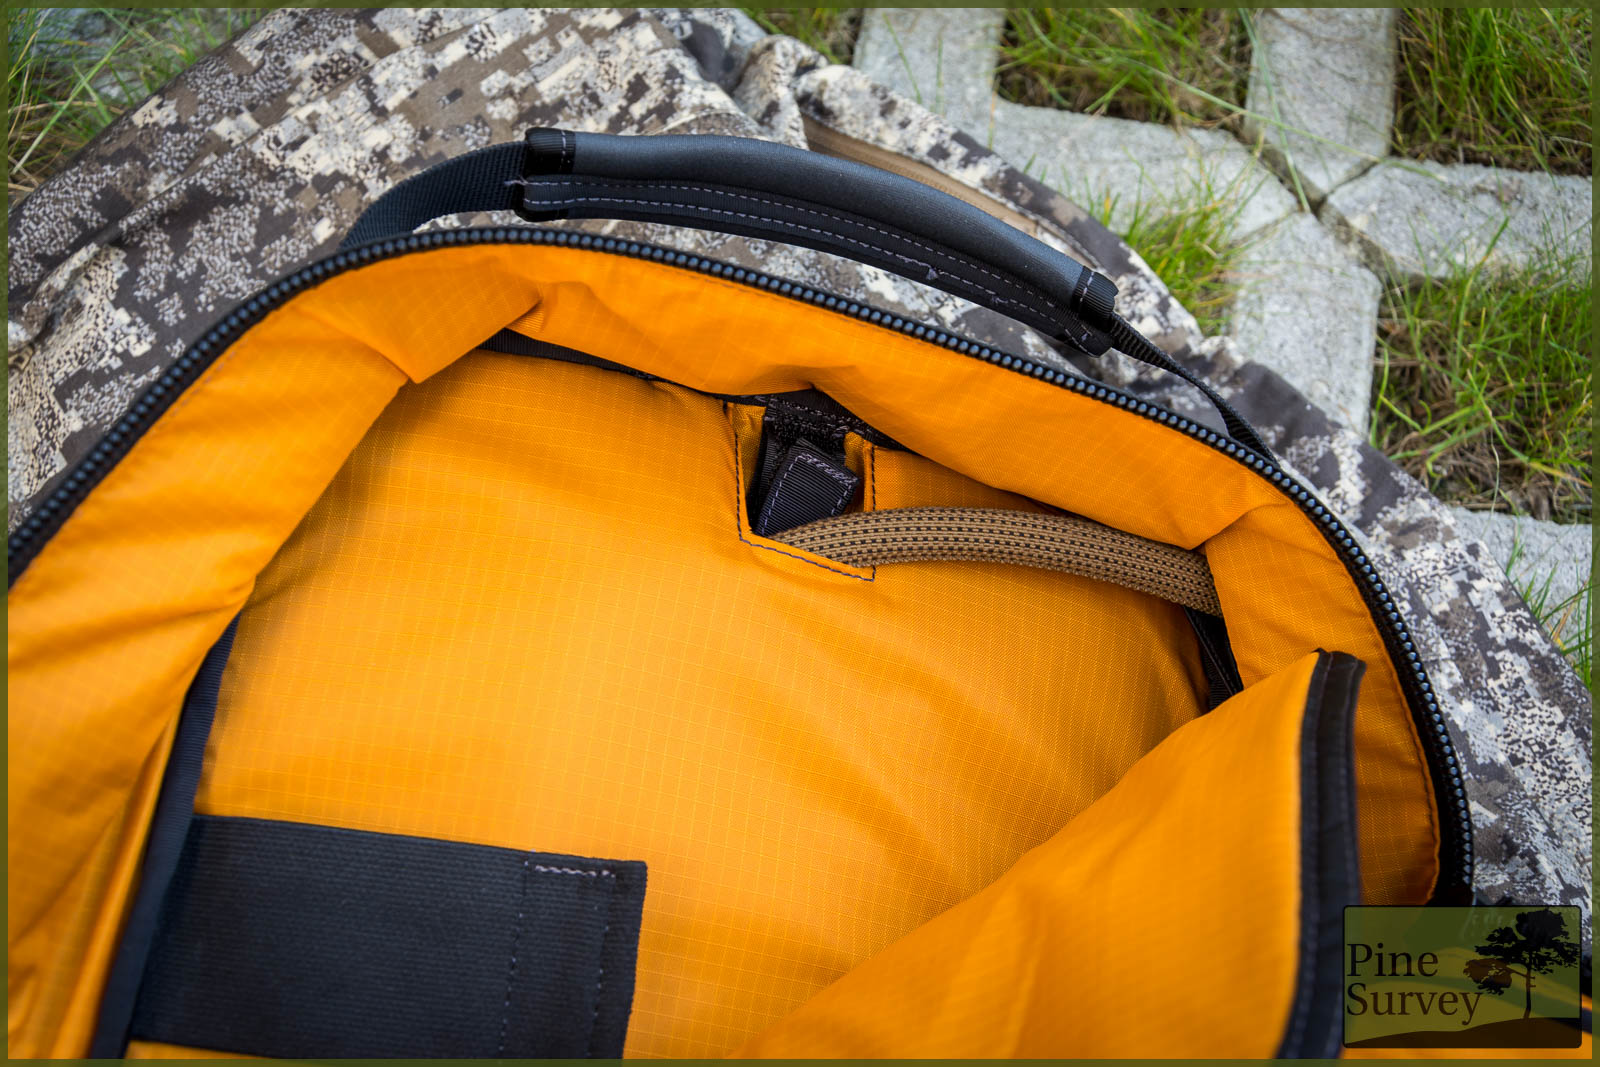
When opening only this side of the pack (more on that later), the curve opens like a flap and gives you access to another slit compartment. In here you have convenient access for SD Cards, batteries, or smaller accessories, like remote controls. It would have been nice to have some mesh pockets in there to better hold these small items, but so far this compartment served me well enough.
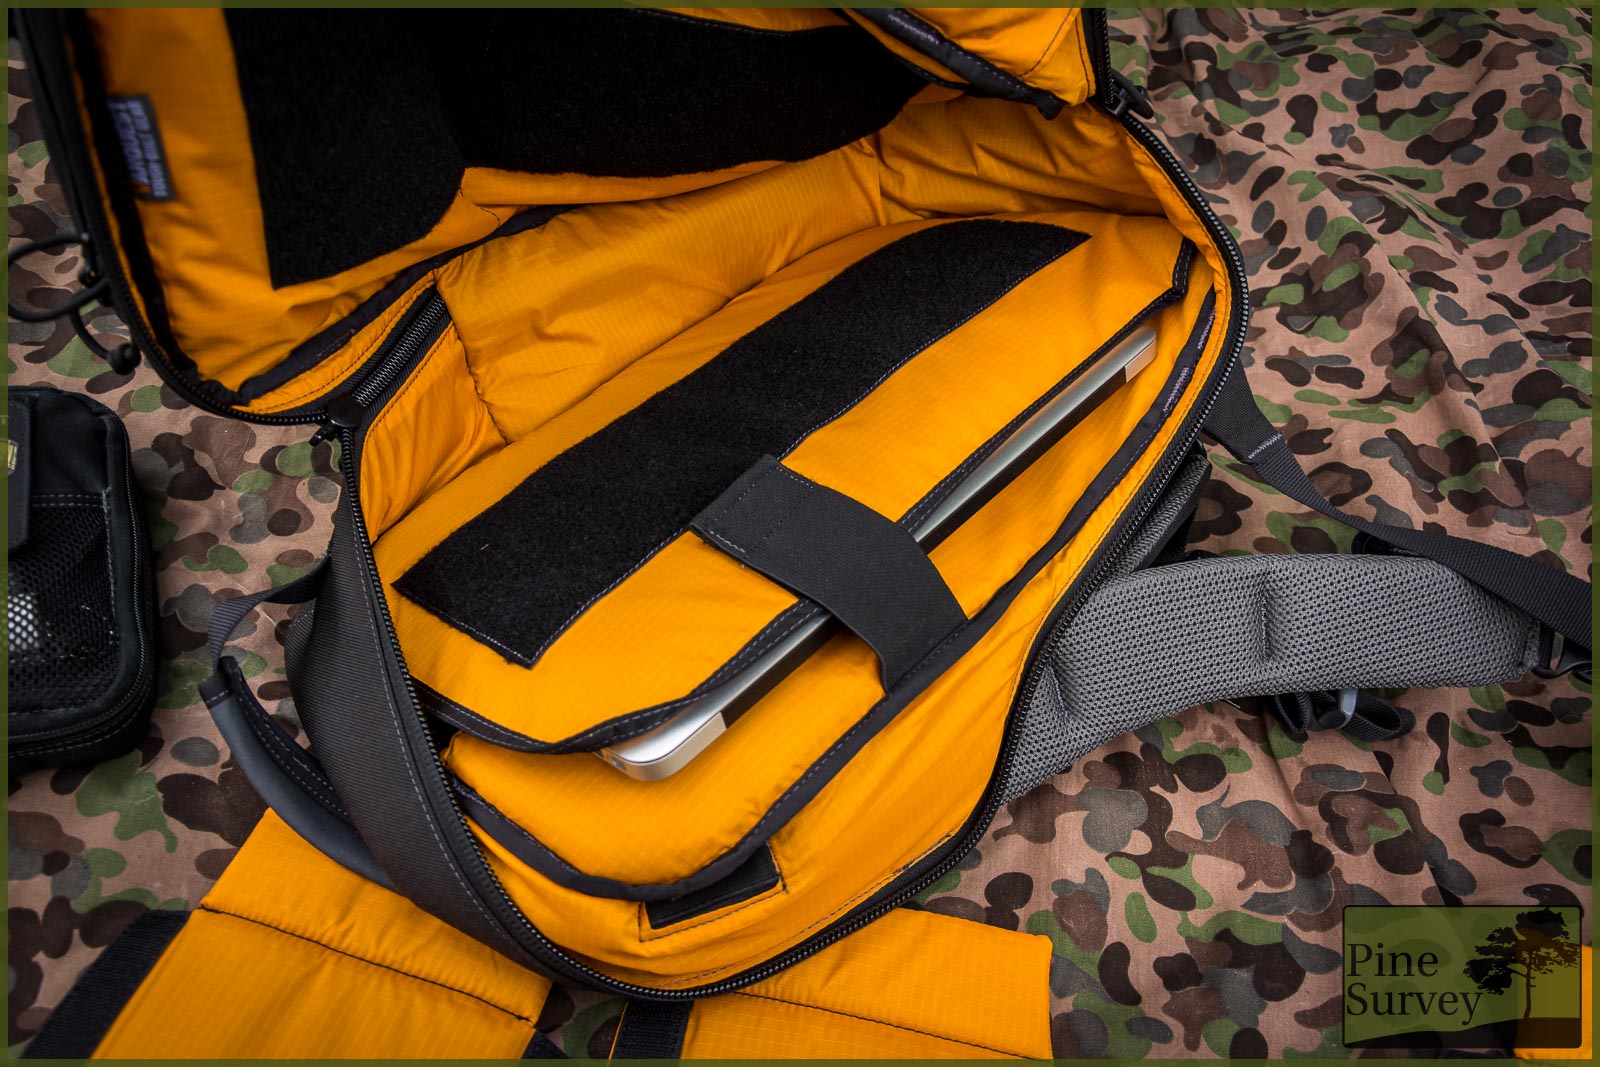
The main compartment without the dividers – closer look to the laptop sleeve
To the back the main compartment also features a laptop sleeve. You can access this from the side and the top, and your laptop will be secured by elastic webbing. My 13” MacBook has no problems finding space, and there is plenty of room left. According to specs it is supposed to hold laptops up to 15”.
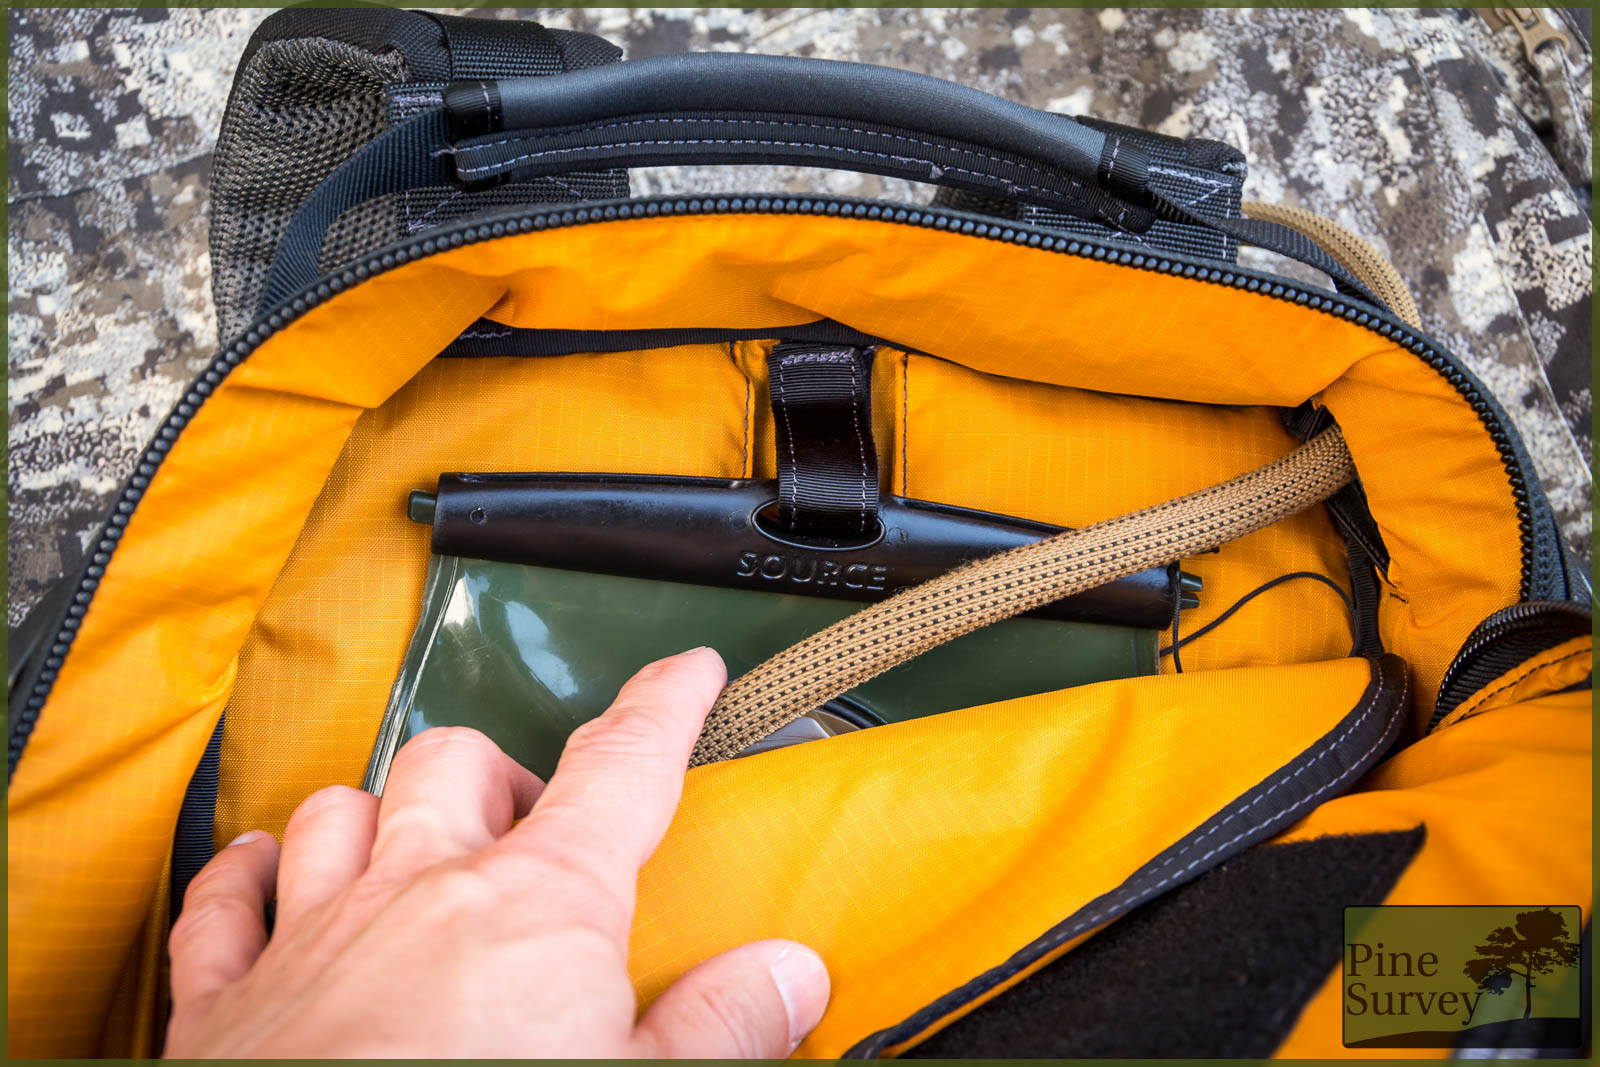
Using the laptop sleeve for a hydration bladder
If you want to use this sleeve for a water bladder, you can use the attached velcro tab to hang it in there. External ports to route the tube of the bladder to the outside can be found on either side and are closed with elastic webbing. This gives the pack a nice clean look and is also easy to handle while routing the tube through.

ports for the hydration tube or comms cables
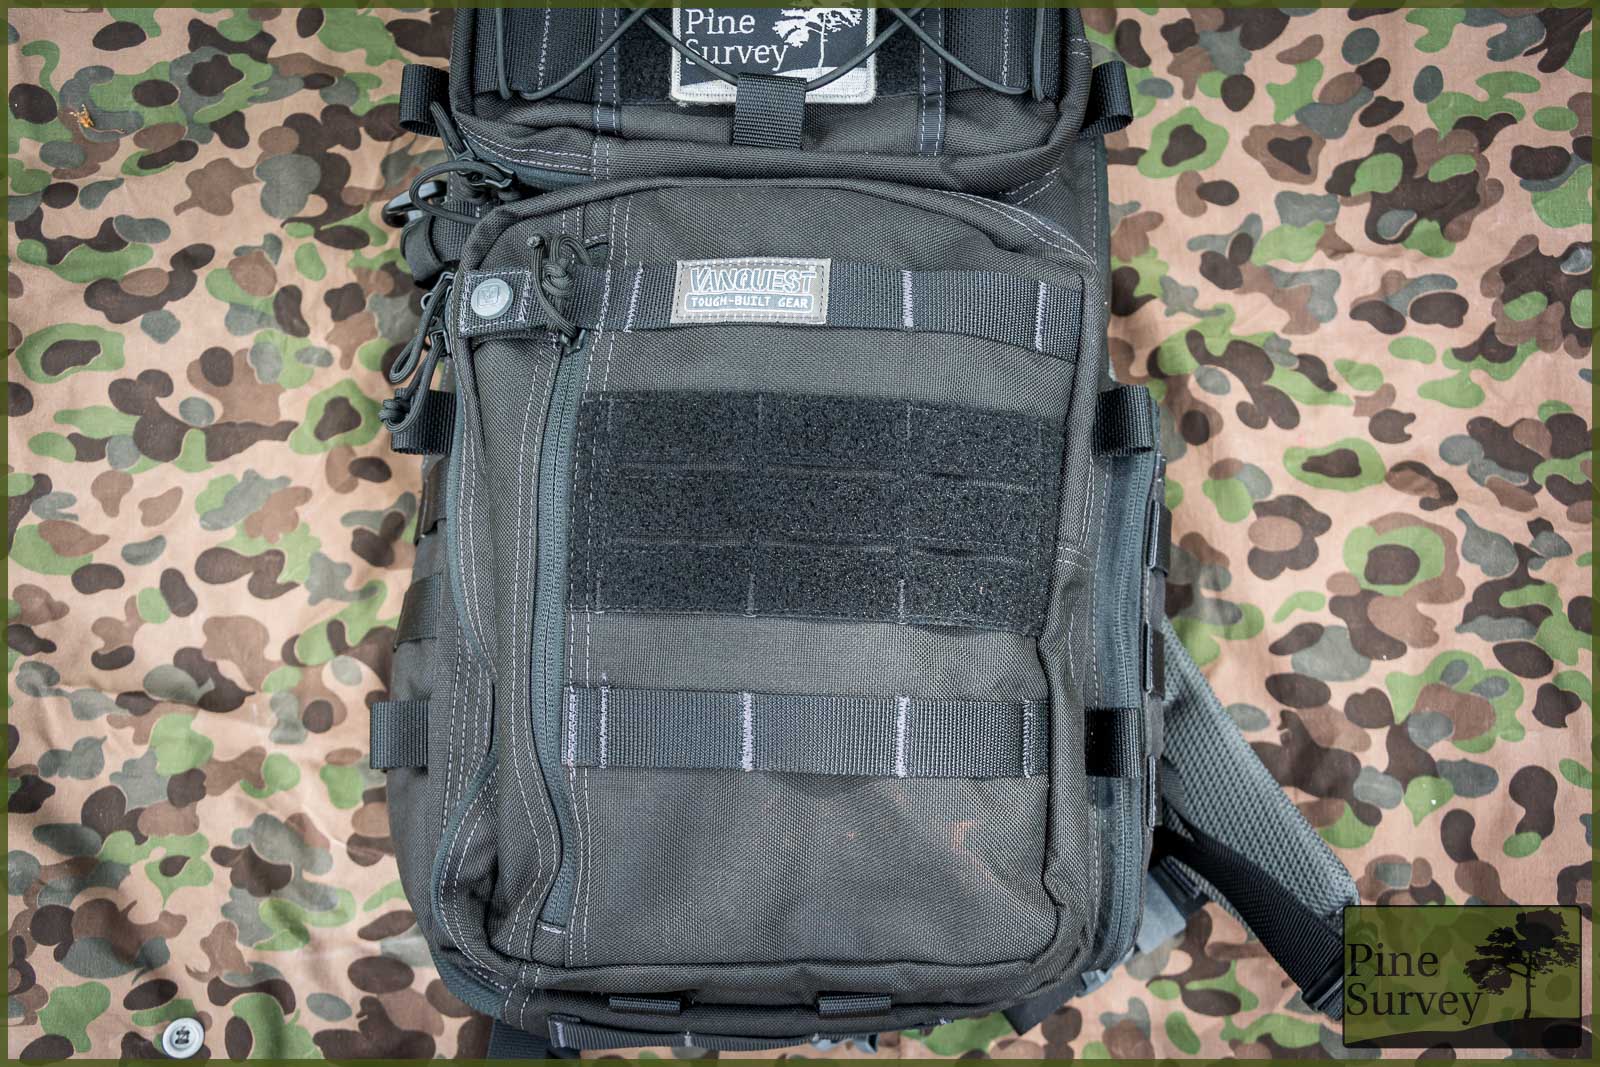
Side Pouch
On the side you will find another pouch that features three rows of MOLLE webbing on the outside, with two channels each. Another design feature on the outside of this pouch is a slit pocket, that gives you the option to keep flat items ready at hand.
side pouch
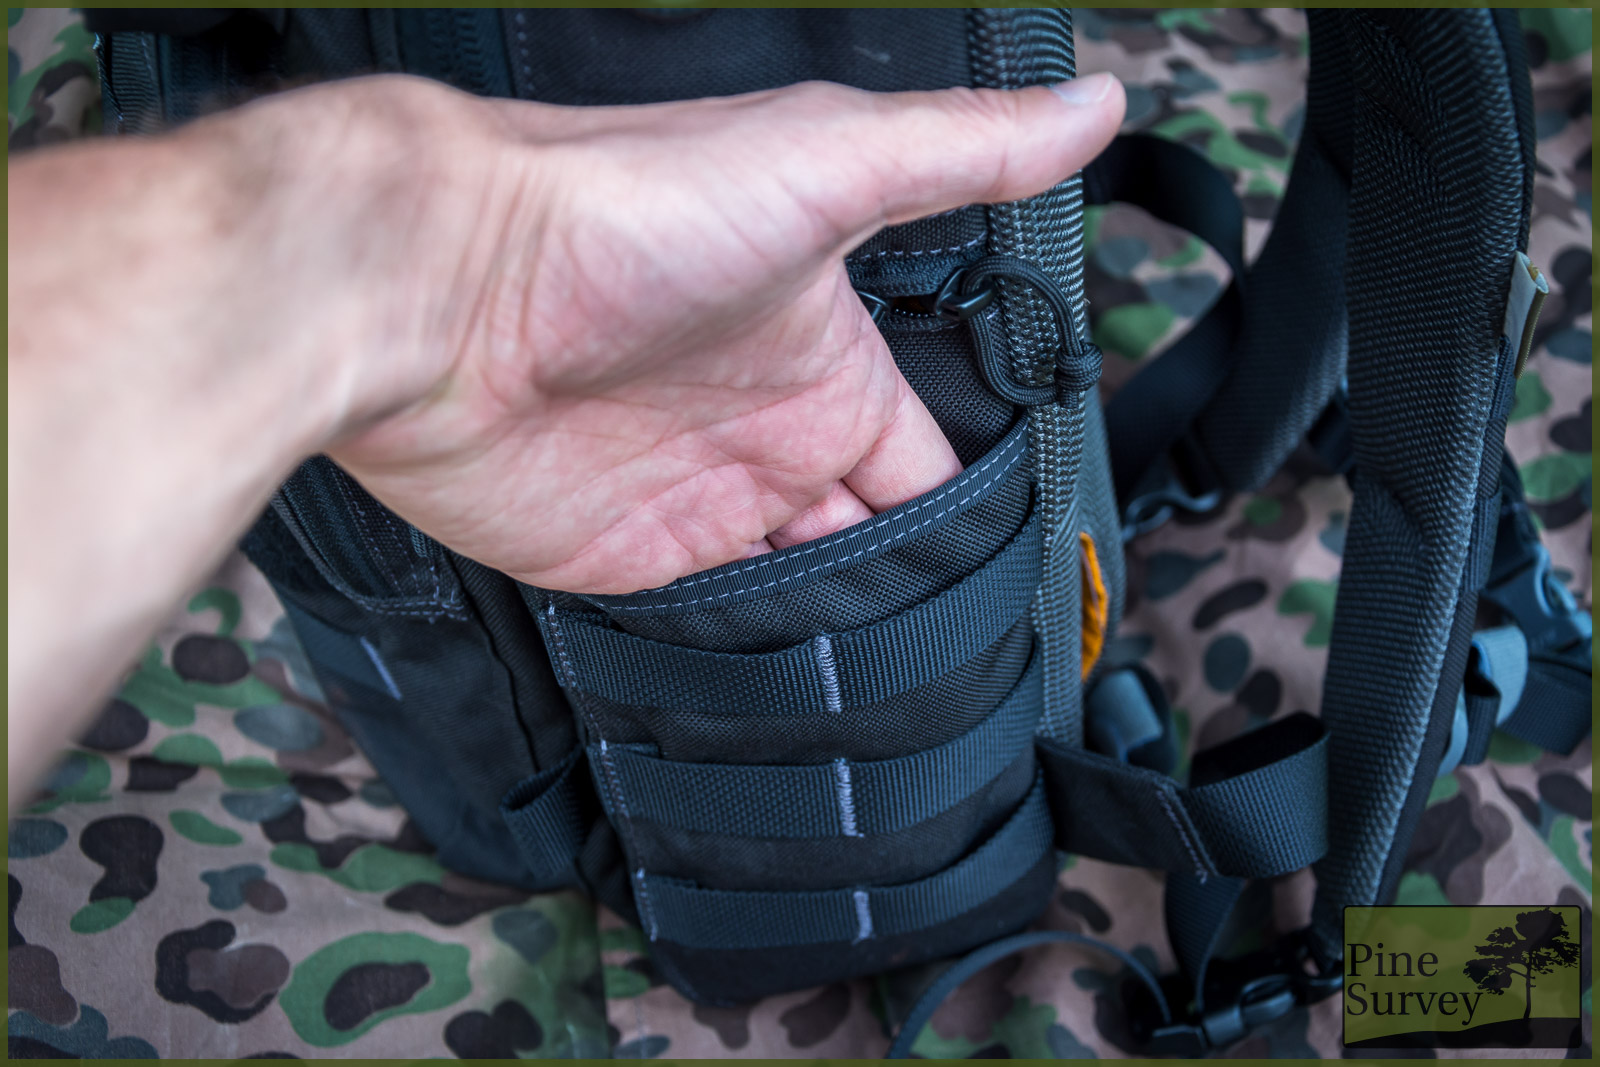
Slit pocket on the side pouch
The pouch itself opens all the way to bottom, so if you bring the pack to your chest over your right shoulder, it opens up conveniently. Inside you will find three slit pockets placed over each other and three pen slots – one larger than the others. A key fob is attached inside this pouch as well.
Interior of the side pouch
CCW Compartment
In between the main compartment and the padded back you will find a zippered CCW compartment with a velcro area going over the whole backside. In there you can adjust any velcro based holster: for example the Vanquest CCW-PLUS-MAG Hook-&-Loop Insert.
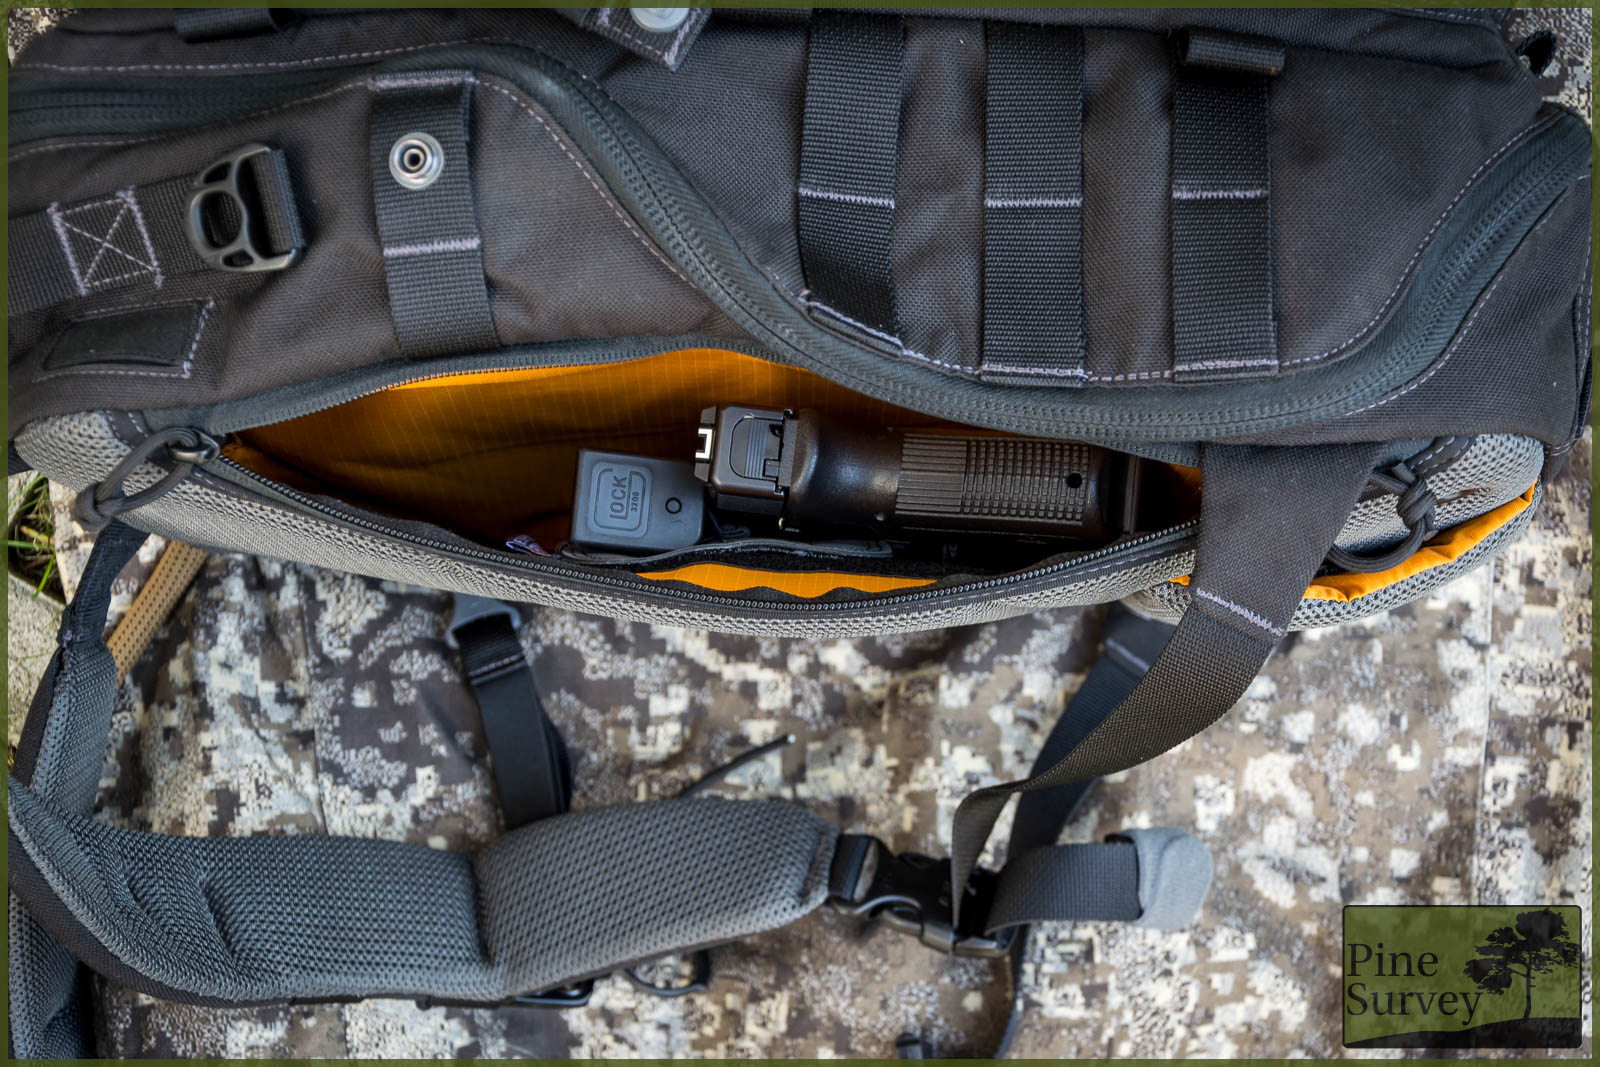
CCW compartment
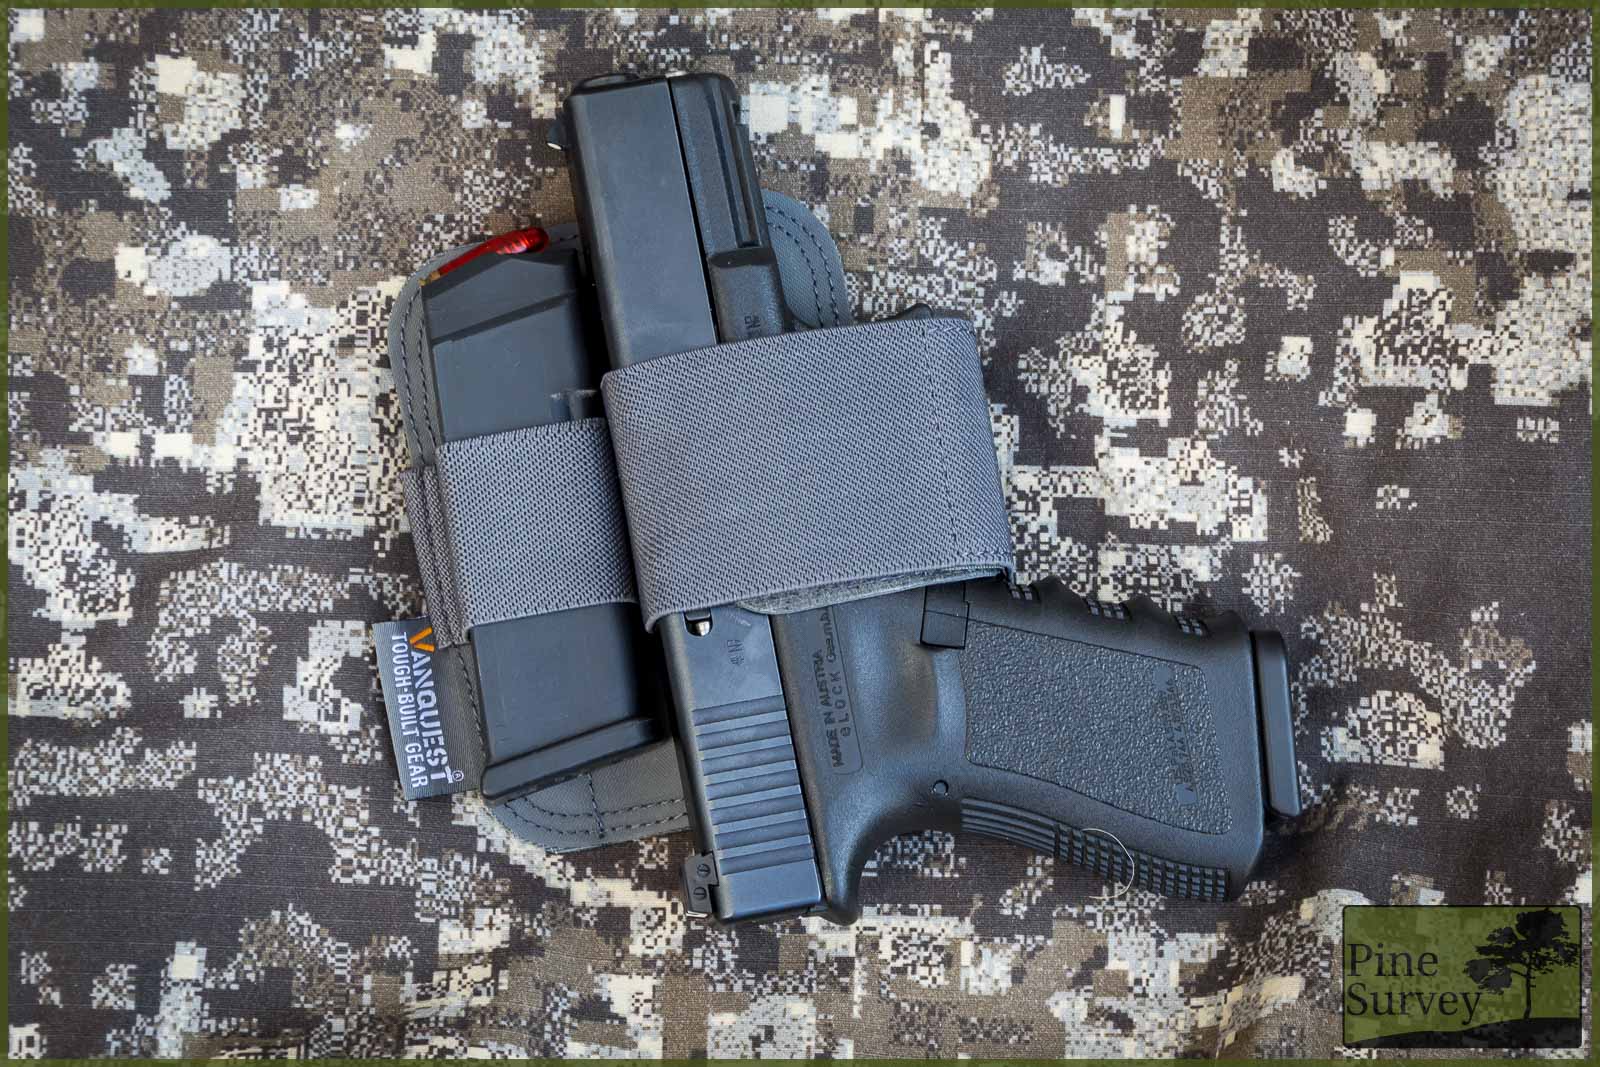
Vanquest CCW plus MAG Hook and Loop Insert
Other uses are open to the user. You can even put your water bladder in here, if you choose to do so. The necessary openings to the main compartment are accessible – you can use the velcro tab of the main compartment to hang the bladder in there, as well as route the tube through the various exit ports.
Using the CCW compartment for hydration
The CCW compartment features two drain holes to the bottom, which exit to the padding of the pack.
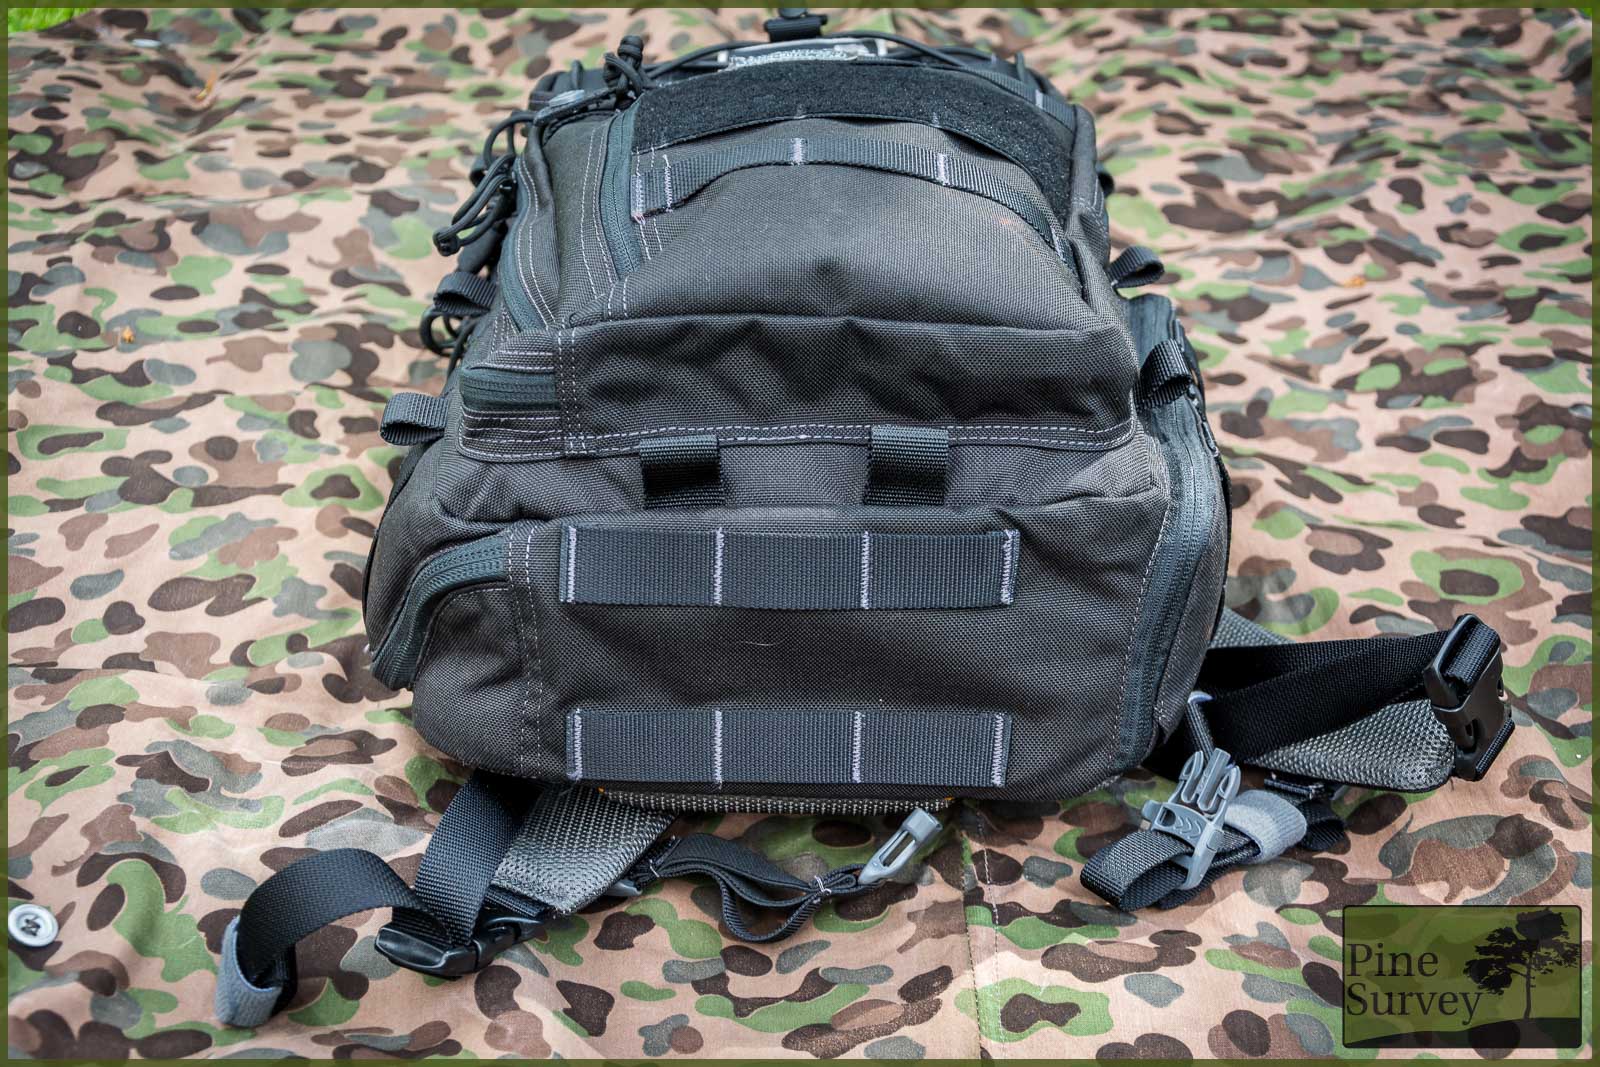
Load distribution – Backside
The back of the pack is heavily padded and has a light frame sheet sewn in between the padding and the back compartments.
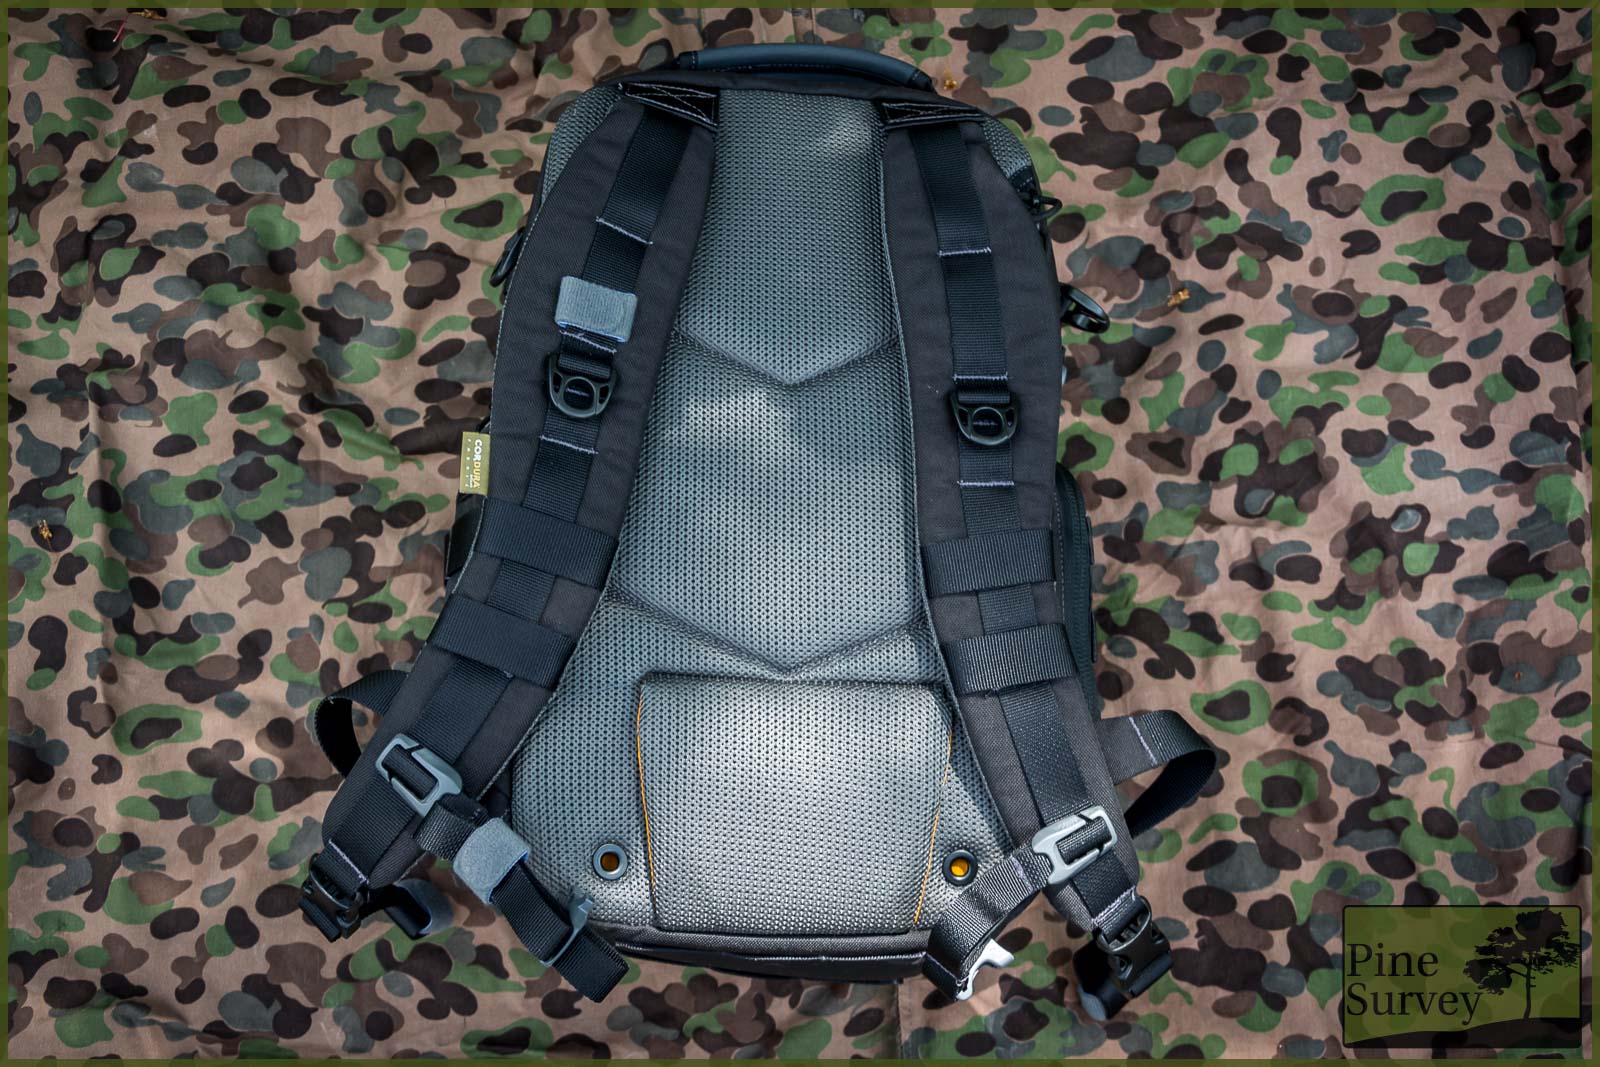
padded backside
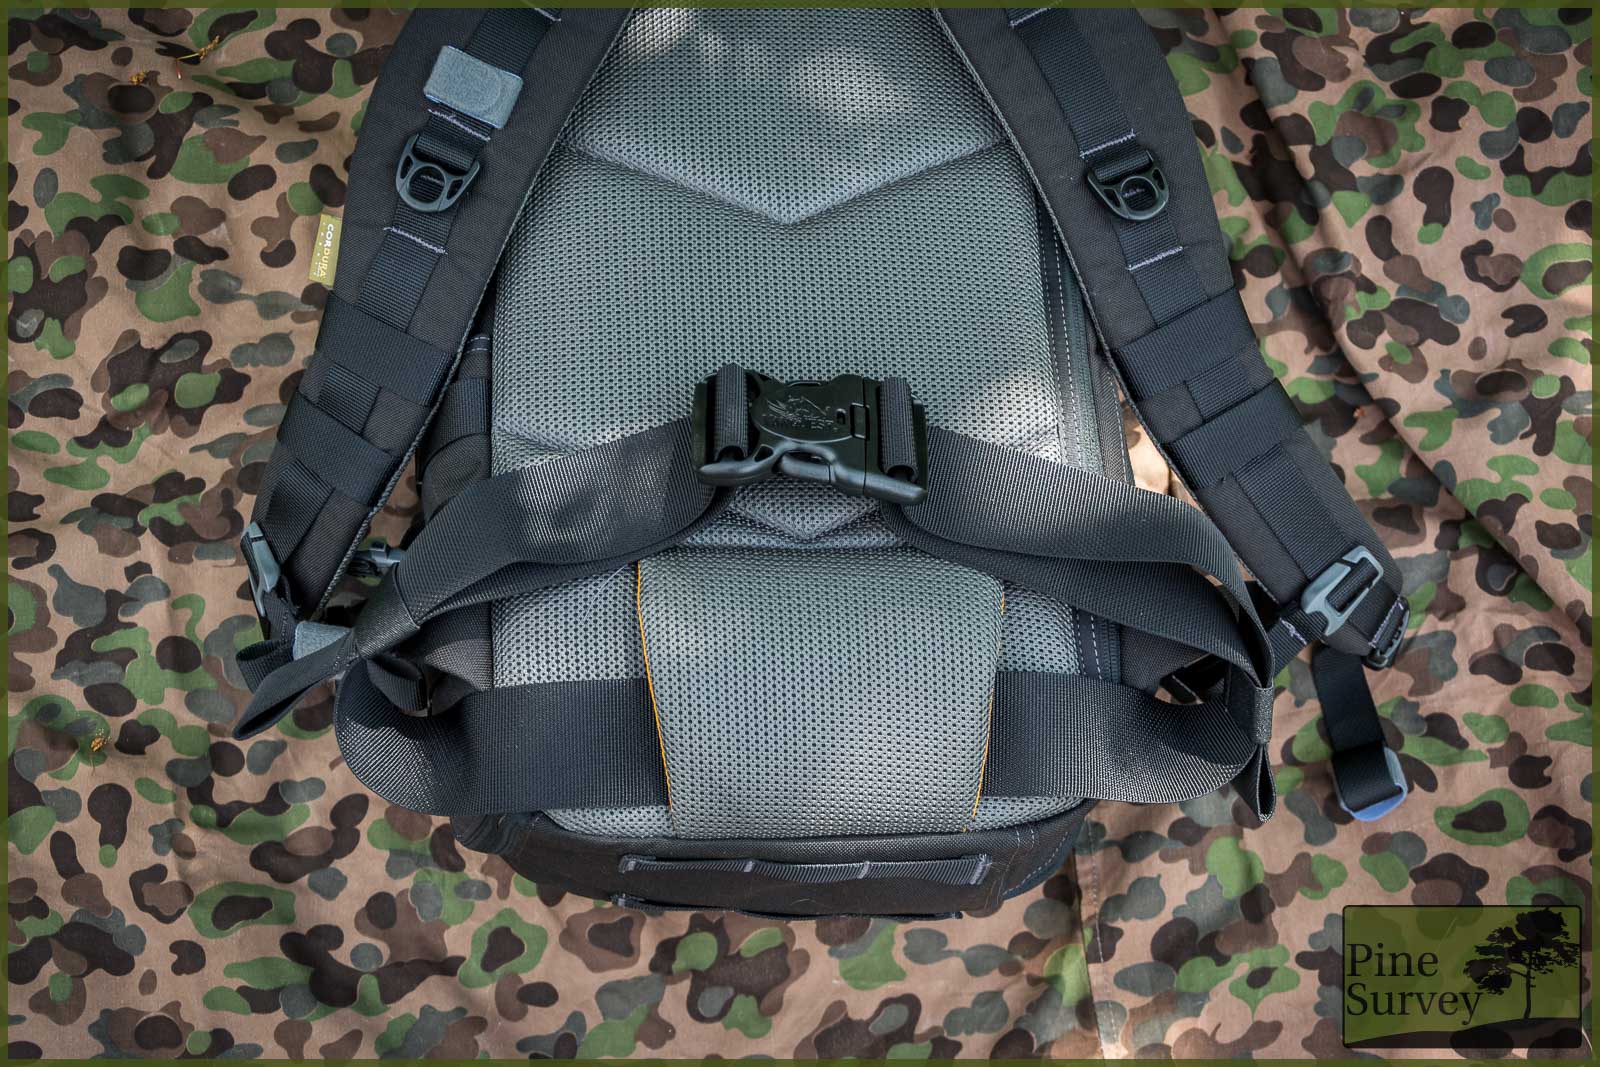
On the bottom of the back is a lumbar support pad which also functions as an attachment point for a simple strap based waist belt. Considering the size of the pack, this is well enough to keep the backback firmly positioned on the back. Two V-shaped seams keep the padding in place and act as basic air channels.
padded lumbar support with attached waist belt
The shoulder straps are contoured and strongly attached to the pack by webbing. Using firm box stitching, these won’t go anywhere.
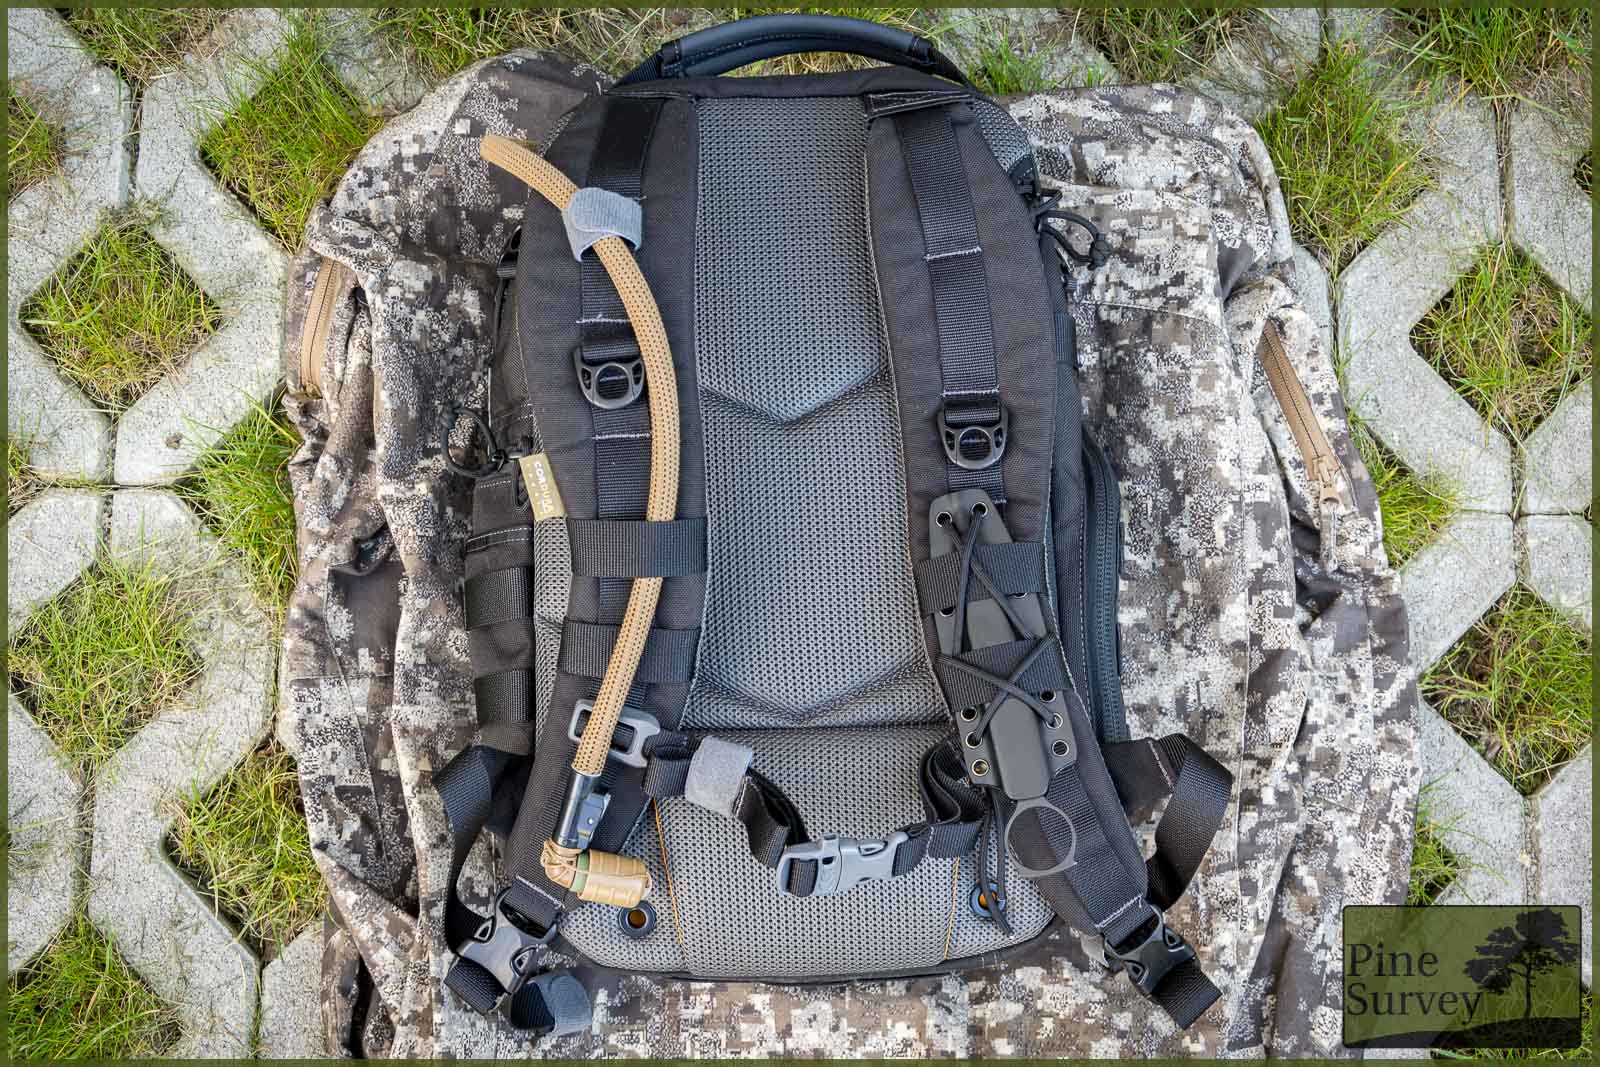
Shoulder straps with various attachment options
On the shoulder straps itself you will find several attachment points using either webbing or hardware. First of all you have the obligatory strap going from top to bottom, which is sewn down in intervals, giving you the option to attach carbines or the Anchor Wraps of Vanquest, which are hook and loop strips to organize loose webbing or route cables and tubes. Then you will find polymer hardware that looks like D-Rings on steroids.
On each strap you will also find two horizontally attached webbing straps that give you the possibility to either route your hydration tube through them, or even attach kydex sheaths for your knives.
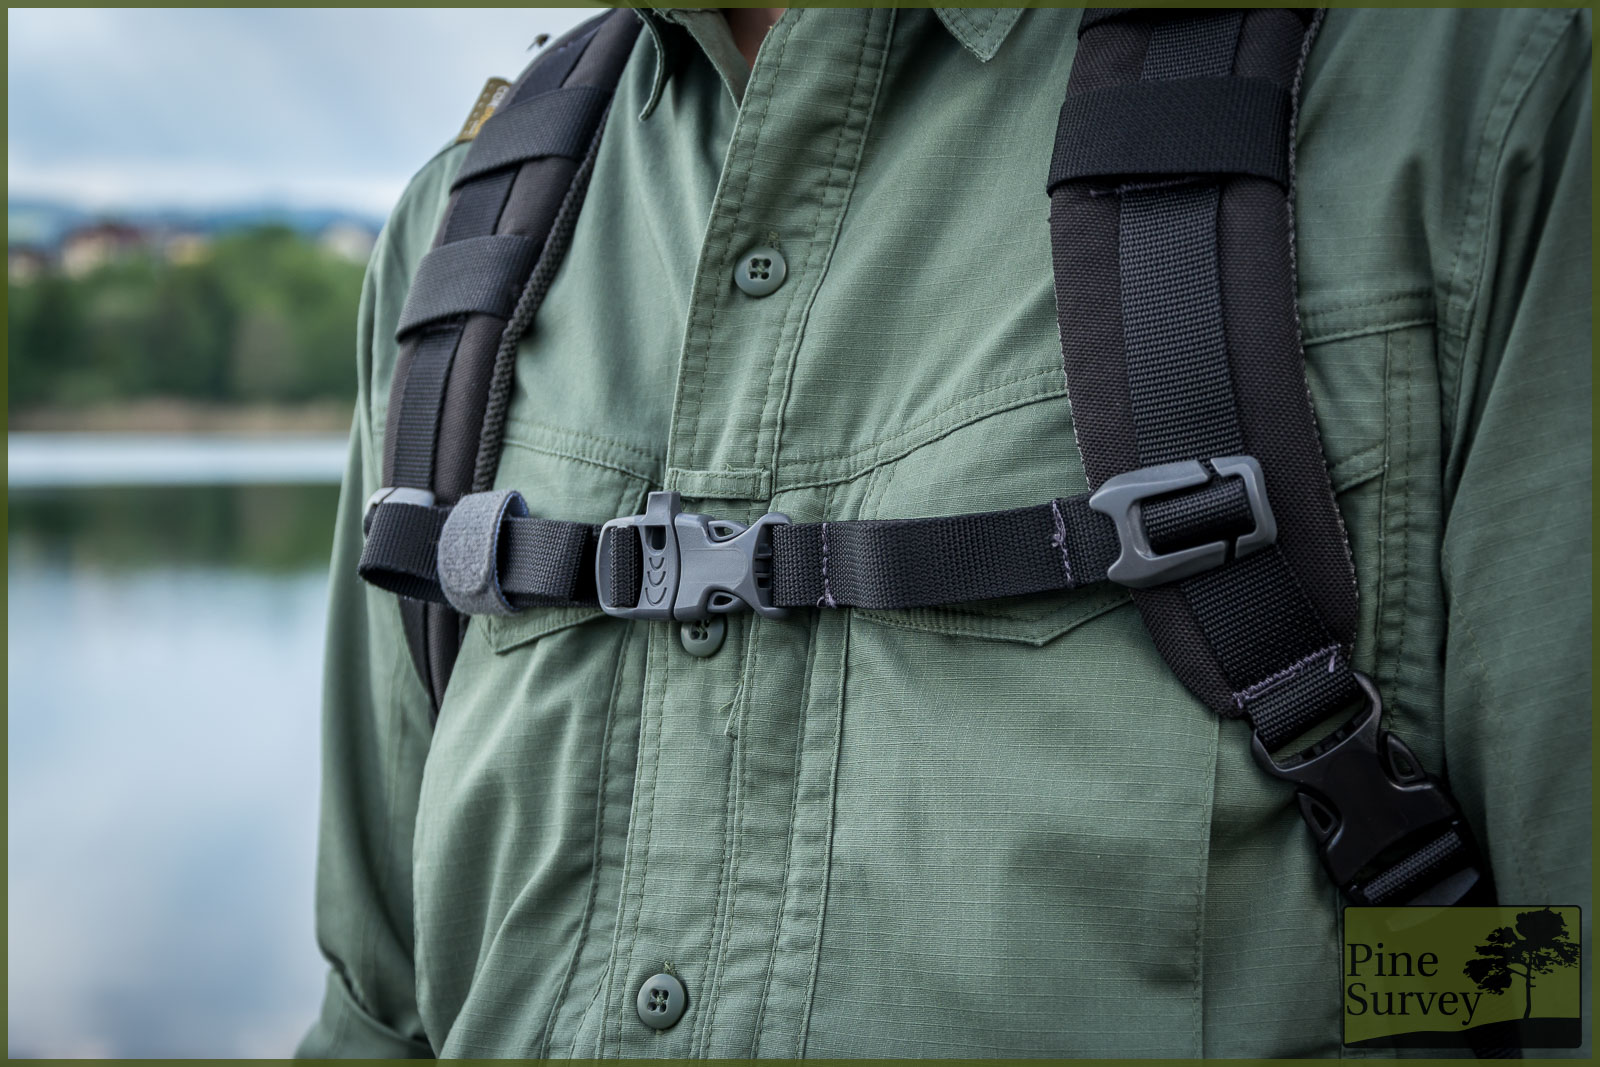
Sternum strap with emergency whistle
The Sternum strap can be adjusted to your height and needs, and the buckle even features an emergency whistle! Both straps are attached to the bottom with buckles, meaning a quick release is possible, if needed.
Various Details
If you are tired of reading, please take a break and get yourself a coffee, because I am certainly not done yet. The detailed thoughts put into this pack demand a corresponding attention.
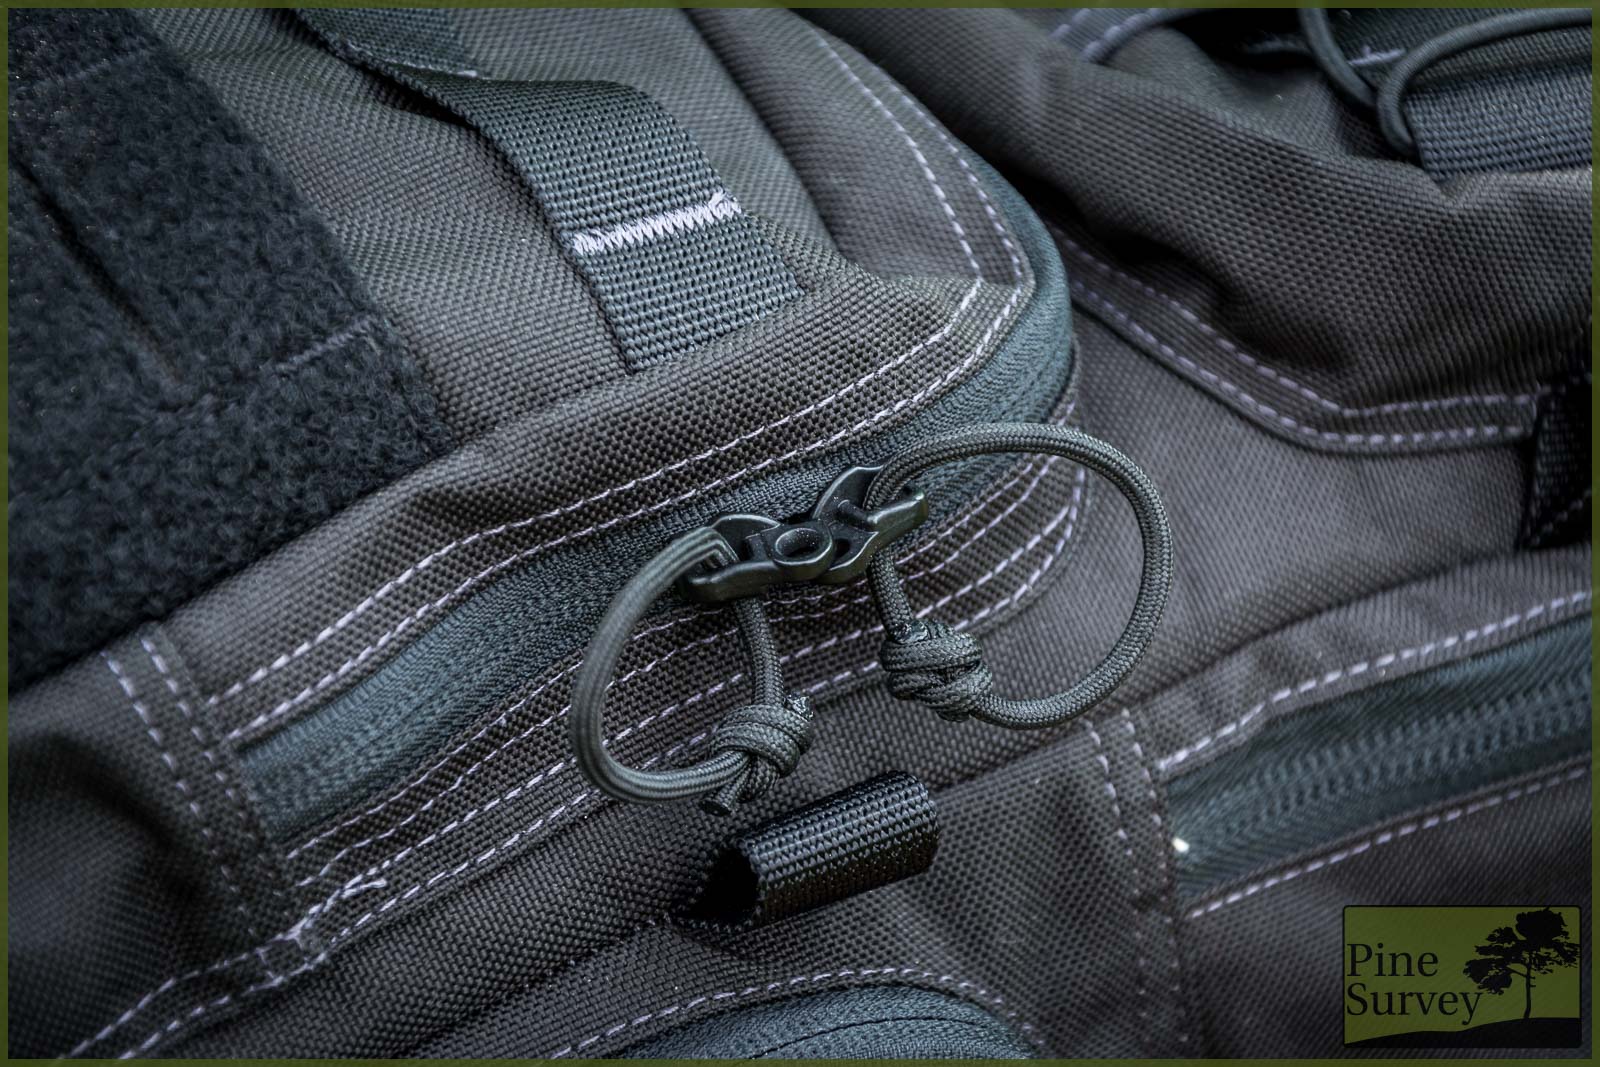
I already did mention the opening protection on the front pouch – namely the strap with the push button to secure the zippers. Something similar can be found for the main compartment. Right before the curve that opens up to the area where you would typically open the pack to access the camera gear, you will find another strap with a push button. This will prevent the pack from opening too far. You can also divide the zippers in order to have one to open the top, and the second one for the bottom. And if you have not seen it by now. you can even use a lock to really lock the zippers up!
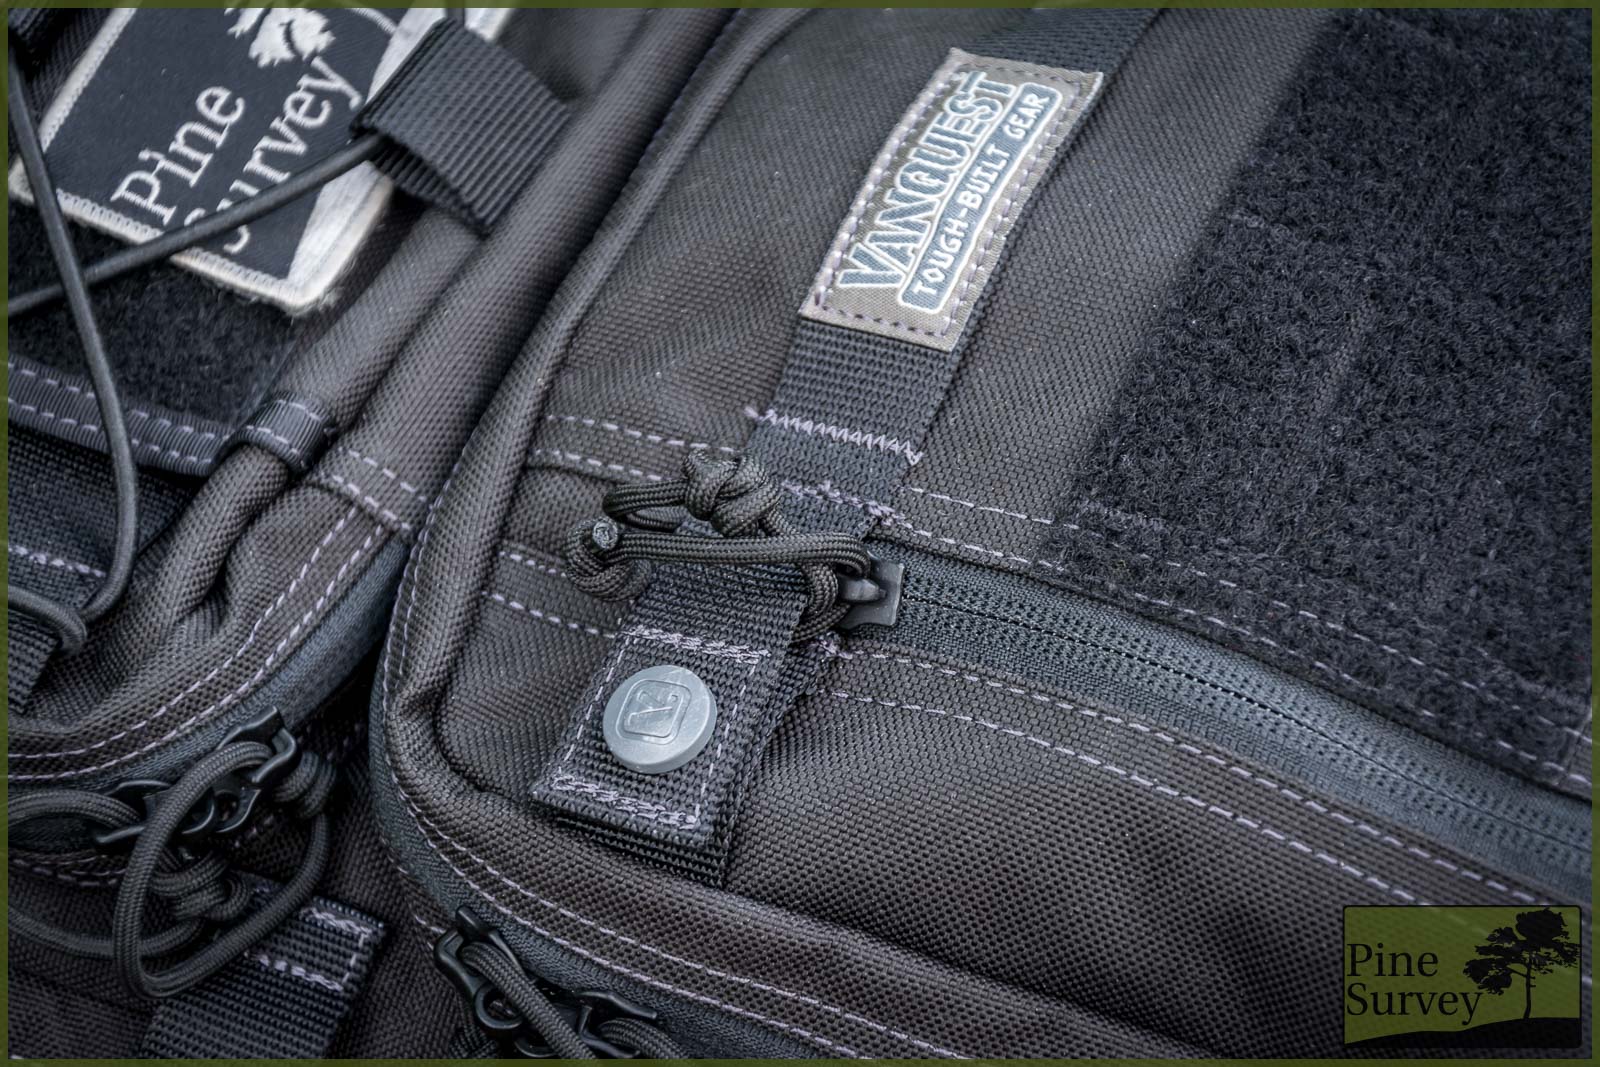
Zipper detail on the front pouch
Zipper detail on the main compartment
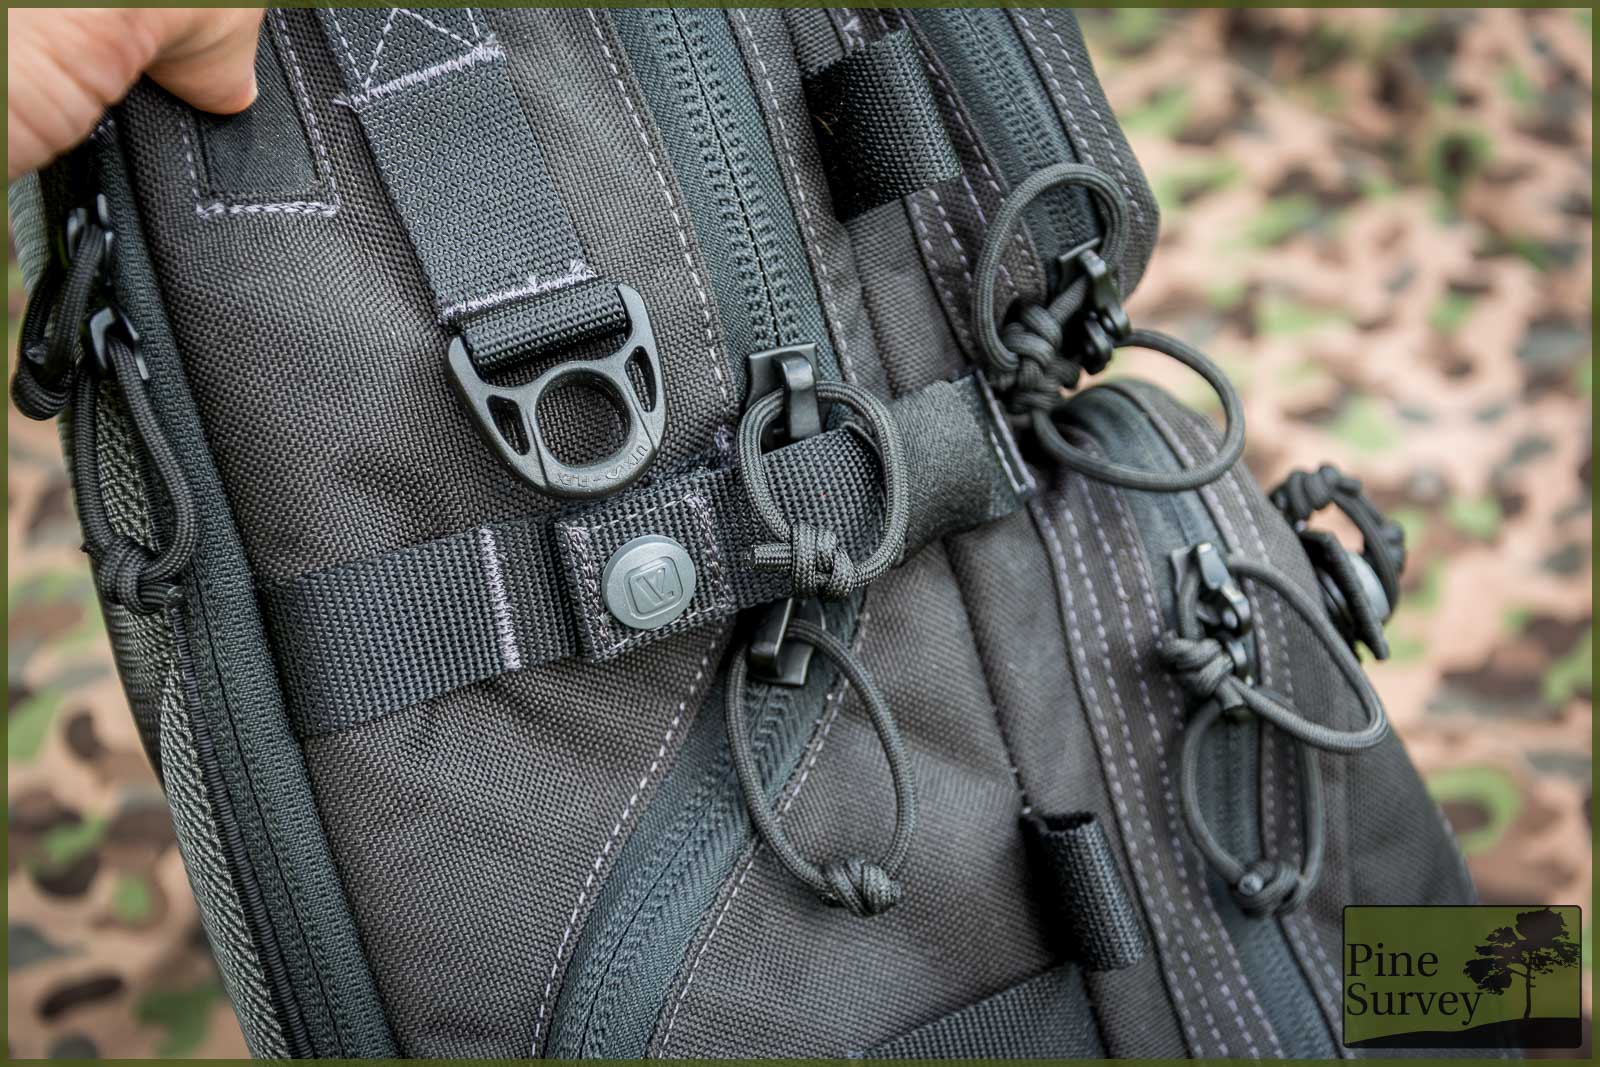
Around the pack you will find several webbing loops or tabs. Three on each side and two more to the bottom. These can be used in various ways – and I have to be honest here: I had to ask Alexander from Vanquest. He told me that these offer the option to attach compression straps, Grimlocks (could have thought about that one myself), route cables for comms, and are also there in case future accessories will become available. One of these accessories would be a yet unreleased tripod beavertail that would be attached to the bottom loops.
Various attachment points and loops or tabs
Speaking of the bottom: There you will also find MOLLE compatible webbing to attach a sleeping mat, or use some shock cord to attach jackets and the like.
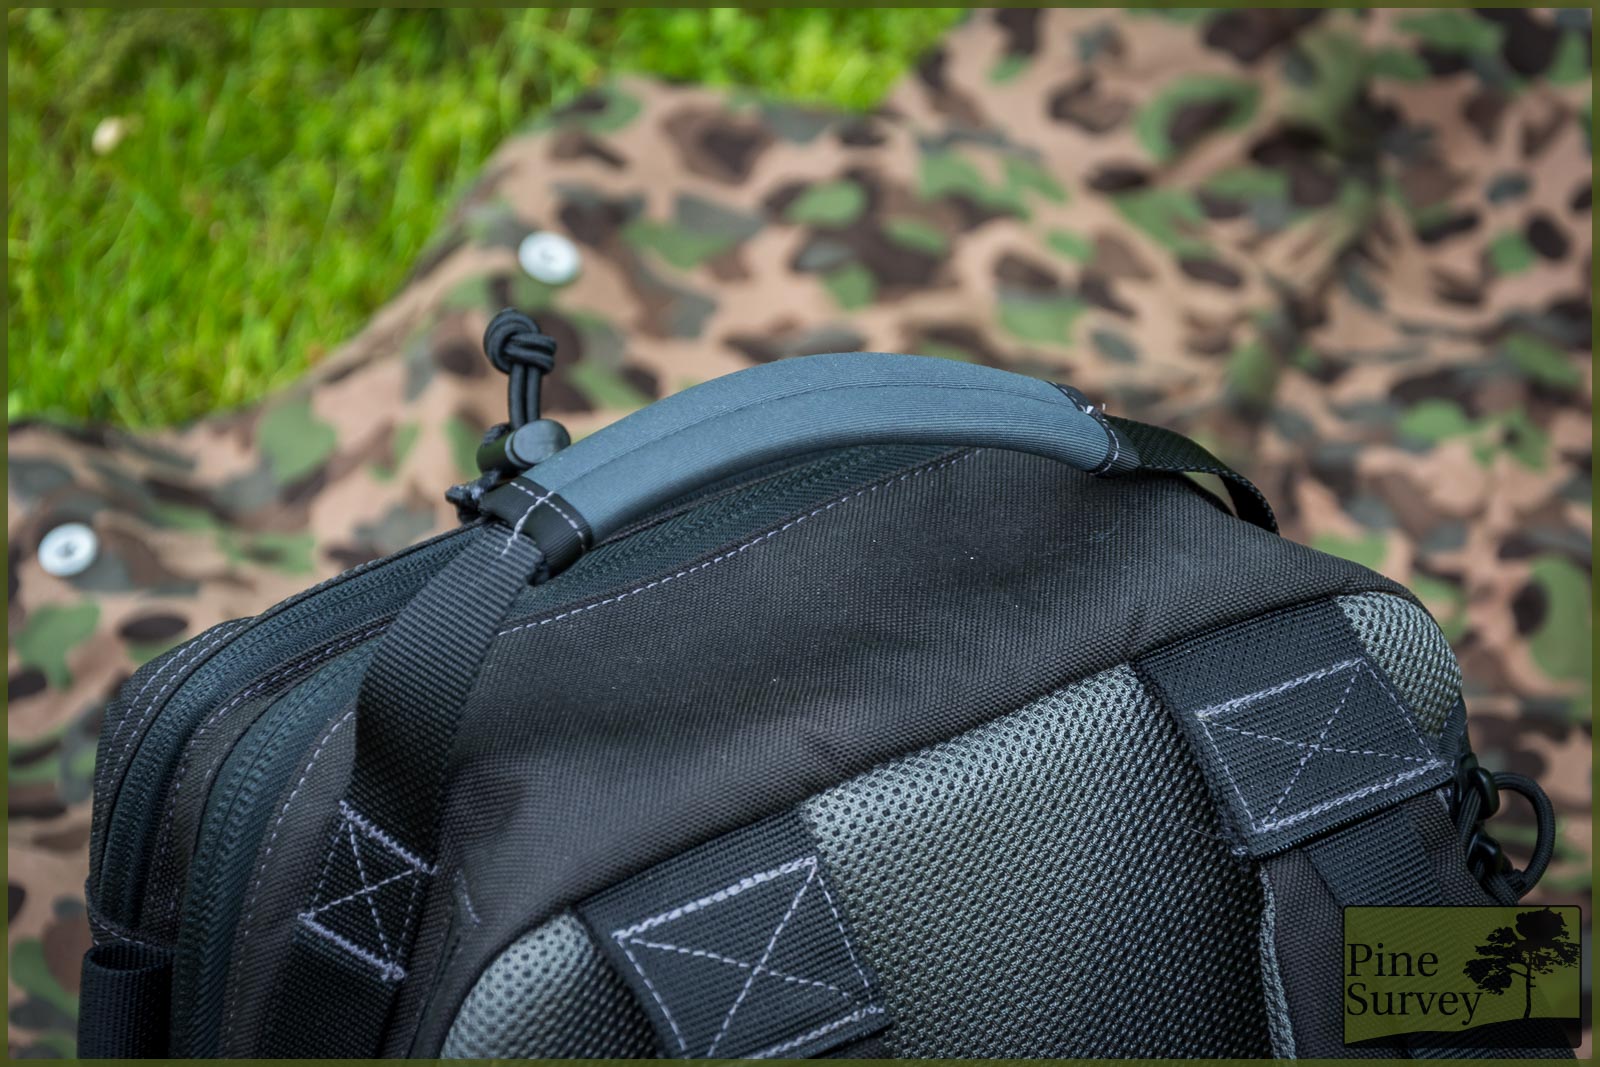
Handle of the Trident-20. Also a good look on the attachment of the shoulder straps
The handle of the pack is attached securely via box stitches and also offers these D-Rings on steroids, in case you want to use a carbine to attach other items.
If you haven’t realized it from the pictures by now, the whole interior is lined with a high visibility fabric, making it easier to find your gear in low light conditions.

Buckle of the waist belt
Last but not least: the buckle of the waist belt has an interesting feature. You need to push down a button in the front, before you can release it.
Manufacture
The quality of manufacture and the materials used leave nothing to wish for. Instead of „ballistic nylon“ like Maxpedition, Vanquest Gear uses genuine 1000D Cordura for this pack (and also their other products). The zippers are by YKK and the buckles and other hardware is by ITW and Dura-Flex. It is safe to say that there were no shortcuts taken when it comes to materials. The same applies to the workmanship.
Clean and exquisite manufacture
The pack came clean looking – not a single thread was loose, the stitching is precise, closely stitched, and reinforced at stress points. The feel is sturdy as you might know it from 1000D Cordura and after a short break in period, it became comfortable to use.
In Use
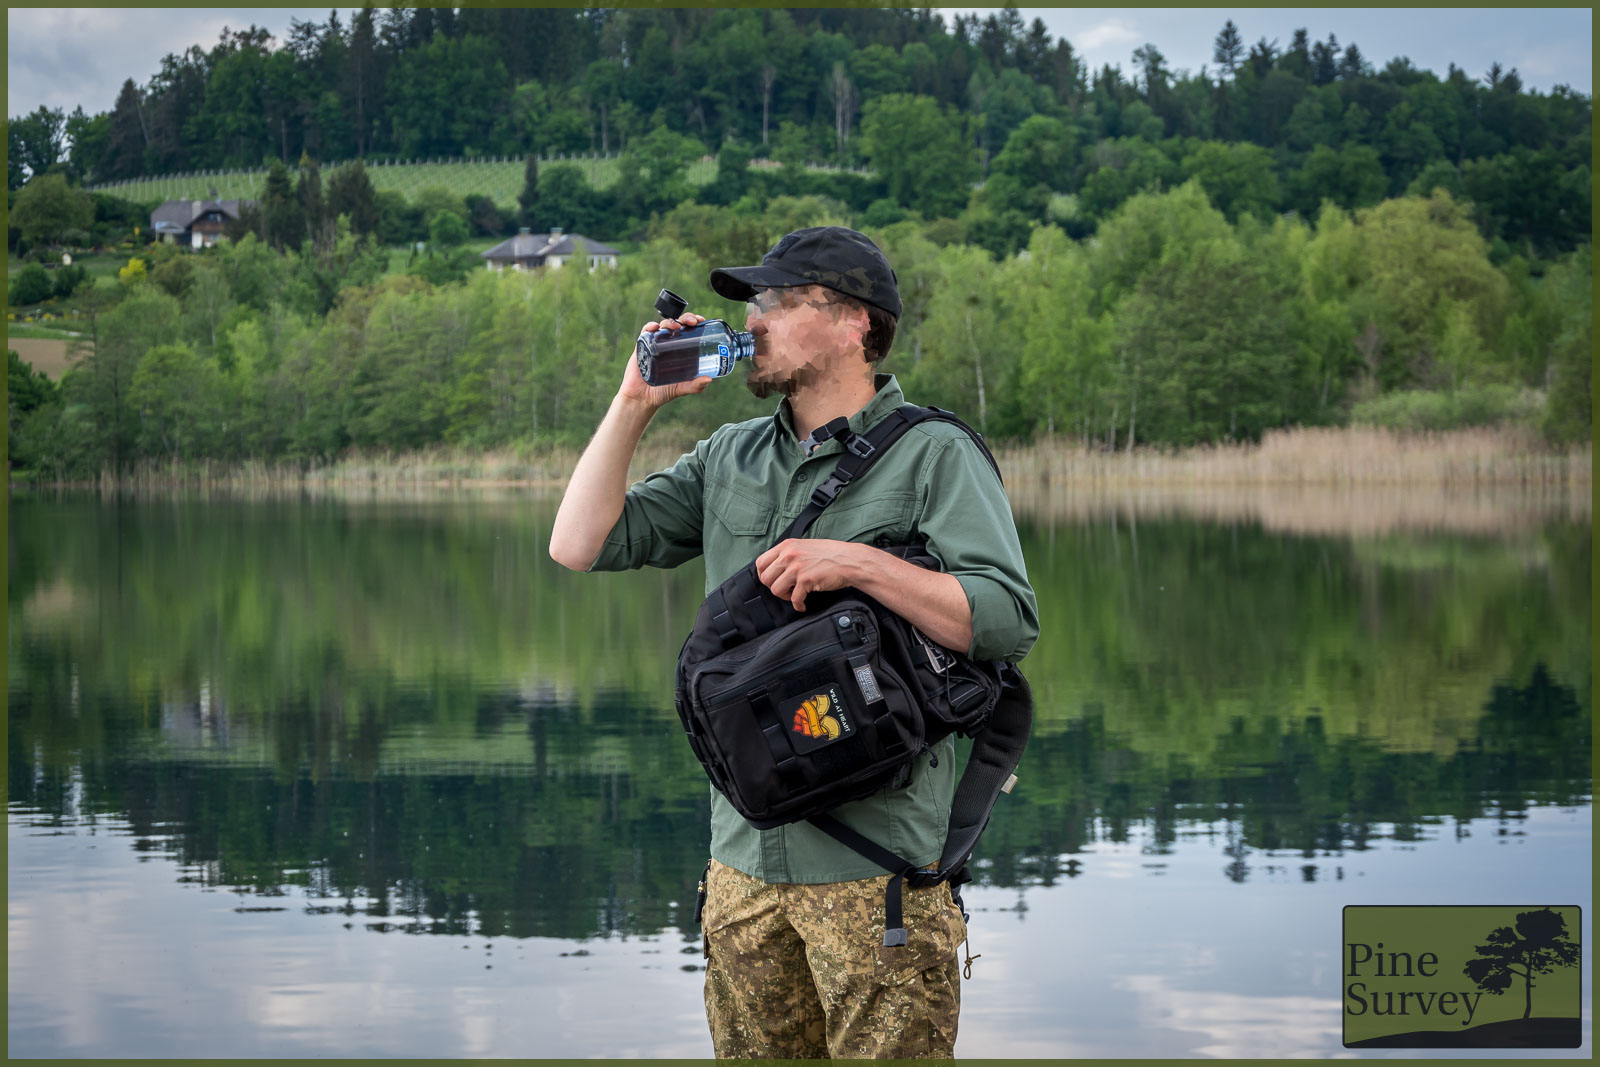
So far the Trident-20 has accompanied me through my everyday routine as an EDC pack to the office, as a camera pack during my photography tours and also during my travels. The sheer amount of options to organize your gear is overwhelming me at times. I never managed to make use of all the possible slots and pockets by now. As a result everyone will find a suitable way for him/herself to carry their gear for sure.
in use
As a camera pack the Trident-20 served me very well! Good access to my gear without having to put the pack down, proofed to be very comfortable, especially when you don’t want to let your gear standing around.
The zippers always went smoothly and I did not have to fight with the pack to open it up, even in awkward positions. Sometimes the curve of the zipper on the side made it a bit harder for me, but that is sheer physics, and has nothing to do with the design or the material.
The option to have all your gear in front of you, with the option to even access smaller items in the slot of the flap made the pack a very respected companion during my trips.
in use
When using it as an EDC pack, the Trident-20 offered enough room for my laptop, organizer pouches, documents etc. In general the pack rides very comfortable on the back, even when carrying it over longer periods of time.
Accessibility: As already mentioned the access from the side is a very nice and convenient feature. It would be cool, if there is a left- and right handed option. The pack is designed to be brought to the front over your left shoulder in order to have your right and free. My assumption is that this has something to do with the CCW option of the pack, in order to have your right hand free.
However, if you are not using the pack that way and are used to have your pack hanging loosely on your right shoulder like I do, it takes some time to get accustomed to the whole concept. In that sense it would be nice to have both options: lefty, righty.
Regarding the use for CCW: I am only able to give you pictures on the setup, but no info on how the pack does re CCW. I do not have a permit to carry my weapon and therefore cannot give you info on that.
Conclusion
The Vanquest Trident-20 is the kind of feature packed backpack you do not see every day. You don’t have to be necessarily a photographer to appreciate the pack. The versatility of its design itself offers a variety of uses, be it for EDC, the range or photography.
The quality of manufacture and the attention to detail is impressive when it comes to this pack. I rarely had products in my hands that have such a clean feel to it. At the same time you can really tell that someone was actually thinking about certain features on this thing, instead of just making a sketch saying: main, second, third compartment, shoulder straps… done.
Features like the loops on the bottom even provide the option to update the pack with possible future accessories. Not a lot of companies have future upgrades of their packs in mind. Mostly they just do new packs, to earn more money.
On a personal note I could do with less of the MOLLE compatible webbing, since I do not use it as such on packs, but this is a personal habit that differs from person to person.
With that being said it might be definitely worth your time stopping by the Vanquest homepage and checking out their gear. Coming to an end I hope I was able to give you a detailed look of the Trident-20 Gen.2.
Thanks to the guys of Vanquest for making it possible to make this review!
Take care!